These notes introduce Objective-C and iOS application development in the context of an iPhone application that allows the user to decrypt and encrypt messages with Caesar cipher.
| In order to develop iOS applications, you need a Mac and Xcode. These notes cover iOS 8 SDK, for which you’ll need Xcode 6 and OS X 10.9.4 or later. |
| Build or compile your code frequently to detect any errors early! Don’t proceed if you have warnings or errors. |

Objective-C
iOS applications are usually written in Objective-C and more recently in Swift. Swift was developed by Apple over the course of the past several years and released to public in summer 2014. It “adopts safe programming patterns and adds modern features to make programming easier, more flexible and more fun,” according to Apple. Objective-C is an older language, designed in the earliy 1980s and based on a language called SmallTalk-80. Objective-C is a strict superset of C, a language on which C++ was based. Similarly to C++, Objective-C added extensions to C to create a new programming language that enabled objects to be created and manipulated.
Command Line Application
-
Let’s start by creating a command line application where we can write and test some code. Launch Xcode, select Create a new Xcode project, choose OS X and Application on the left, and then select Command Line Tool. You can give your project any name, but here, we’ll call it
CaesarTests. Be sure to select Objective-C as the language.
-
Notice how Xcode has automatically create a file called
main.mfor you..mis the extension in Objective-C that’s equivalent to.cppin C++ and m comes from implementation. If you compile and run the project, you’ll see a message that includesHello, World!in the console on the bottom of Xcode’s widow: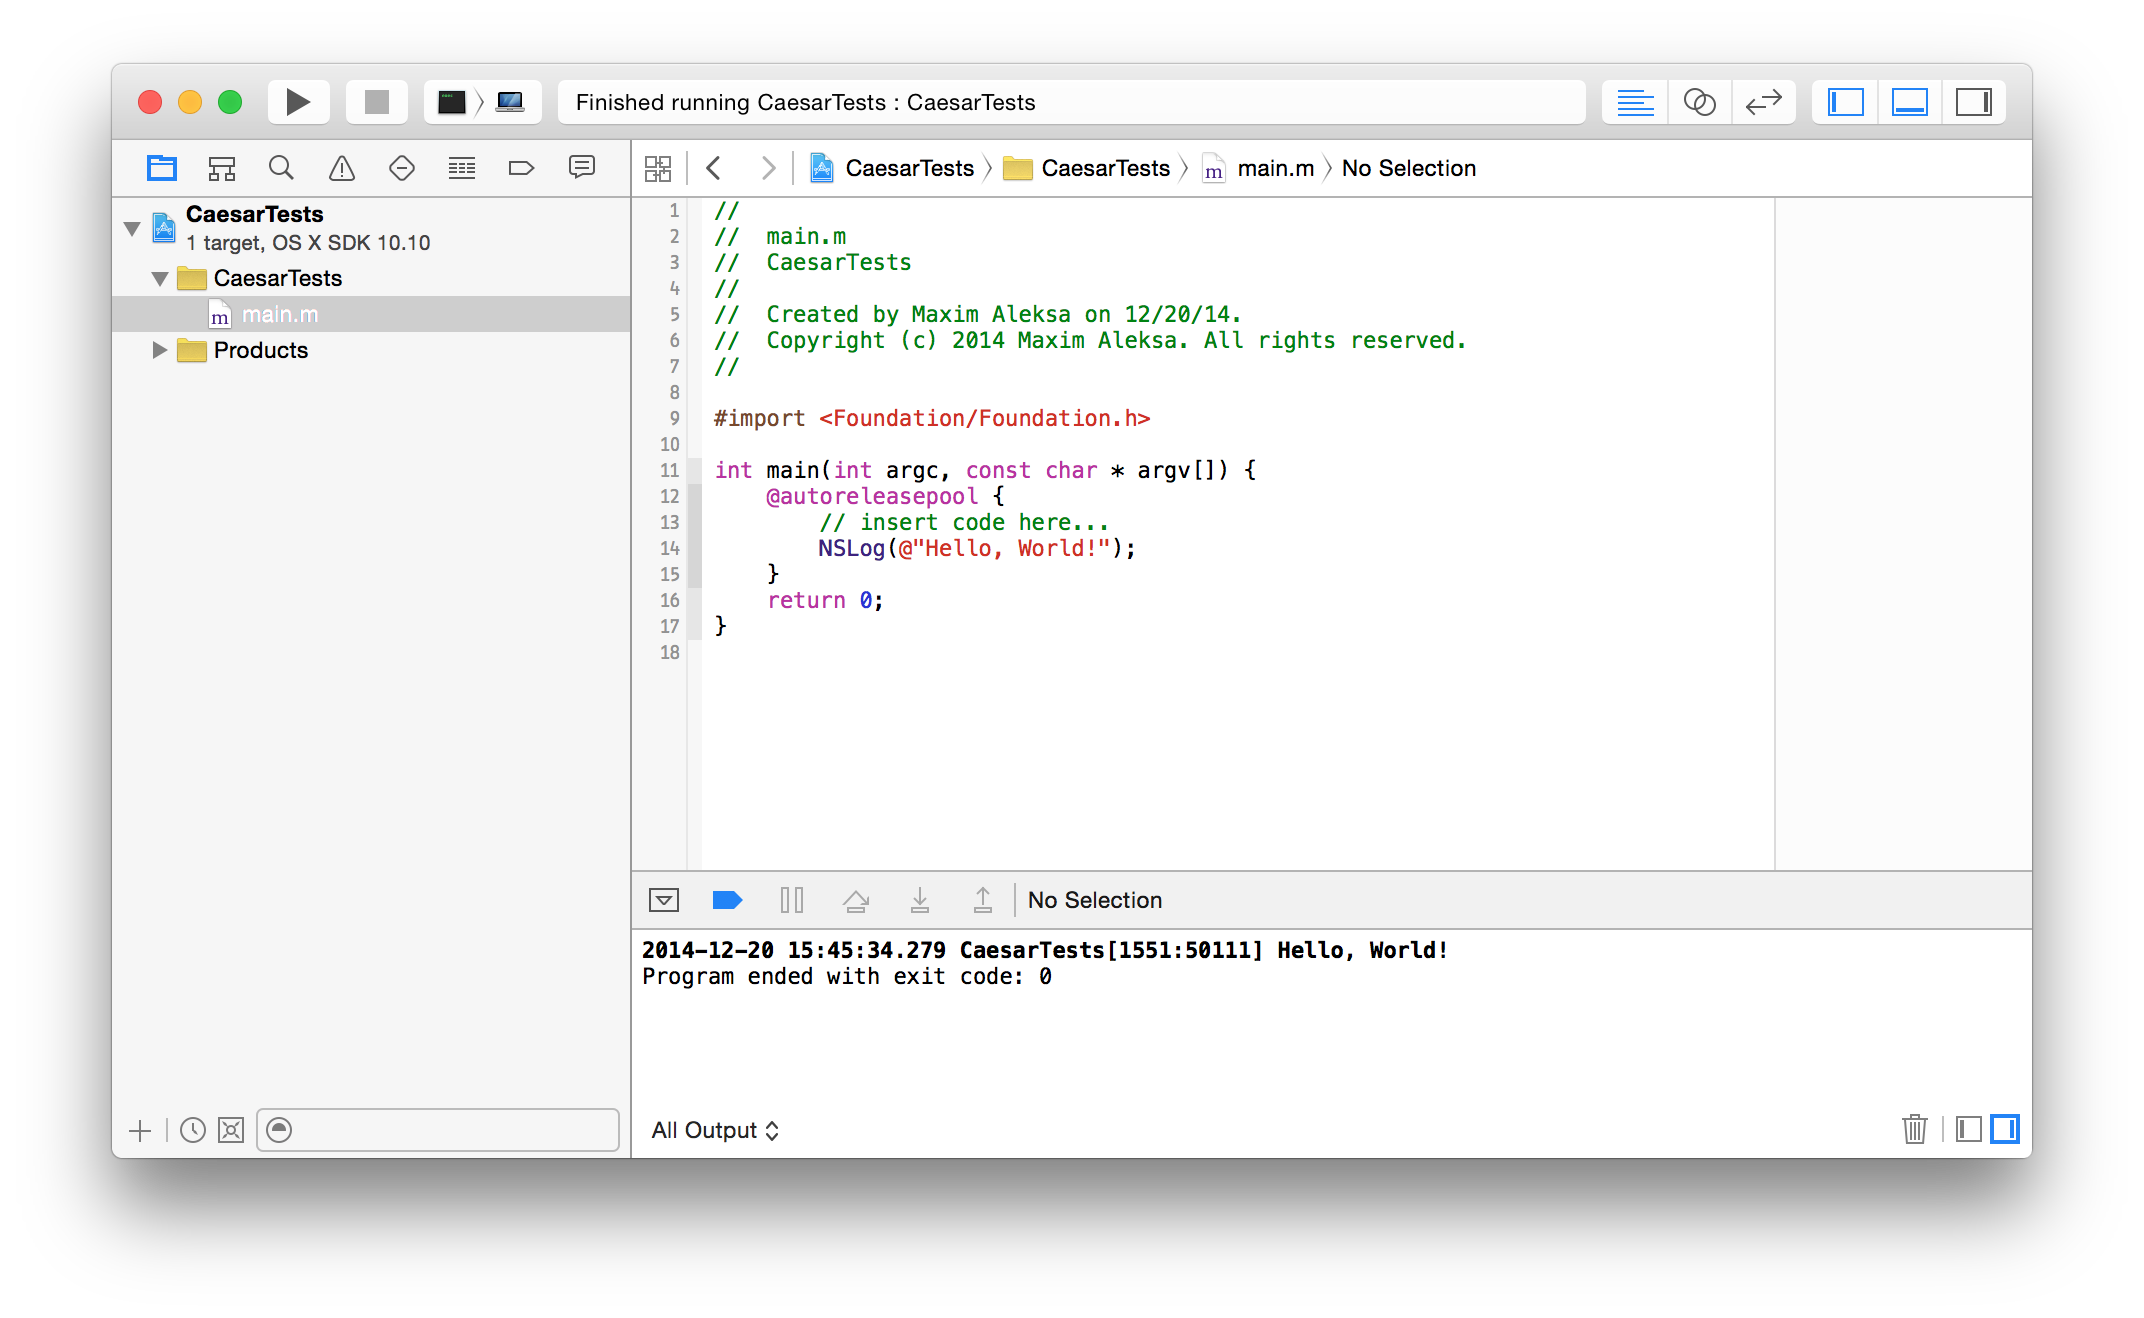
-
Let’s look at the code that Xcode has given us, top to bottom.
1 2 3 4 5 6 7 8 9 10 11 12 13 14 15 16 17// // main.m // CaesarTests // // Created by Maxim Aleksa on 12/20/14. // Copyright (c) 2014 Maxim Aleksa. All rights reserved. // #import <Foundation/Foundation.h> int main(int argc, const char * argv[]) { @autoreleasepool { // insert code here... NSLog(@"Hello, World!"); } return 0; } -
Notice how on lines 1 through 7 comments are started with two forward slashes (
//). And just like in C++, one can have multi-line comments between/*and*/. -
Like 9 has a
#importstatement. It’s similar to a#include, but smarter. It will only import a file once when the program compiles, even if multiple files reference it.Foundationis a library that gives you many classes and functions, includingNSLog(). In fact, you’ll find that many identifiers begin withNS, as NeXT Software licensed the Objective-C language in 1988 and developed its libraries and a development environment called NEXTSTEP. -
Line 11 begins the
mainfunction, which is the entry point of the program. Notice that it takes to arguments: aninteger and an array ofchar *s (more on this later). This is a way to pass command line arguments to a program, so that it can receive input even before it entersmain. You can do the same in C++, and Xcode has been giving you amainwithargcandargvevery time you create a new C++ project. -
Line 12 reads as follows:
@autoreleasepool {. Any program statements between the@autoreleasepool {and the matching closing}are executed within a context known an autorelease pool. The autorelease pool is a mechanism that allows the system to efficiently manage the memory your application uses as it creates new objects (again, more on this later). This is a fairly recent addition to the language and you might think that it’s tedius to do these few extra steps in the beginning and at the end ofmain, but it fact it takes care of many headaches of dynamic memory that you’d have to deal with in C++ (more on these ones in EECS 280!). -
Line 14 calls
NSLog(). Likecout, you can use it to print messages to the console, though its usage is more similar to C’sprintf(), if familiar. It takes a string object (which begins with@"and ends in"in Objective-C) and prints (logs) it along with some other information, such as the current time. -
Finally,
mainreturns0on line 16, which means all went well. -
Hopefully, Objective-C is making sense to you thus far. If not, step back and try to understand this small program.
Pointers
-
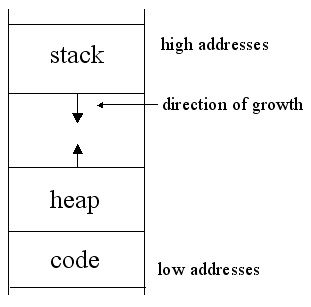
To write Objective-C code you need to understand what pointers are and how they relate to computer’s memory. Let’s try to explain them in the context of C++. First, remember that code and data for your program are stored in random-access memory (RAM).
-
So far when you have been declaring variables (either of privitive types, e.g.
ints, or objects, e.g.strings), you’ve been doing it like this:int courseNumber = 203; string courseTitle = "Discrete Mathematics"; -
And if you declared them inside of a function, they disappeared, unless you
returned their copies. These variables live in the part of computer’s memory known as the stack. You can think of the memory devided in two main parts: the stack, where the local variables in functions are stored and deleted as the functions return, and the heap, where memory can be dynamically allocated to store values. The stack and the heap grow toward each other as more memory is allocated to hold variables, as illustrated by this diagram from Cornell:
-
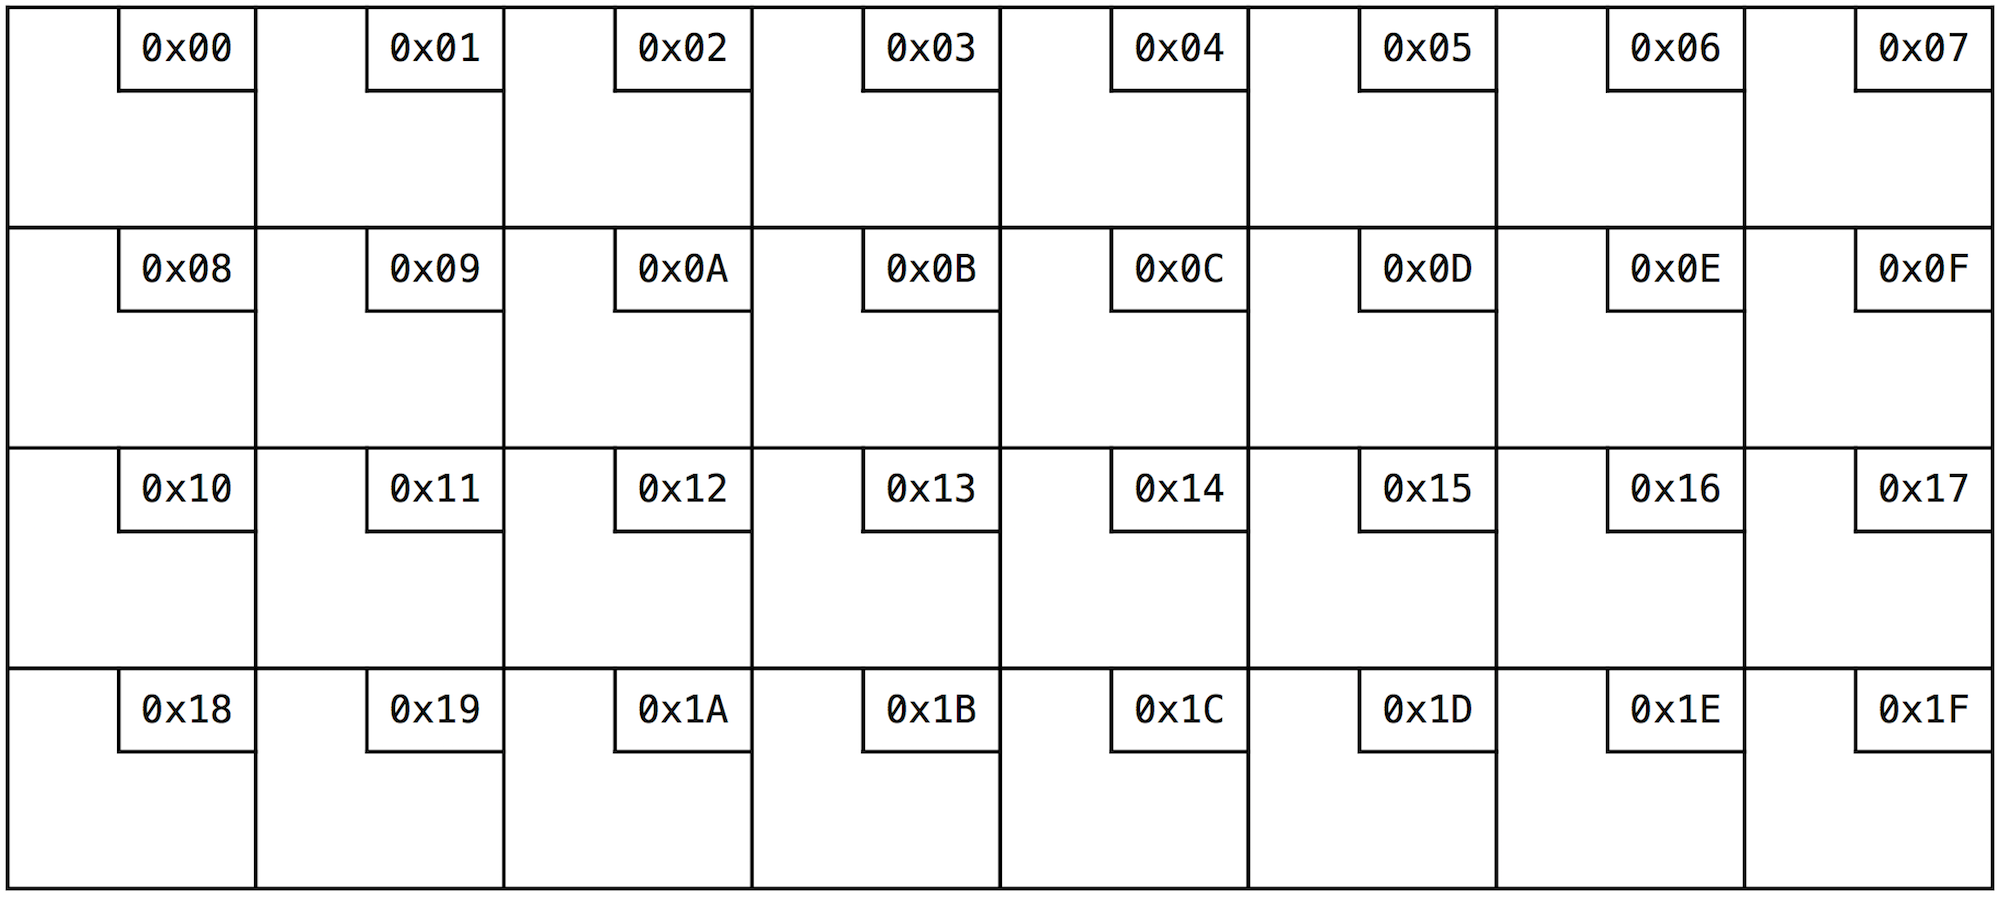
You can also think of computer’s memory as a huge array of 1 byte (8 bits) blocks. Each block is associated with a hexadecimal number that represents its memory address.
-
Just as
ints are variables that store integers anddoubles are variables that store numbers with a decimal point, a pointer is a variable that stores memory addresses. On modern Macs (a 64-bit computers), a memory address is 8 bytes, so it makes sense that a pointer is also 8 bytes. Pointers thus allow you to keep references to other variables. -
Let’s look at how to declare a pointer in C++:
<type> *<variable name>;Note that
*can either be next to the type and have a space on the right size, be next to the variable name and have a space on the left side, or have a space on each side. -
Let’s look at a few examples:
int *p0; double *p1; char *p2; string *p3; -
Remember that a pointer’s value is a memory address. Its type then describes the data located at that address. So in the first example,
int *p0declares a pointer to 4 bytes of memory that will contain aninteger. Similarly,p1is a pointer to (can hold the memory address of) adouble,p2is a pointer to acharandp3is a pointer to astring. -
Remember
char *from earlier? It turns out that it was simply a pointer to acharacter. Soargv(short for argument vector), the second argument ofmain, was simply an array of pointers tocharacters. An array can also be though of as a pointer, since both the variable that represents an array and a pointer refer to a memory address. Soargvis just a two dimensional array ofchars, or simply an array of C-style strings! -
Anyway, by default, pointers will have invalid memory addresses, so we should only use them after we make them pointer to either an existing variable or to a dynamically-allocated chunk of memory on the heap. Here is how to allocate memory on the heap in C++ and make a pointer point to that memory:
int *myDynamicNumber = new intSince newis a feature of C++ and not of Objective-C or C, the above code will not work in the project we created earlier.This will allocate 4 bytes of memory on the heap (remember that other part of computer’s memory?) and
myDynamicNumberwill be a pointer to that memory address. And so the only way to reference that memory or the integer value that is stored in that part of memory is with the pointermyDynamicNumber. Here’s how to store a value:*myDynamicNumber = 5;Here the
is the *dereference operator that allows us to manimulate the memory thatmyDynamicNumberpoints to instead of the pointer itself (which would mean that we modify the memory address it holds and it would point to a different address). We can also create aninteger on the stack (just like the usual) and assign to it the value of the dynamically createdinteger:int x = *myDynamicNumber; -
Whenever we finish using that chunck of memory, we have to deallocate it, so that the operating system can give it to other programs and processes that might need it.
Not deallocating dynamically-allocated memory can really slow down the user’s computer. Whenever you see the spinning beach ball and your computer is very slow, it’s running low on memory, which was probably caused by a programmer who was not careful enough to deallocate the memory he claimed. To deallocate the memory to which
myDynamicNumberpoints (a.k.a. tell teh operating system we no longer need that memory), use thedeletekeyword:delete myDynamicNumber;Note that this is not doing anything with
myDynamicNumber, which still points to the same memory address. All we did was tell the operating system that we no longer wanted that memory. -
Finally, curl up with Binky for some pointer fun: http://www.cs.stanford.edu/cslibrary/PointerFunCppBig.avi. (Yes, that’s computer science at Stanford.)
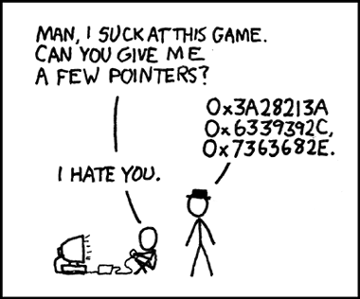
| Stop! Don’t proceed further until you have a basic understanding of pointers or until you appreciate this comic from http://xkcd.com/138/: |
-
Remember that since large objects can take a really long time to copy if we pass or return them by value, and since we want to be able to create objects inside of functions, Objective-C uses exclusively pointers to objects, and this is why knowing pointers is important. But don’t be discouraged if pointers don’t quite make sense to you. Just know that whenever you deal with objects in Objective-C, you’ll be dealing with pointers, so their type will be
<ClassName> *. -
Similarly, don’t be worried about having to deallocate memory. You might have had to a few years ago, but no more! Objective-C has introduced automatic reference counting (ARC), which keeps track of all the strong pointers and deallocates memory whenever an object on the heap loses all strong pointers to it. This is what
@autoreleasepoolis for.
Syntax
Let’s get back to objective-C and our Xcode project! Even though you’re about to dive into a new programming language, you are already familiar with some of Objective-C syntax, since just like C++ it derives from C.
Variables
-
Objective-C provides four basic data types:
int,float,doubleandchar. You can declare, initialize and manipulate them just like you can in C++:int thisCourse = 183; int nextCourse = 203; int diff = nextCourse - thisCourse; -
There is also
BOOL, which is eitherYESorNO(though it’s really asigned charunderneath the hood).
Strings
-
When you created a command line tool application in Xcode, it gave you this line of code:
NSLog(@"Hello, World!");@"and"enclose a string object. The Foundation framework supports a class calledNSStringfor working with character string objects. Whereas C-style strings consist ofcharcharacters,NSStringobjects consist ofunicharcharacters. Aunicharcharacter is a multibyte character according to the Unicode standard. This enables you to work with character sets that can contain literally millions of characters. There are also some other types, likeunichar, a multibyte character according to the Unicode standard. -
Let’s modify our program by creating an
NSStringobject (and a pointer thereto!) and then passing it toNSLog:#import <Foundation/Foundation.h> int main(int argc, const char * argv[]) { @autoreleasepool { NSString *str0 = @"Hello from EECS 183."; NSLog(str0); } return 0; }Notice that you get a warning from Xcode: Format string is not a string literal (potentially insecure).
NSLog()likes to take literal strings, so we’ll replace it with a literal format string—a string where whose parts come from values of other variables and objects. To fix it, we just need to replaceNSLog(str0);with
NSLog(@"%@", str0); -
%@just means that there you will insert an object. That object (str0) comes after the string literal. -
If you wanted to insert an
integer instead of an object, you could do something like this with%d, which is in fact used for inserting decimal integers:#import <Foundation/Foundation.h> int main(int argc, const char * argv[]) { @autoreleasepool { NSString *subject = @"EECS"; int courseNumber = 183; NSLog(@"Hello from %@ %d!", subject, courseNumber); } return 0; }As you might guess, this would print
Hello from EECS 183!
-
%fis used to insertdoubles and%cis for characters.
Loops
-
Loops in Objective-C are very similar to those is C++. Here’s what a for-loop that prints
Hello World!ten times might look like:for (int i = 0; i < 10; i++) { NSLog(@"Hello world!"); }
Conditions
-
If/else statements are also similar to C++:
if (x < 0)
{
    NSLog(@"x is negative");
}
else if (x > 0)
{
    NSLog(@"x is positive");
}
else
{
    NSLog(@"x is zero");
}
Classes
-
Classes and objects are a very important part of Objective-C. They are use for mostly everything and it’s vital that you understand the principles of object-oriented programming before you begin building applications in Objective-C.
-
So let’s create a class to represent a message that can be encrypted or decrypted using a Caesar cipher. We’ll put it in two separate files,
Message.handMessage.m.Message.hwill be the header file and will hold the public interface of the class. This is the only file that the user’s of the class should know about.Message.mwill hold the implementation of the class, as well as the private interface.In the menu bar, select File > New > File…. Choose OS X and Source on the left (since we’re still working on the command line application). Then choose Cocoa Class. Name the class
Message. By default, most classes (includingNSString) derive fromNSObject, so leave it asMessage’s superclass, but be sure that Objective-C is selected as the language.If you’re not familiar with subclasses, superclasses and polymorphism in general, don’t worry too much, though you’ll probably want to learn about it if you want to make larger applications. 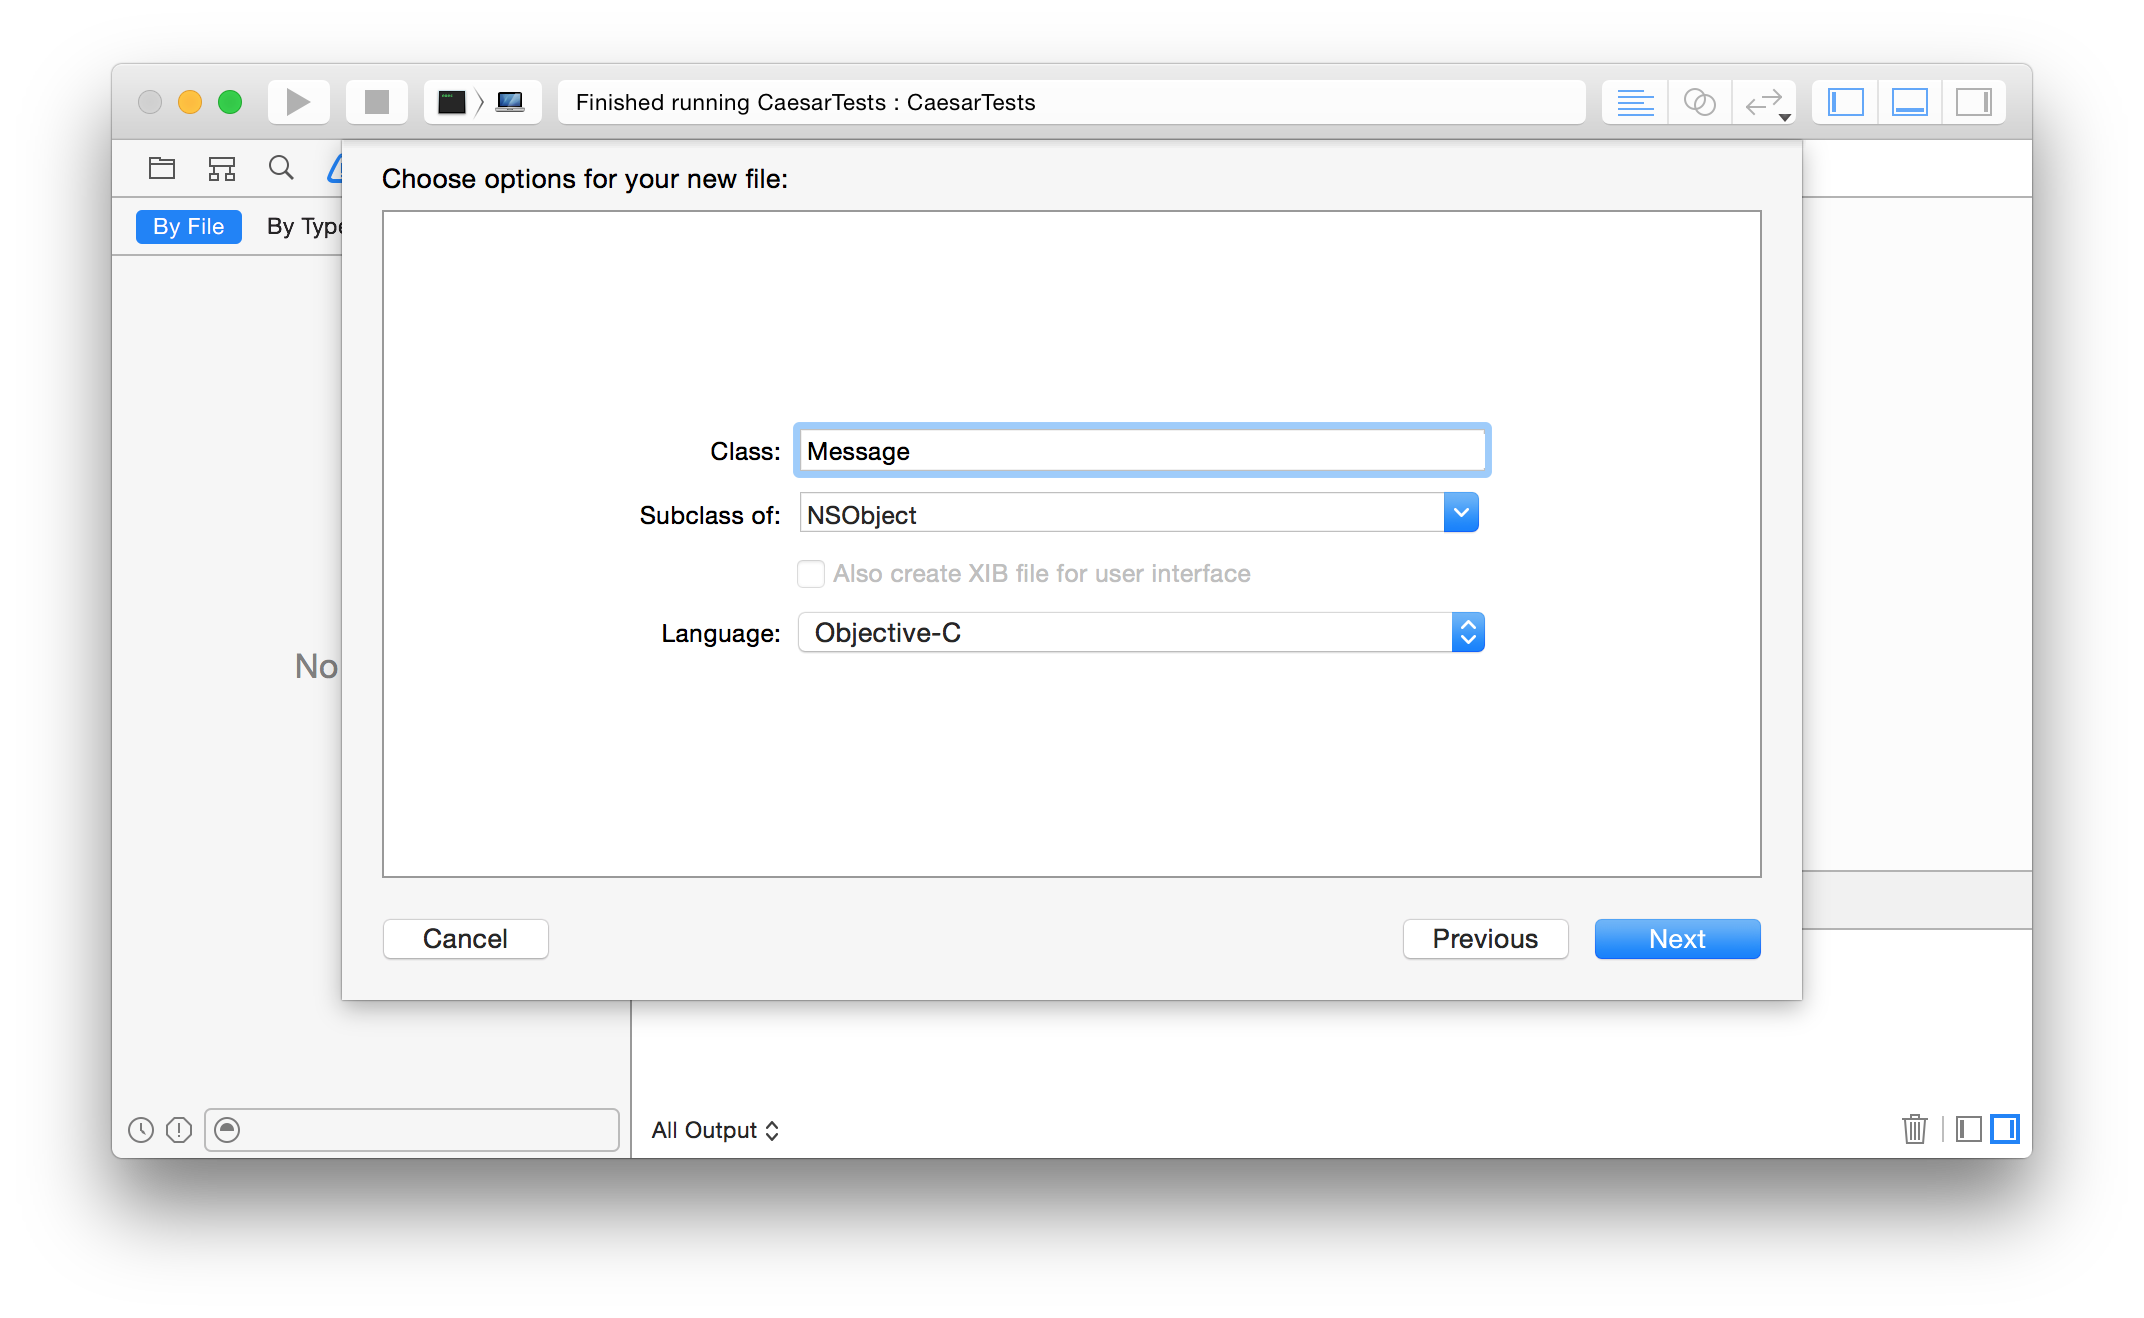
-
Once you create this class, you’ll see both
Message.handMessage.min the Navigator area on the left side of Xcode. Click onMessage.hand you’ll see that Xcode has given you some code to start with. -
It’s much easier to work with class files when you have the header file on the left side of the window and the implementation file on the right side of the window. Simply click on
 in the top-right corner to enable assistant editor and you shoud get a window that looks like this, with
 Message.hon the left andMessage.mon the right: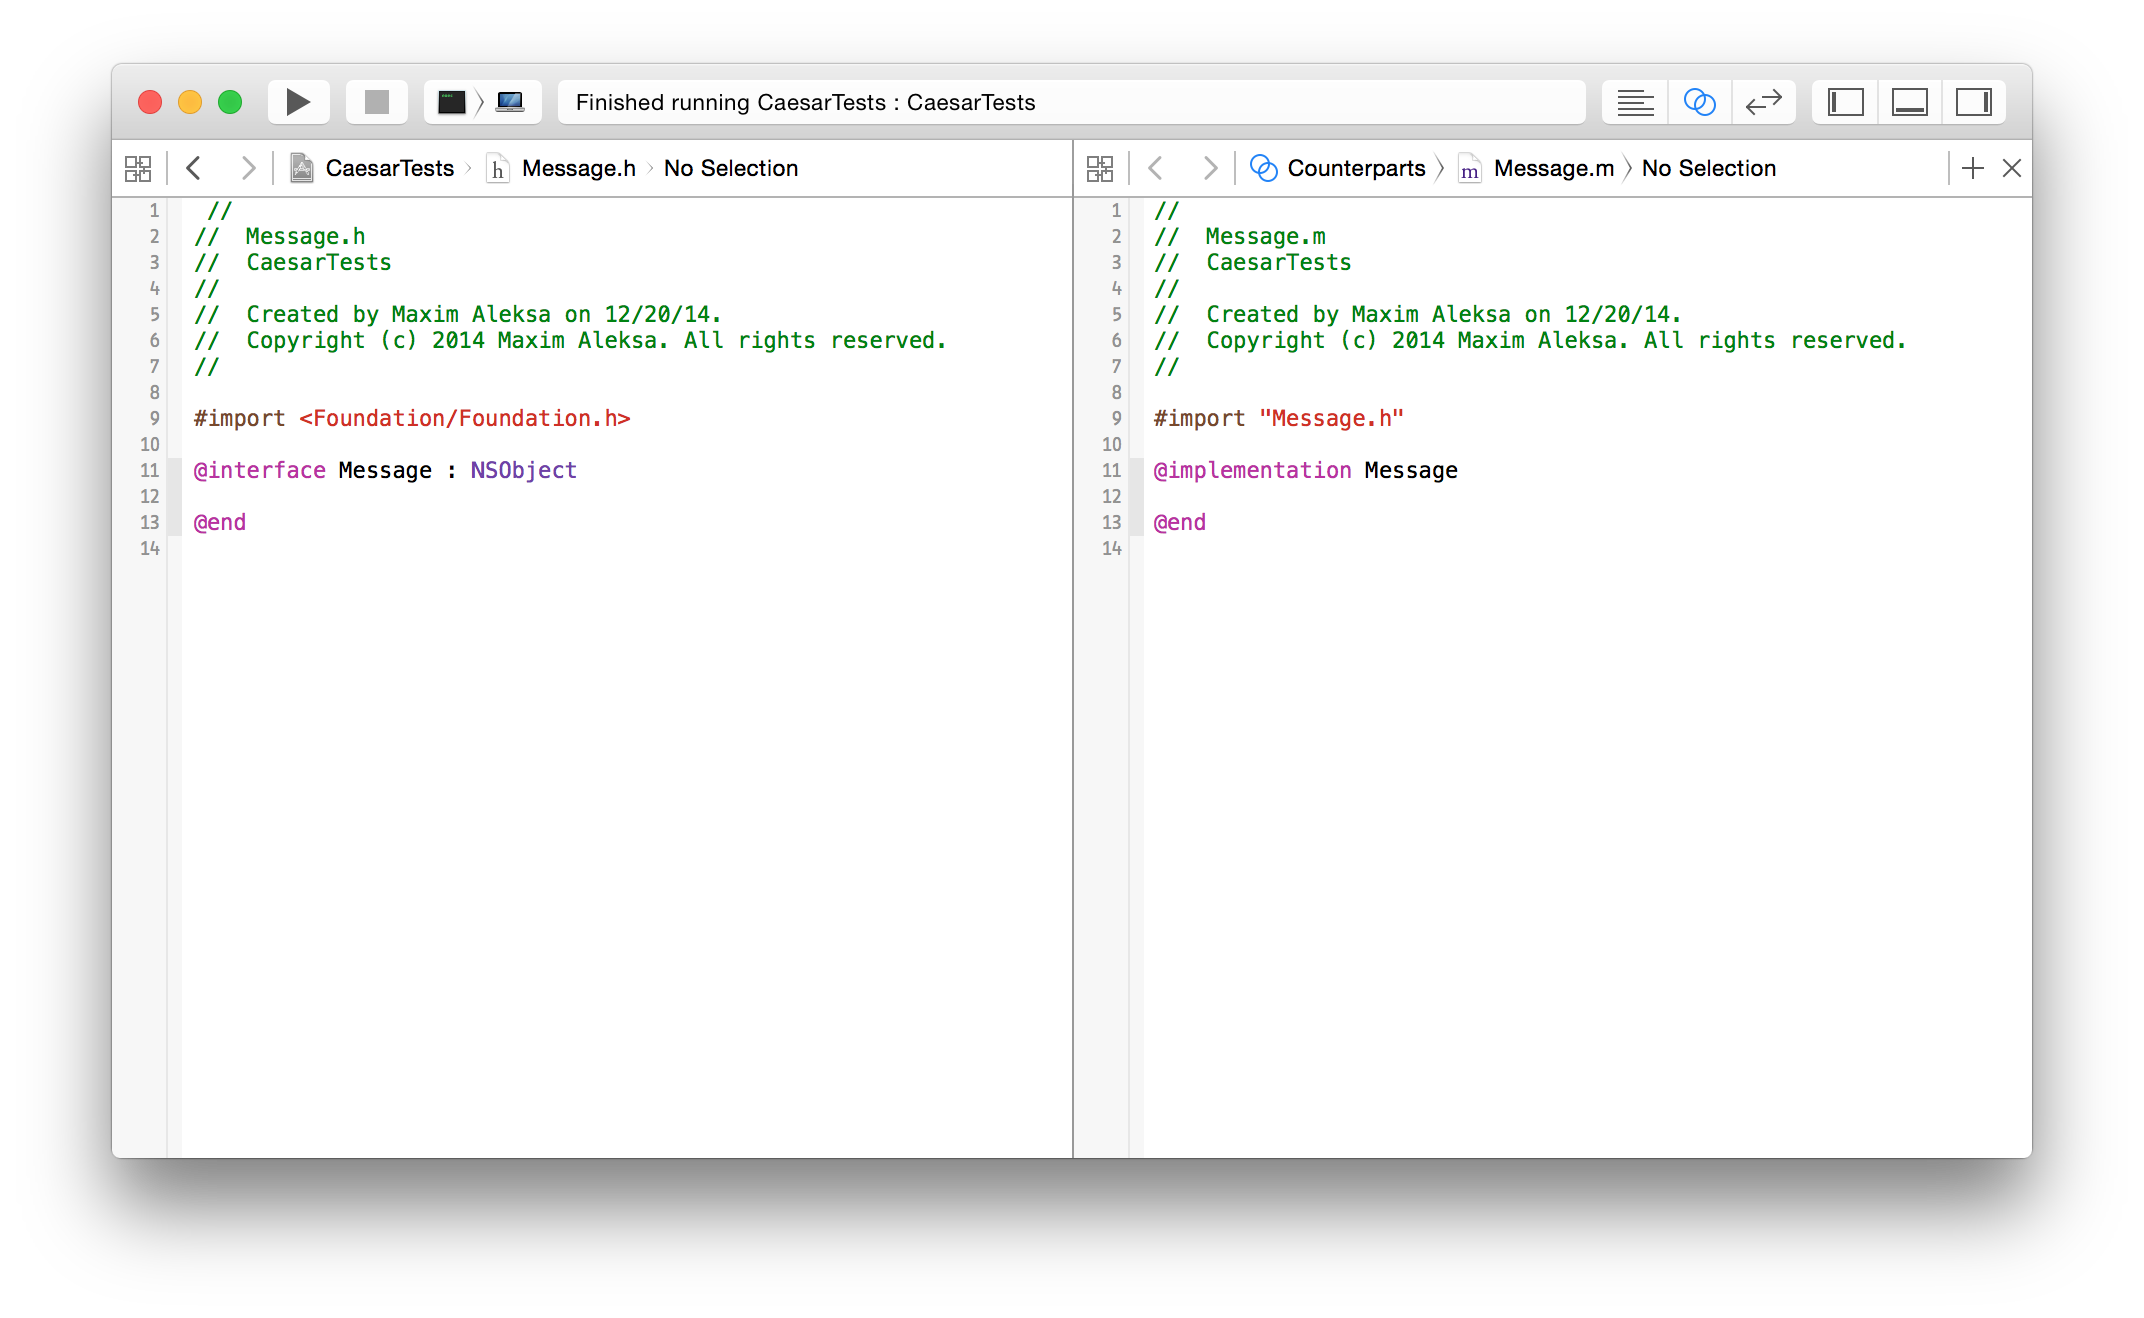
Interface
-
Let’s begin working on the public interface of the
Messageclass. First notice that Xcode automatically decided to#import <Foundation/Foundation.h>for you. It will provide everything we’ll need to create our class. And remeber that#importensures that the library will be imported just once when we compile. -
Then we have
@interface Message : NSObject

@end
@interface Message : NSObjectbegins the public interface of a class calledMessagethat derives from the classNSObject. This would be equivalents to these lines of C++ code:class Message : public NSObject { public: };All the public declarations will go between
@interface Message : NSObjectand@end. Note that only public interface is defined in an Objective-C header file. -
Fundamentally, our
Messageclass needs to know just one piece of information: the message itself. The class should then be able to encrypt or decrypt with a key that the user of the class provides. -
In C++ we would declare a private member variable of type
stringand we would create public setter and getter functions. In Objective-C, by contrast, we create a@property, which automatically generates setter and getter methods for us:@property (strong, nonatomic) NSString *message;Notice that
messageis a pointer to anNSStringobject. Also within the paretheses there is a list of attributes for the propery. Thestrongattribute is used for dynamic memory management and says to make an additional reference to the object whenever the setter method is used. This also helps the operating system free memory when a dynamically-allocated object is no longer being referenced. Thenonatomicattribute says that you don’t need to worry about race conditions that could occur from multiple threads trying to access the instance variable at the same time. Unless you copy objects, you shouldn’t be worrying about this.The name of the instance (member) variable created by the
@propertyis actually_messageand underneath the hood Objective-C is creating these setter and getter methods:// setter - (void)setMessage:NSString *message { _message = message; } // getter - (NSString *)message { return _message; } -
You might find Objective-C syntax for methods (member functions) a bit stange, but it doesn’t take that long to get used to.
-means an instance method, a method that’s applied to a particular object upon which the method is called (just like all member functions work in C++). This is in constrast with class methods that begin with a+are called on a class. Class methods cannot access instance variables created with properties and are usually utility and helper functions. We’ll see an example later.Then comes the return type in parentheses, followed by the method’s name. As you’ll find later, arguments are interspersed throughout the method name. So if you had a method that took two arguments, its signature could look something like this:
- (void)aMethodThatTakesAWord:NSString *word andANumber:int number;Note that the method’s name in this case would be
aMethodThatTakesAWord: andANumber:. -
But now, let’s declare two public methods that will work with the
Messageclass. Remember that we need a way to encrypt a message with some key and decrypt a message with some key. The message stored inside theMessageobject will ultimately remain the same, rather the methods will return the encrypted and decrypted versions thereof, so the are the methods we’ll need are these:- (NSString *)encryptWithKey:(int)key; - (NSString *)decryptWithKey:(int)key;They both take an integer argument, a key, that is applied to the object’s message instance variable and an encrypted or a decrypted version of the message is returned.
-
So this is the entire public interface of
Message:Message.h1 2 3 4 5 6 7 8 9 10#import <Foundation/Foundation.h> @interface Message : NSObject @property (strong, nonatomic) NSString* message; - (NSString *)encryptWithKey:(int)key; - (NSString *)decryptWithKey:(int)key; @end -
Before we proceed, let’s take a look at how we access properties and call methods in Objective-C. Let’s go back to
main.mand write some tests for theMessageclass.First, let’s
#import "Message.h"(remember to use double quotes for local files) and then let’s create aMessageobject, which we’ll callsecretMessage.Although
Messageclass has an instance variable of typeNSString,Messageitself is not a string, so we can’t just doMessage *secretMessage = @"hi";Since we’re creating a pointer to a
Message, we need to first ask the operating system for some memory. We’ll callallocmethod onMessageclass. Notice thatallocis a class method and we’ve never implemented it. It’s inherited fromNSObjectfrom whichMessagederives. Then we need to initialize the newly-created object by callinginitinstance method, which is also inherited fromNSObject. Unlike constructors in C++, you have to callinitializers yourself, and the only place you should call them is right after allocating memory (see example below). The syntax for calling methods in Objective-C is the following and method calls can be nested:[<object/class> <method name and arguments>];
And so we create a
Messageobject, allocate memory for it and initialize it all in one line. This is very common in Objective-C.Message *secretMessage = [[Message alloc] init]; -
Now let’s create a string that will have our initial plaintext:
NSString *plaintext = @"Hello world!";As a sanity check, let’s make a call to
NSLog()and printplaintext.NSLog(@"Original: %@", plaintext);Run the project and make sure that
Original: Hello world!is indeed printed to the console. -
Now let’s assign that
plaintextstring to themessageinstance variable of ourMessageobjectsecretMessage. Recall thatmessageis a property ofMessage. Properties are accessed with a dot notation on Objective-C and setters and getters are called automatically:secretMessage.message = plaintext; -
Now let’s create another string,
ciphertext, to which we’ll assign the message encrypted with a key of 5. To do that, we’ll declare anintand initialize it to5and then we’ll callencryptWithKey:method onsecretMessage, passing in thinteger:int key = 5; NSString *ciphertext = [secretMessage encryptWithKey:key];Let’s follow that line by another call to
NSLog()to test the encryption:NSLog(@"Encrypted with a key of %d: %@", key, ciphertext); -
Time to decrypt! Reset the
messageinstance variable ofsecretMessage, create a new stringdeciphertextand log the result:secretMessage.message = ciphertext; NSString *deciphertext = [secretMessage decryptWithKey:key]; NSLog(@"Decrypted with a key of %d: %@", key, deciphertext); -
Let’s add a few more tests. A good idea would be to outsource the testing to a function, and here’s what that would look like:
main.m1 2 3 4 5 6 7 8 9 10 11 12 13 14 15 16 17 18 19 20 21 22 23 24 25 26 27 28 29 30 31 32 33 34 35 36 37 38 39#import <Foundation/Foundation.h> #import "Message.h" void testMessageWithKey(NSString *text, int key); int main(int argc, const char * argv[]) { @autoreleasepool { testMessageWithKey(@"Hello world!", -26); testMessageWithKey(@"Hello world!", -13); testMessageWithKey(@"Hello world!", -1); testMessageWithKey(@"Hello world!", 0); testMessageWithKey(@"Hello world!", 1); testMessageWithKey(@"Hello world!", 2); testMessageWithKey(@"Hello world!", 3); testMessageWithKey(@"Hello world!", 13); testMessageWithKey(@"Hello world!", 25); testMessageWithKey(@"Hello world!", 26); testMessageWithKey(@"Hello world!", 27); testMessageWithKey(@"Hello world!", 52); } return 0; } void testMessageWithKey(NSString *text, int key) { Message *secretMessage = [[Message alloc] init]; NSString *plaintext = text; NSLog(@"Original: %@", plaintext); secretMessage.message = plaintext; NSString *ciphertext = [secretMessage encryptWithKey:key]; NSLog(@"Encrypted with a key of %d: %@", key, ciphertext); secretMessage.message = ciphertext; NSString *deciphertext = [secretMessage decryptWithKey:key]; NSLog(@"Decrypted with a key of %d: %@", key, deciphertext); } -
Ideally, you’ll have many tests, more that what’s above. And while our program won’t yet work correctly (in fact, it will crash when we run it), writing tests before writing the implementations is a very good practice.
Implementation
-
Now the only task left for us in order to finish the
Messageclass is to implementencryptWithKey:anddecryptWithKey:. Well, that’s not quite true. Take a look atMessage.m, which should be on the right side of the Xcode window if you enabled Assistant Editor earlier. By default, you’ll get the following lines of code from Xcode, after the header comments:#import "Message.h" @implementation Message @end -
As you might guess, the methods' implementation will go between
@implementation Messageand@end. To declare any private properties or methods (which we’ll do later), you’ll need to add the following lines before@implementationthat will extend theMethodclass:@interface Message () @endAll the private properties and methods of
Messagewill go between@interface Message ()and@end.
-
Now, let’s start implementing
encryptWithKey:anddecryptWithKey:. Remember that implementations will go between@implementation Messageand@end. We’ll begin withdecryptWithKey:, which is quite easy. To decrypt, we’ll just encrypt with the opposite key. In other words, if the user of the class wants to decrypt a message with a key of 5, we’ll just encrypt the message with a key of -5. And this is the implementation:- (NSString *)decryptWithKey:(int)key { return [self encryptWithKey:-1 * key]; }Notice that when calling methods on the current object, we have to use the keyword
self(unlike C++ where we just called the method without an object). -
Let’s now “stub”
encryptWithKey:, so that at least our class doesn’t crash when we try to run our program. We’ll return the actual message stored inside the object, which means that the current implementation will neither encrypt nor decrypt anything.- (NSString *)encryptWithKey:(int)key { return self.message; } -
We can the program without crashing and all original, encrypted and decrypted messages you see should be just “Hello world!,” since our program isn’t doing any encryption or decryption.
-
Now, let’s work on encryption. It will be a bit different from what you did in the project. It will not convert all lowercase letters to uppercase, nor will it strip non-alphabetical letters. It will just shift all lowercase letters and all upper-case letters, leaving the other characters as they are.
-
First, we need to simplify the key. The user of the
Messageclass can pass in any integer, but the key that’s applied to the characters should only be between 0 and 25. Also make sure that the key is not negative. We’ll leave that to you:// TODO: simplify key and put it in range [0, 25] -
Because
NSStringis an immutable object, we cannot modify its contents. Nor should we modify the contents of the instance variable, since we’ll be just returning the encrypted string. So let’s put all characters from the message into an array. It will be an array ofunichars, sinceNSStringis a string of Unicode characters (recall the discussion earlier).We first find out the length of the message. Remember that it’s an
NSString, which has alengthmethod. So we first access themessageproperty of the current object (using theselfkeyword) and then call the methodlength. We store the length inmessageLength, a variable of typeNSUInteger, which is similar to anint, but is unsigned. Notice that it’s not an object, so we don’t need a pointer to it.NSUInteger messageLength = [self.message length];We then create an array of
unichars of sizemessageLength. Unlike C++, Objective-C and have arrays whose size is not known at compile time, somessageLengthdoesn’t have to be a constant.unichar messageArray[messageLength]; -
We then have a for loop that gets a character from the message string using
NSString’scharacterAtIndex:method and put that character in the corresponding index of themessageArray.for (int i = 0; i < messageLength; i++) { unichar currentCharacter = [self.message characterAtIndex:i]; messageArray[i] = currentCharacter; } -
So now we have an array of characters. Note that the characters haven’t been shifted, and so if we create a new string using characters from that array, we’ll essentially get the original string. Let’s do exactly that. It turns out that
NSStringclass has a class method calledstringWithCharacters: length:that takes an array ofunichars and anNSUIntegerand returns anNSStringobject that represents a string of that length with the characters from the array. So let’s use that method to get an “encrypted” string:NSString *encryptedMessage = [NSString stringWithCharacters:messageArray length:messageLength];Note that it’s very common to line up the semicolons in method names, which tend to be quite long and descriptive.
-
And we can return this “encrypted” message:
return encryptedMessage; -
Try running the project again, and you should still get only just “Hello world!” printed to the console, since our program still isn’t doing any encryption or decryption.
-
We now need to add the part that actually does the encryption. Go back to the for loop you wrote earlier that put the characters in the message array. Instead of putting the same characters in the array, we need to shift the letters before inserting them in the array. To keep our code clean, let’s write a helper function that will shift a character by a given key, so it will take to arguments: a
unicharand anint. Because we’re inside of a class, we’ll actually write a private class method and this is how we’ll use it in the for loop:for (int i = 0; i < messageLength; i++) { unichar currentCharacter = [self.message characterAtIndex:i]; messageArray[i] = [Message shiftCharacter:currentCharacter byKey:key]; }Notice that the method is sent to
Message. We could instead write an instance method and send it toself, but a class method probably makes more sense, since we’re not dealing with any instance variables. -
Let’s declare
shiftCharacter: byKey:between@interface Message ()and@endinMessage.m, as we don’t want it to be in the public interface ofMessage,@interface Message () + (unichar)shiftCharacter:(unichar)character byKey:(int)key; @end -
Now, write the definition of
shiftCharacter: byKey:between@implementationand@end. We’ll leave it as an exercise. Be sure to only shift lowercase and uppercase letters, and leave the other characters as they are. Also be sure to take care of situations where the letters wrap around the alphabet (e.g.zgoes back toa).+ (unichar)shiftCharacter:(unichar)character byKey:(int)key { // TODO: shift lowercase and uppercase letters, leave other chars unchanged return character; } -
So that’s it for the implementation of the
Messageclass! Your code should now be similar to the one that appears below, and you should have figured out how to simplify the key and how to shift just alphabetical characters.Message.m1 2 3 4 5 6 7 8 9 10 11 12 13 14 15 16 17 18 19 20 21 22 23 24 25 26 27 28 29 30 31 32 33 34 35 36 37 38 39 40 41 42#import "Message.h" @interface Message () + (unichar)shiftCharacter:(unichar)character byKey:(int)key; @end @implementation Message - (NSString *)decryptWithKey:(int)key { return [self encryptWithKey:-1 * key]; } - (NSString *)encryptWithKey:(int)key { // TODO: simplify key and put it in range [0, 25] // create empty array to store characters NSUInteger messageLength = [self.message length]; unichar messageArray[messageLength]; // put characters into array for (int i = 0; i < messageLength; i++) { unichar currentCharacter = [self.message characterAtIndex:i]; messageArray[i] = [Message shiftCharacter:currentCharacter byKey:key]; } NSString *encryptedMessage = [NSString stringWithCharacters:messageArray length:messageLength]; return encryptedMessage; } + (unichar)shiftCharacter:(unichar)character byKey:(int)key { // TODO: shift lowercase and uppercase letters, leave other chars unchanged return character; } @end -
If you run the project now and your implementation is indeed correct, “Hello world!” should be encrypted with keys -1 and 25 to “Gdkkn vnqkc!”, should be encrypted with keys -13 and 13 to “Uryyb jbeyq!” and should stay they same for keys -26, 0, 26 and 52. You’re now ready to build an iPhone app!
Stop! Do not proceed further until your implementation of the Message class is correct.
|
Intro to iOS Development
Requirements
-
In order to develop iOS applications, you need a Mac and Xcode. These notes cover iOS 8 SDK, for which you’ll need Xcode 6 and OS X 10.9.4 or later.
MVC
-
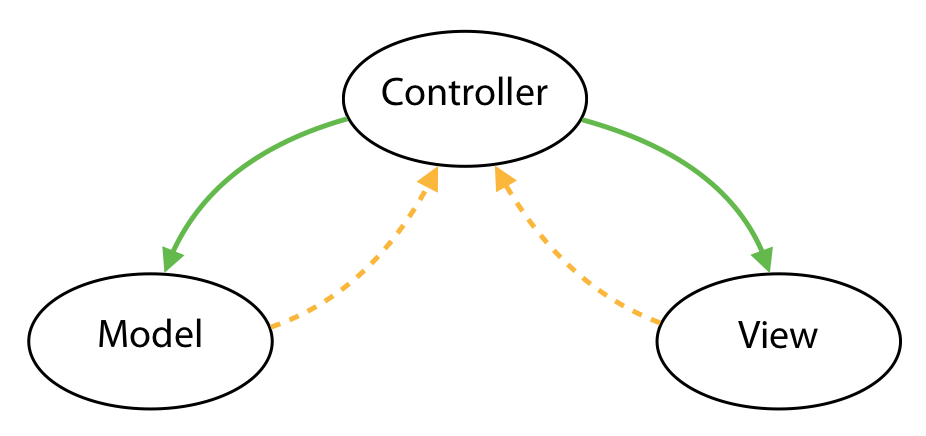
We’ll introduce a new concept, MVC (Model-View-Controller). MVC is a design paradigm used not only for iOS development, but also for creating many websites[1] and other software applications. More simply, it’s a way of organizing and thinking about code. Take a look at it’s representation in the diagram below:
-
Within the MVC design paradigm, we can divide an application into three major components: the model, the view and the controller.
Component Function Examples Model
Managing and organizing data, main logic of the application
Databases (e.g. of songs), data files, logic of a game
View
Presentation of information to user, user interface
Buttons, sliders, text views, table views
Controller
Handles user’s interaction with the application, gets information from the model
Validating user input (e.g. does the email field actually contain a valid email address?)
-
From the above diagram, notice that the controller is “in charge” of the application. Only the controller is allowed to directly communicate with the model and with the view. The controller will usually get the data from the model and then display it on the view. The view can also communicate with the view (e.g. when the user taps on a button or scrolls through the list), as can the model (e.g. the database updates), but these communication are not as direct. Usually the controller decides to “listen” to the updates from the view and the model. But the view and the model are not allowed to talk to each other.
-
The good news is that we’ve already written our model.
Messageclass is the brains of our application that will take care of encrypting and decrypting text. So now we need to build the view (i.e. user interface) and the controller, that will connect the view to the model.
Single View Application
-
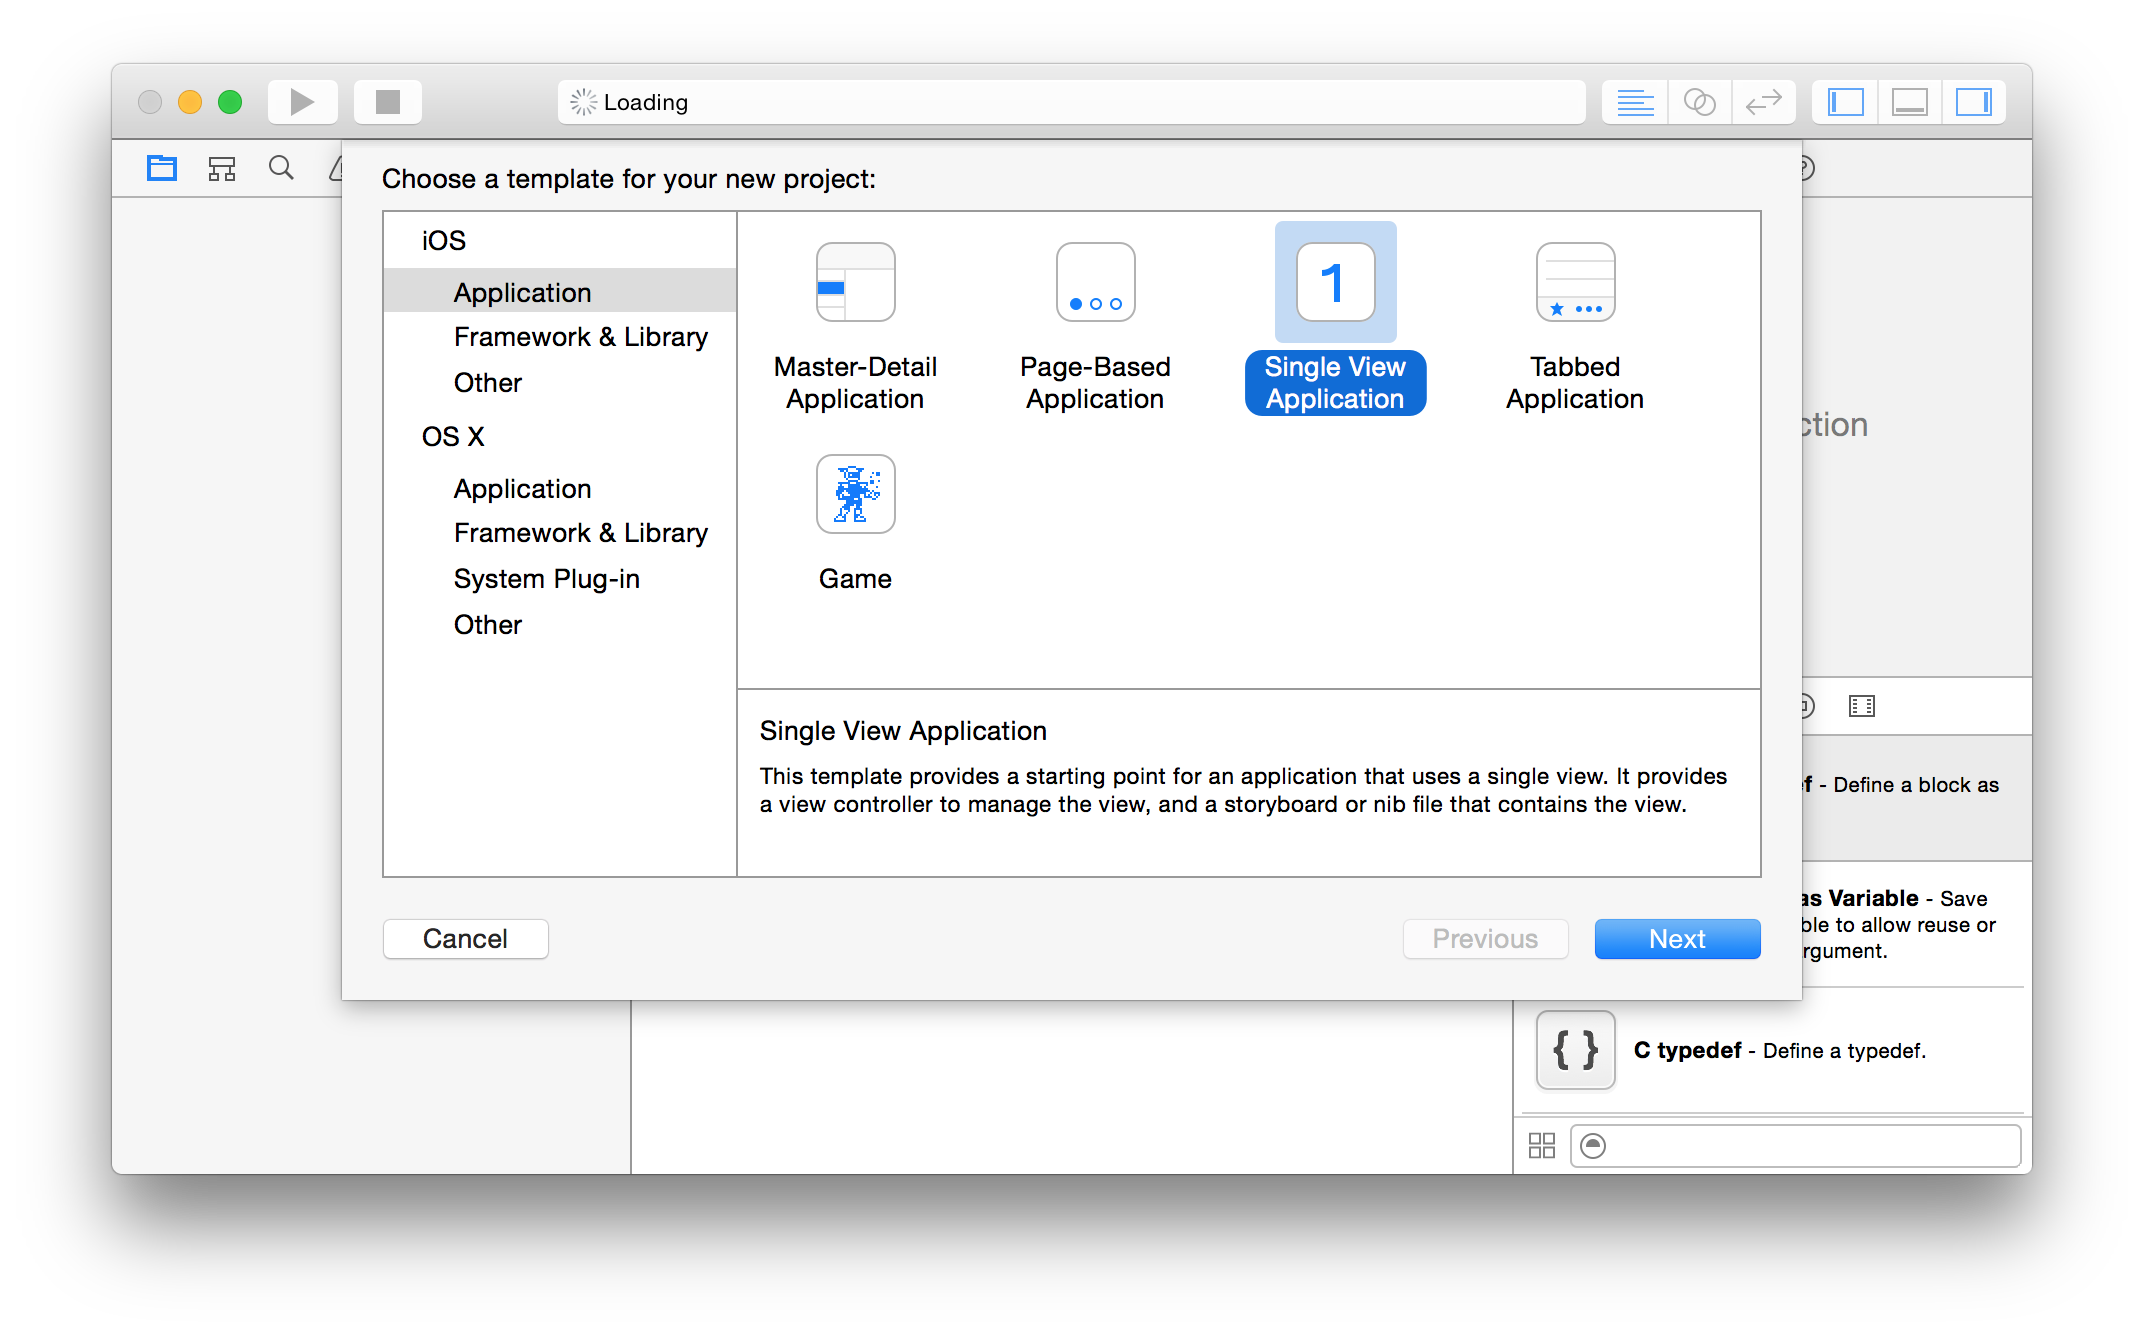
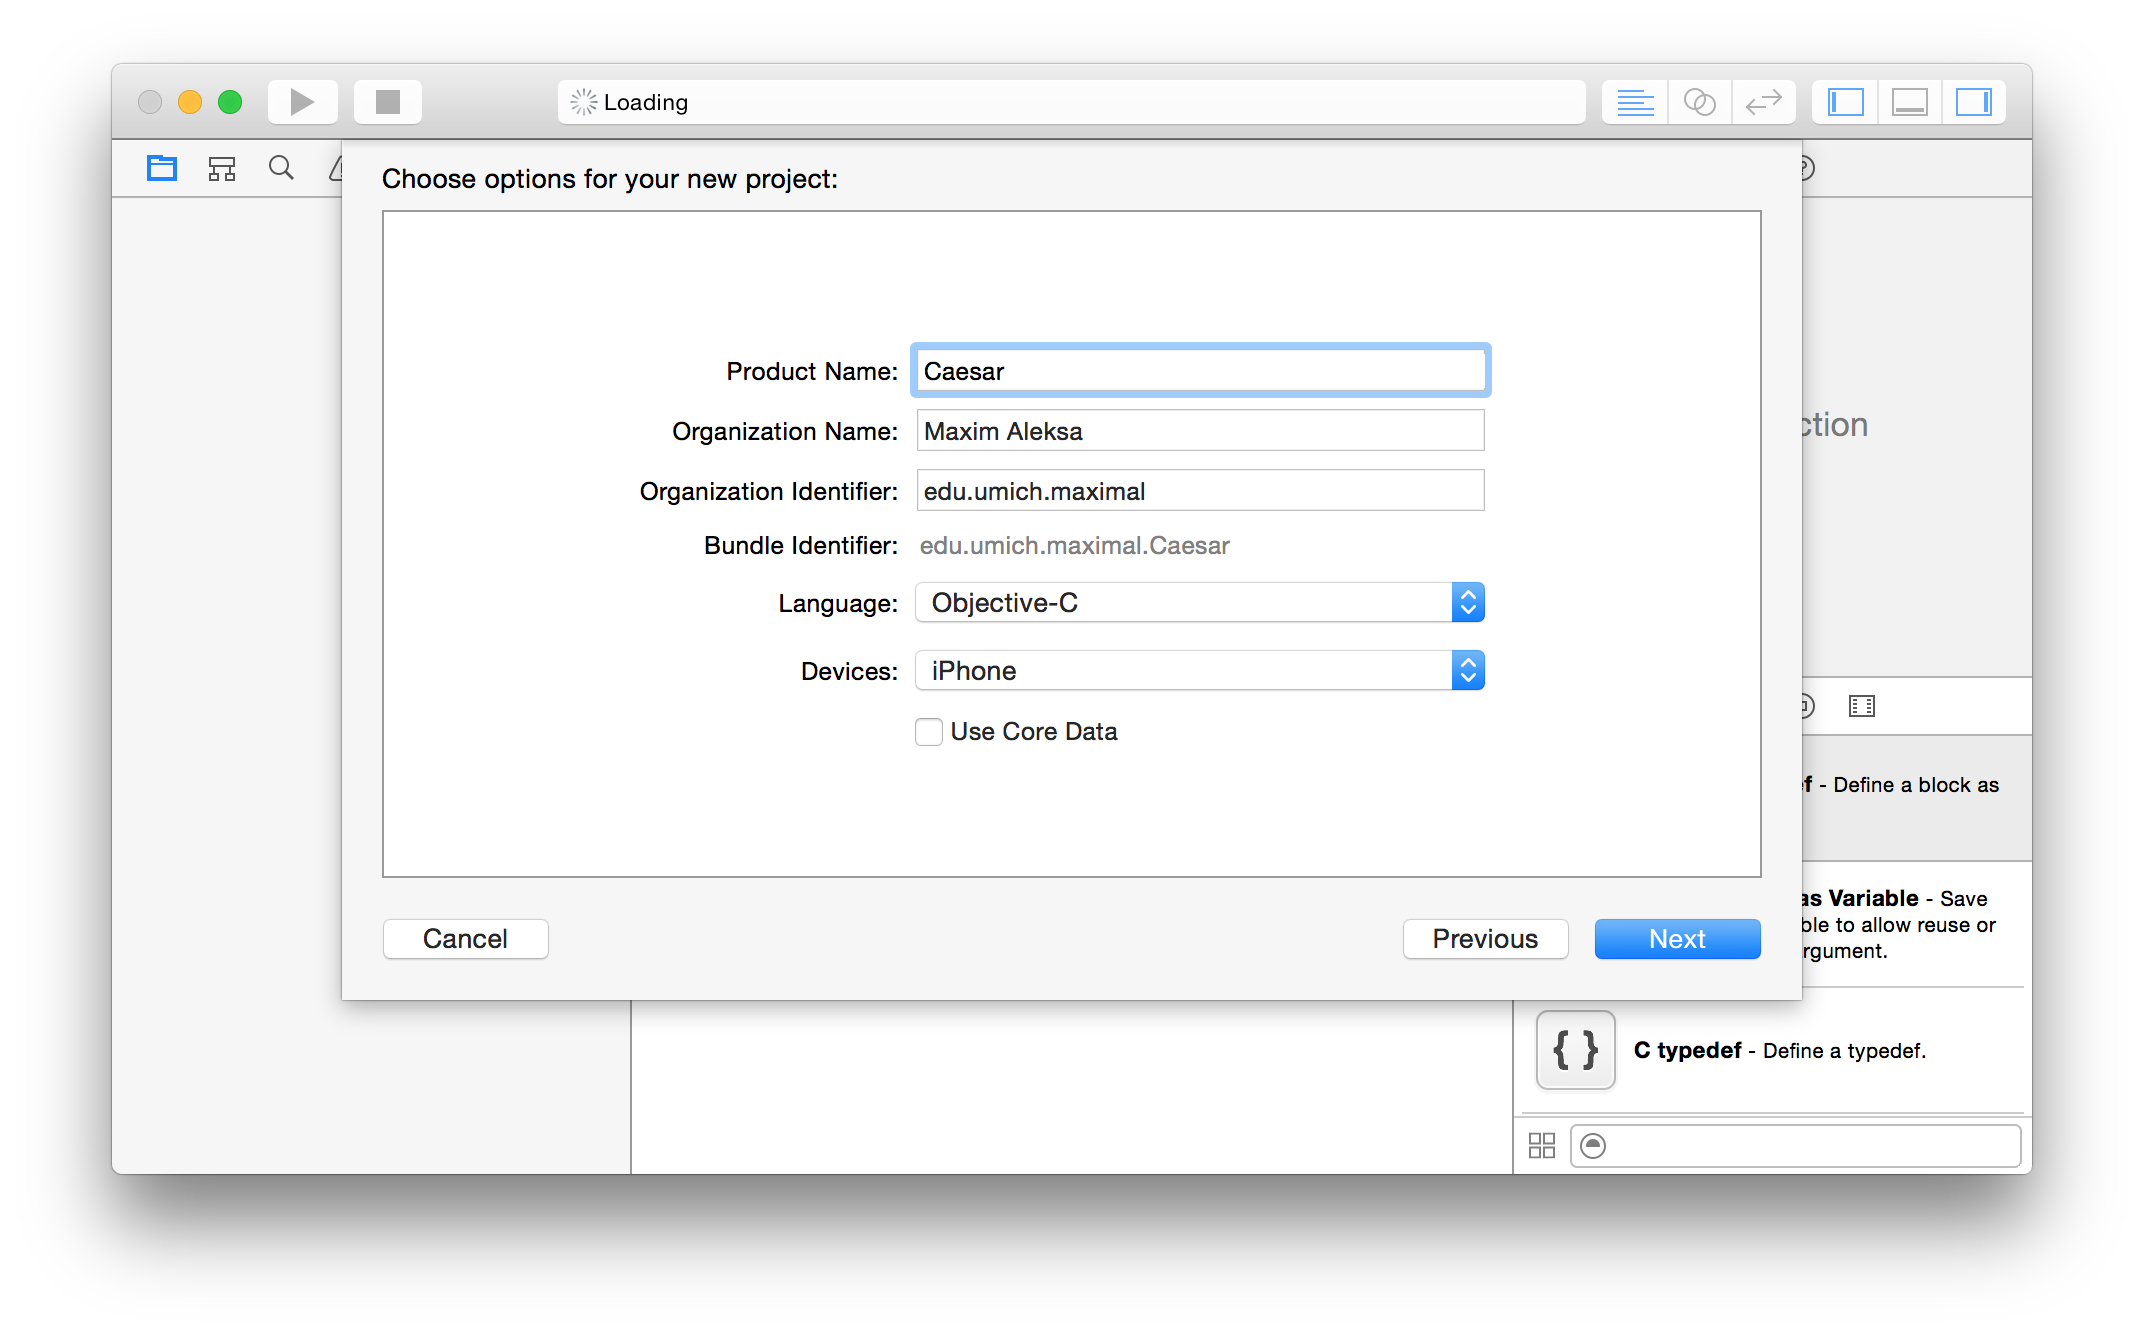
Let’s start creating our iPhone application by creating a new Xcode Project, this time, select iOS and Application on the left and then choose Single View Application. A single-view application is one with just one screen. This is all we need for our app.
-
Next, name the project Caesar, since our app will ultimately encrypt and decrypt messages using a Caesar cipher, choose Objective-C as the language, select iPhone from the list of devices (so as to keep our app simple) and make sure that Core Data is not checked.
-
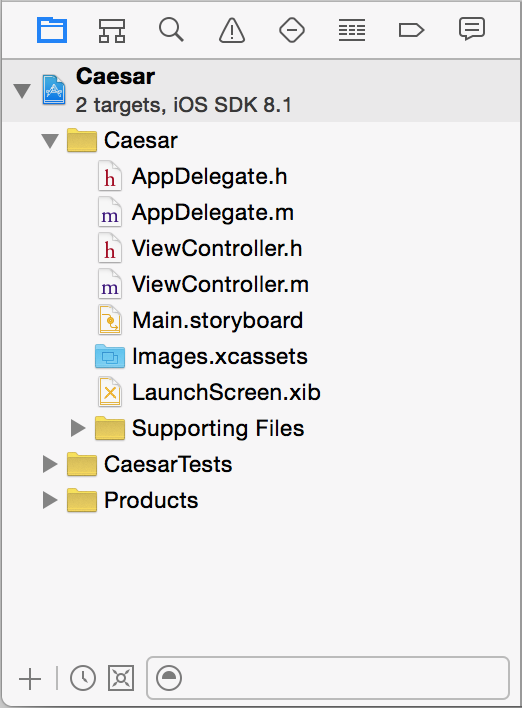
Once you create the project, you’ll see a window with lots of settings, but leave them as they are for now. Instead, turn your attention to the Project navigator on the left side.
-
Among the files are two that correspond to the
AppDelegateclass. An application delegate subclass is created for every new iOS application you create. In general, in this class are methods that control the application’s execution. This includes such things as what to do when the application starts, when it enters and leaves the background, when the system tells it it’s using too much memory, and when it terminates. We won’t make any changes to this class, so feel free to dragAppDelegate.handAppDelegate.mintoSupporting Filesgroup. If you do take a look atSupporting Filesgroup itself, you’ll findmain.m, which contains themainfunction for our app. But we won’t touch it either. -
Next, turn your attention to the
ViewControllerclass. This is our application’s controller. In general, apps have many models, views and controllers, but ours will be very simple, with just one model, one view and one controller. -
Speaking of the model, let’s bring our
Messageclass from theCeasarTestproject we worked on earlier.In the file menu, choose File > Add Files to “Caesar”…, then navigate to
Message.handMessage.mthat you worked on earlier. Make sure that both of them are selected and that the checkbox next to Copy items if needed is checked. After you add the two files that correspond to the model, select them both in the Project navigator on the left, right-click on them and choose New Group from Selection. Name that groupModel, so as to end up with the organization of files like in the screenshot below. It’s not strictly necessary to have our files organized in such a way, but it’ll make working on our app a bit easier.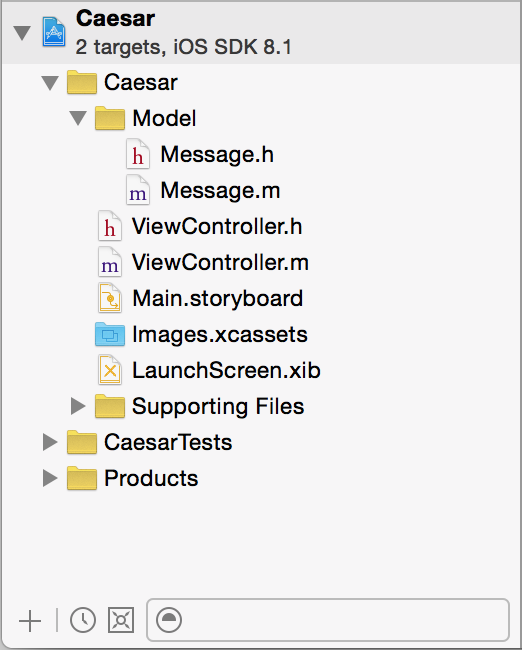
-
You can actually compile run the project right now by pressing the Run button. Xcode with open the iOS Simulator, but all you’ll see is a blank screen:
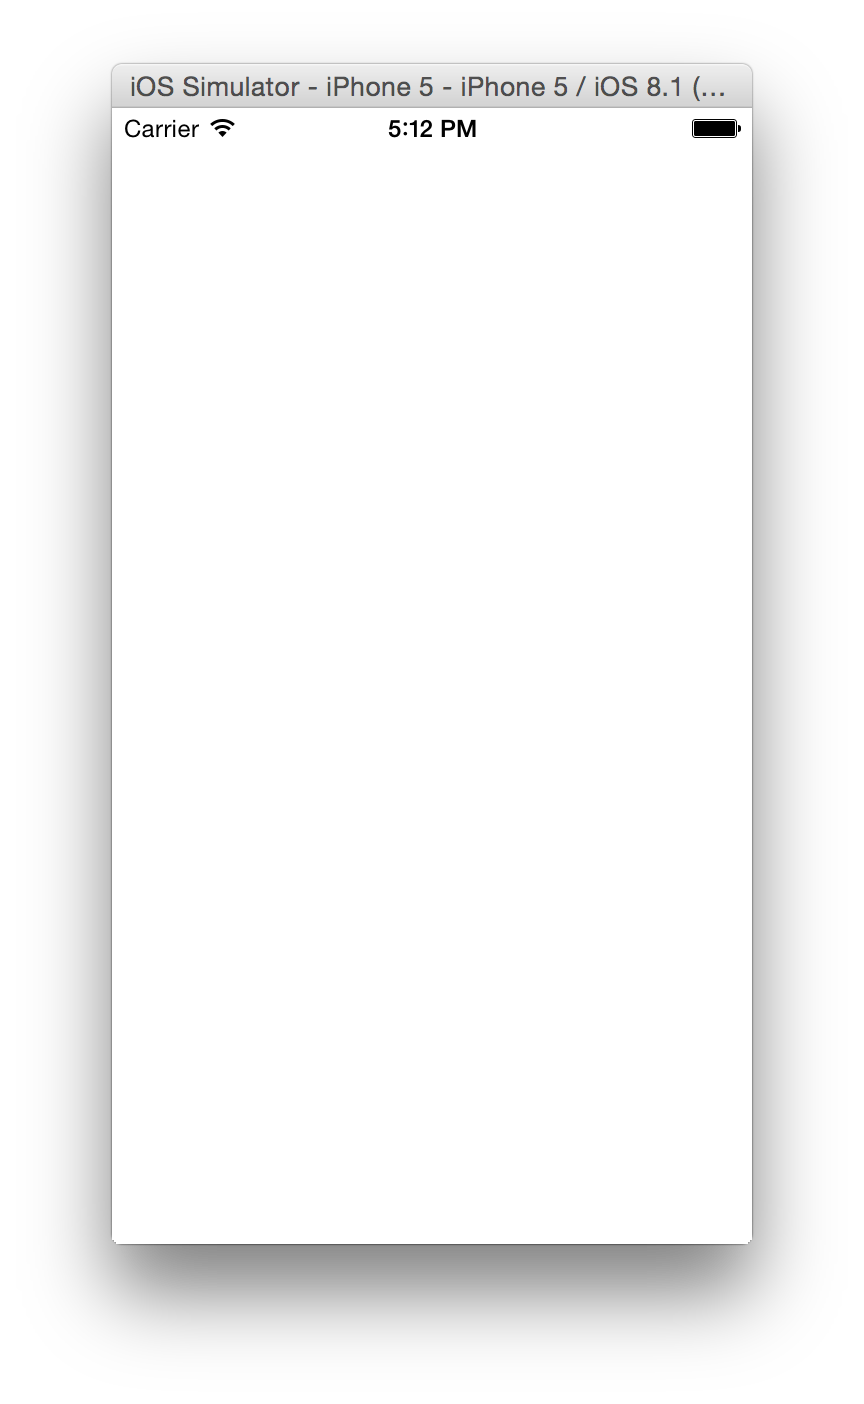
You can actually switch devices in the iOS Simulator (e.g. between iPhone 5, iPhone 6 and iPad). Just choose Hardware > Device and select the device you want to test on. You can also test on a real device, but you’ll have to enroll in the iOS Developer Program to do that.
Interface Builder
-
Now let’s work on the view. Select
Main.storyboardfrom the Project navigator and you should see a window that looks something like this:
-
Building the user interface of our application will be much easier than writing the model. It mostly consists of dragging and dropping UI elements on the canvas. Literally.
-
This view is the representation of the device’s screen when the application runs. In the past, this would actually be a rectangle of the same dimensions as an iPhone’s screen. But know an iPhone can have four different screen sizes, so Apple has introduced Auto Layout mechanism, whereby we can add constraints to objects, so that our app looks right on any device.
-
Let’s begin by changing the background of our view to light gray. Click in the middle of the white square to select the view. Then click on the dropdown menue next to Background in the Attributes inspector of the Utilities area on the right side.
Choose Other and select a very light gray color (about 5%) from the color palette.
-
Our application will have these UI elements:
-
Two text views: one for inputting the original message, and another one for diplaying the encrypted or decrypted message.
-
A slider to select the key from 0 to 26.
-
A label to display the current value of the key.
-
A segmented control to let the user choose between encryption and decryption.
-
-
Let’s start with the slider. Click on
 in the lower part of the Utilities area to switch to the Object library. You’ll see a selection of many different UI elements. To quickly find the slider, type slider in the text field on the bottom of the Utilities area. Drag it and drop it somewhere in the middle of the view, then stretch it horizontally to match the below screenshot. Then click on the slider and set its maximum value to 26 in the Attributes inspector of the Utilities area on the right side.
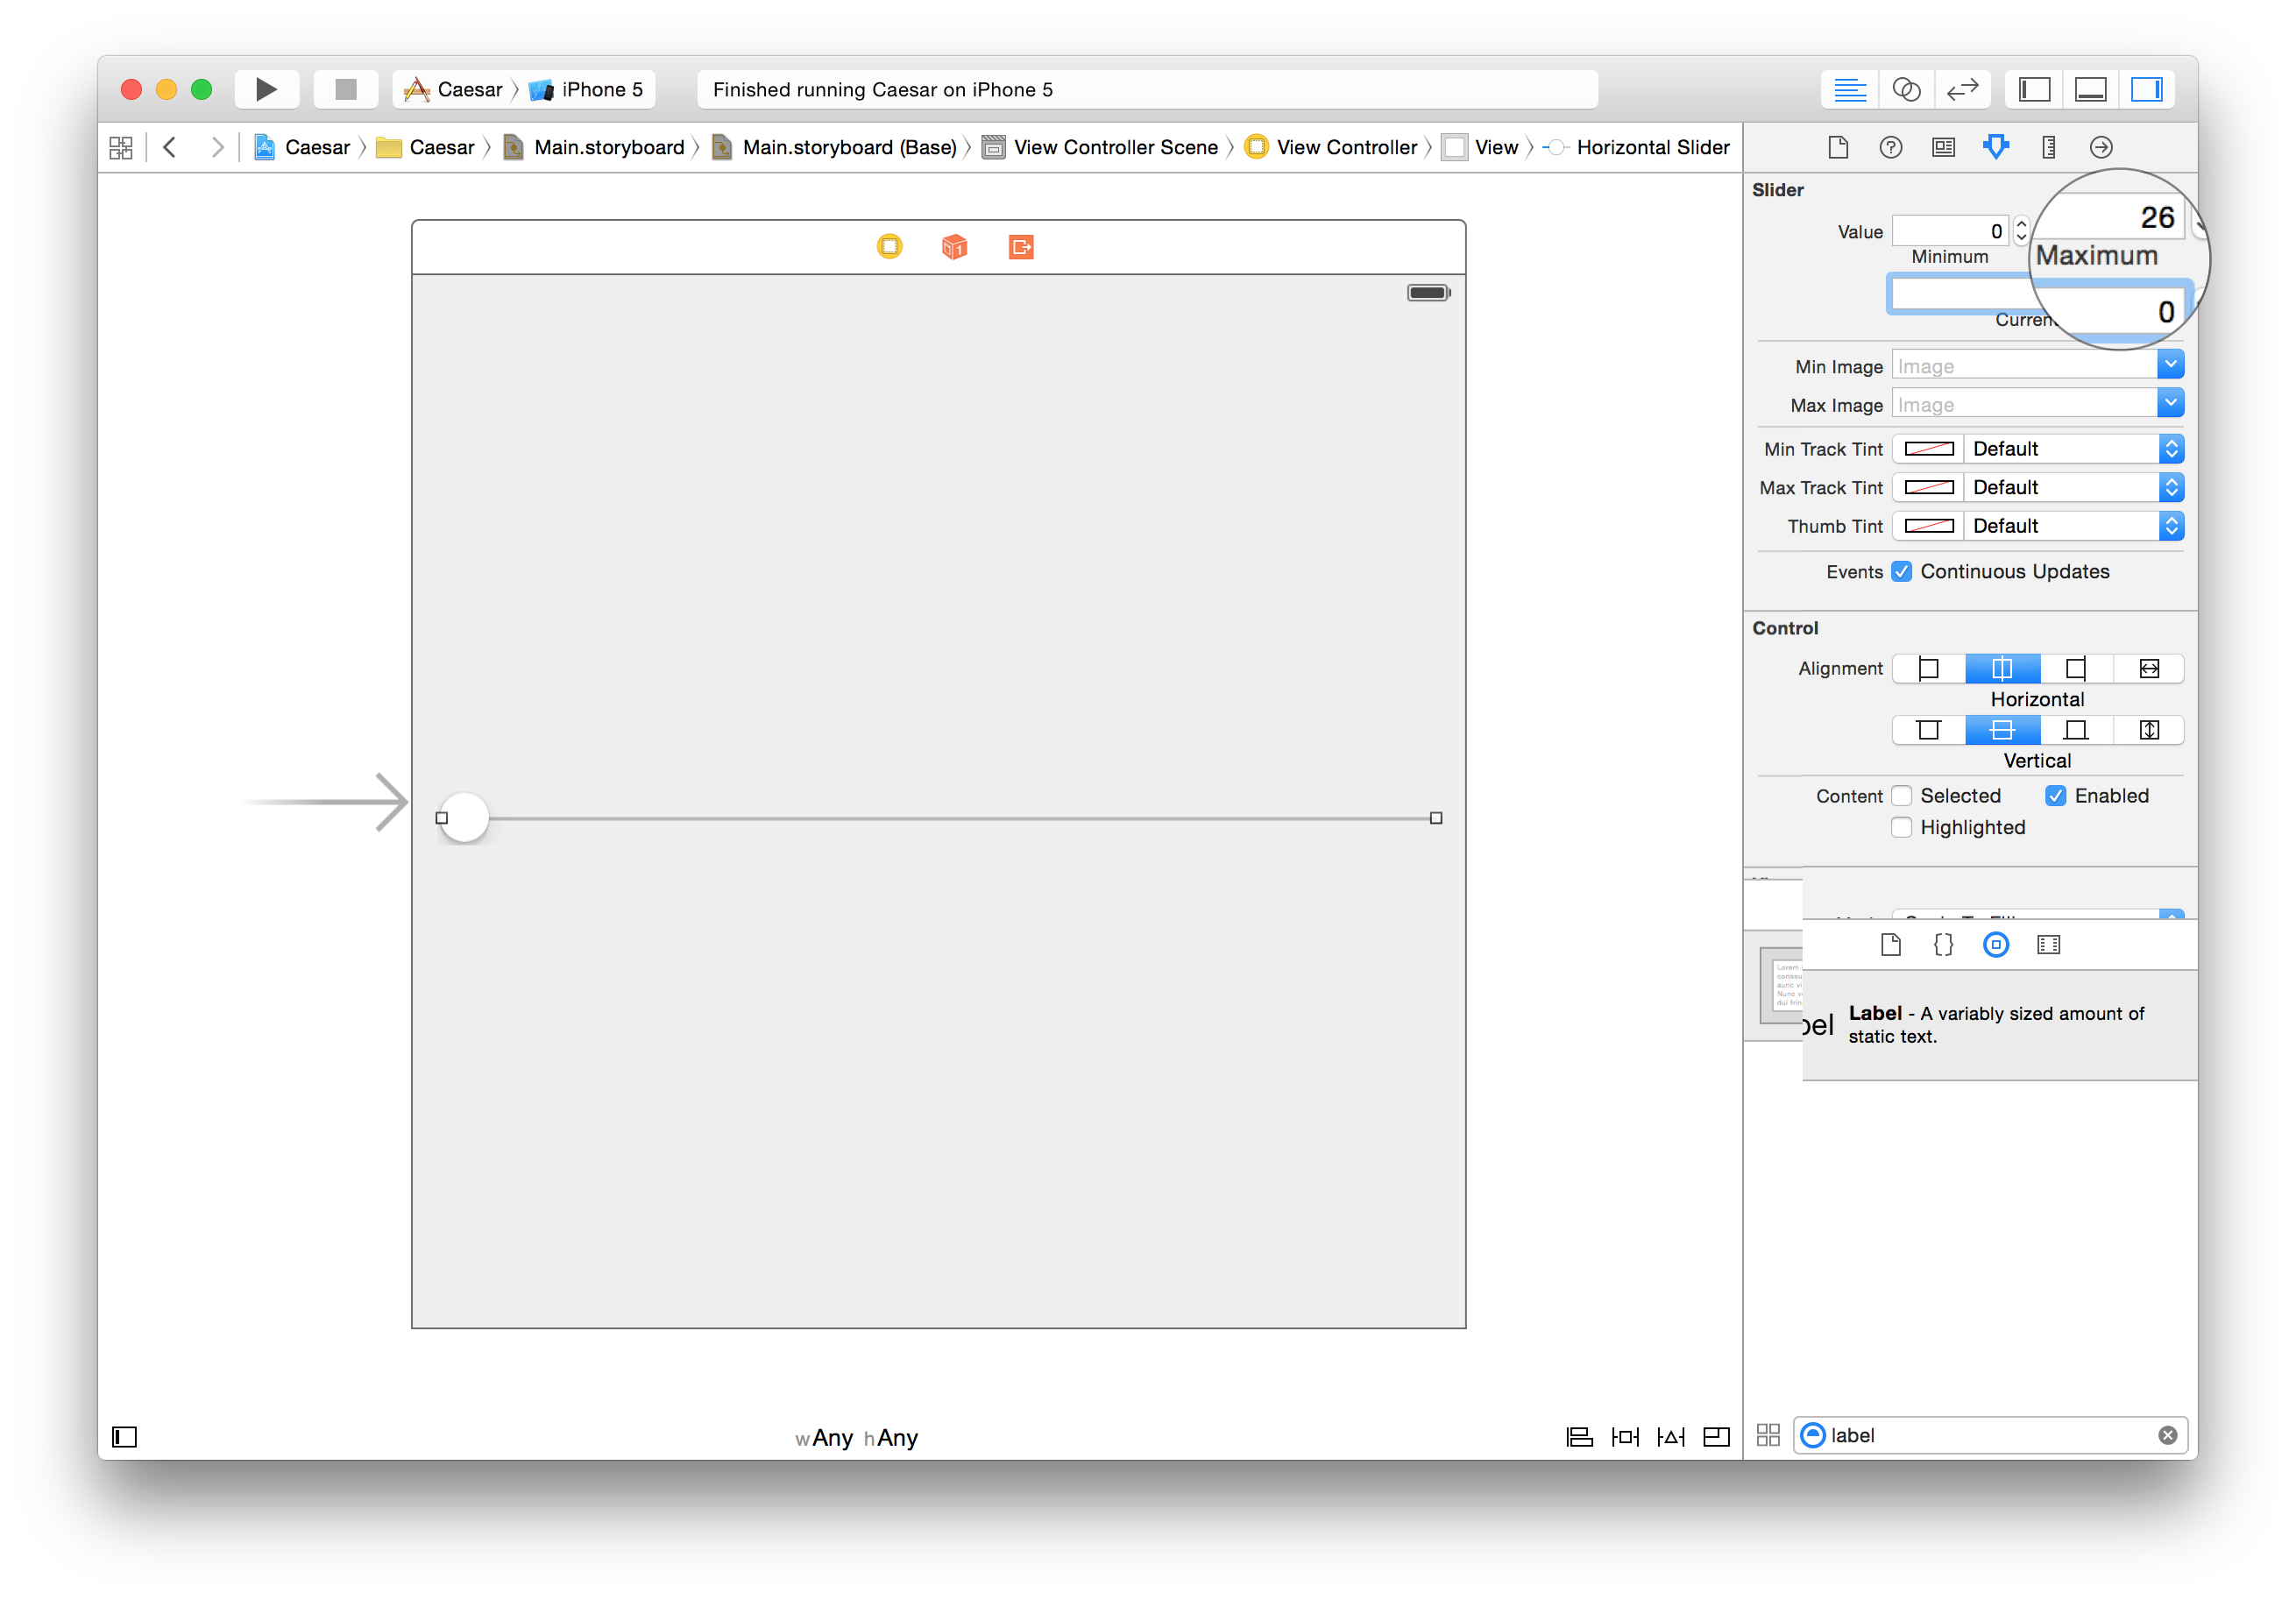
-
Now let’s get two text views. Go back to the Object library in the lower part of the Utilities area and search for a text view. Place two text views in the view: one above the slider (for the original message) and one below the slider (for the encrypted/decrypted message). Then strech them, leaving some space between the upper text view and the slider for a segmented control and a label.
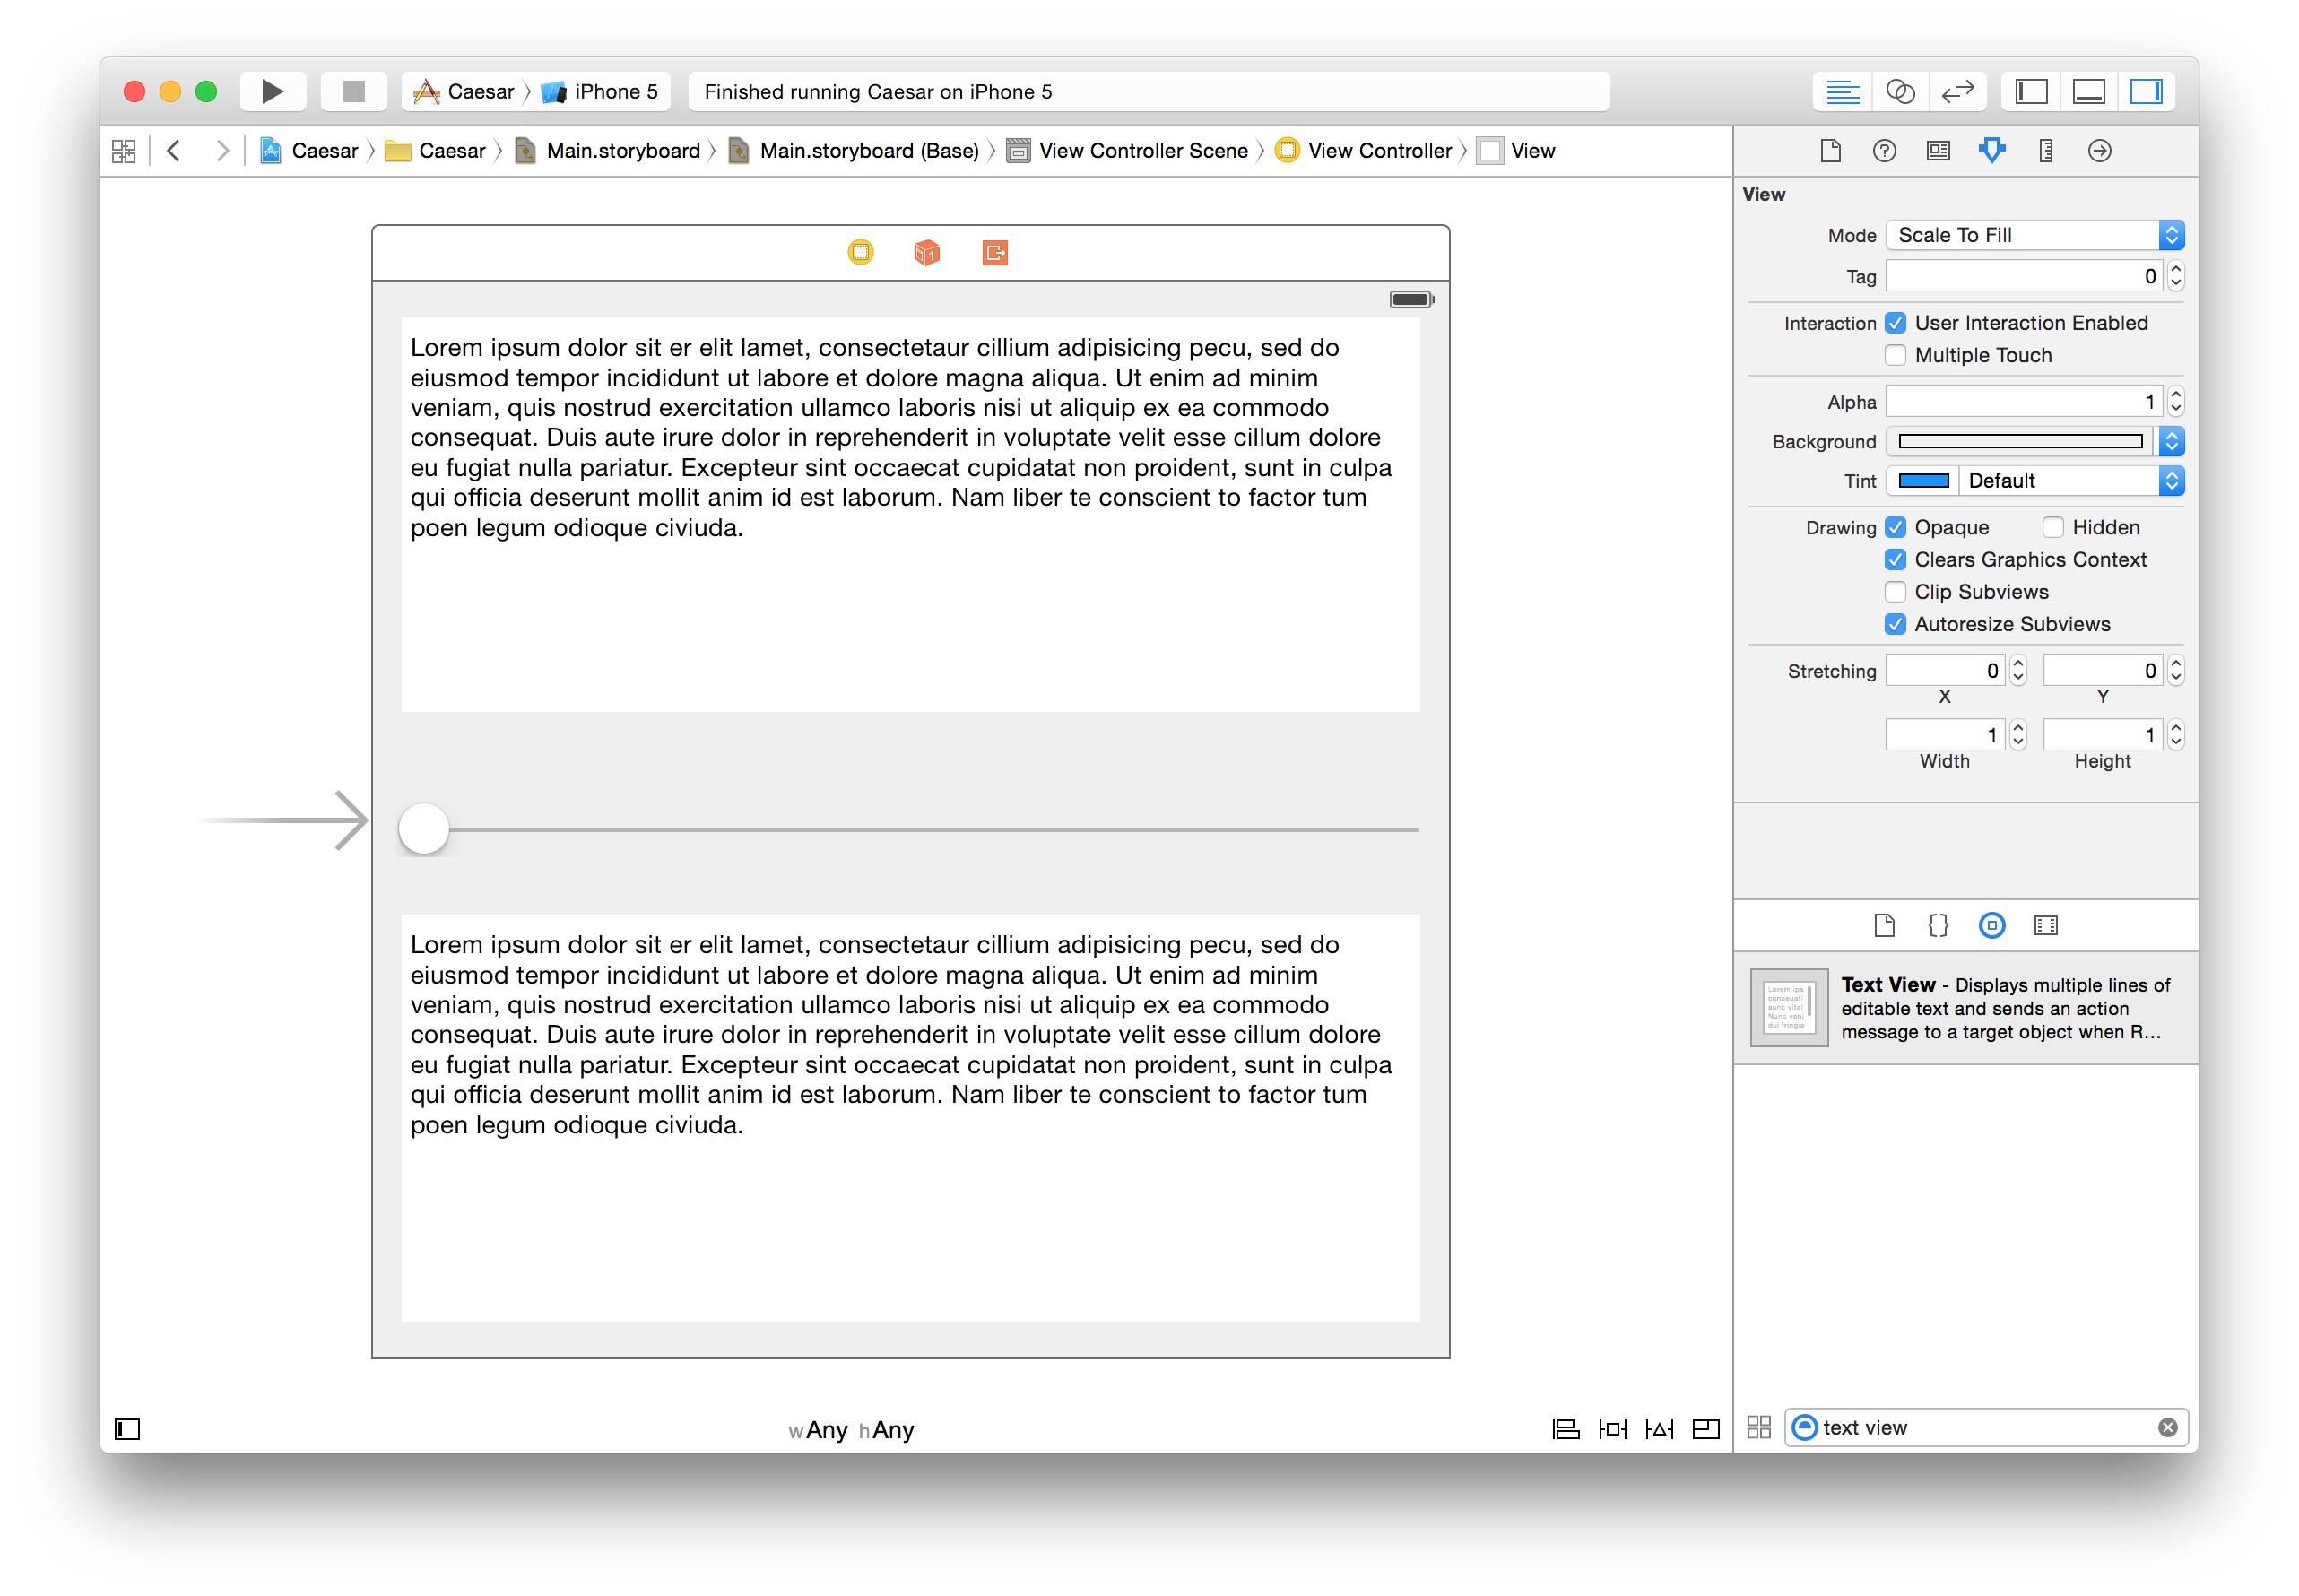
Double-click on each text view and type
Hello World!to set their default text. Then click on the lower text view and uncheck Editable next to Behavior in the Attributes inspector of the Utilities area on the right side. This will prevent the user from being able to edit the resulting message.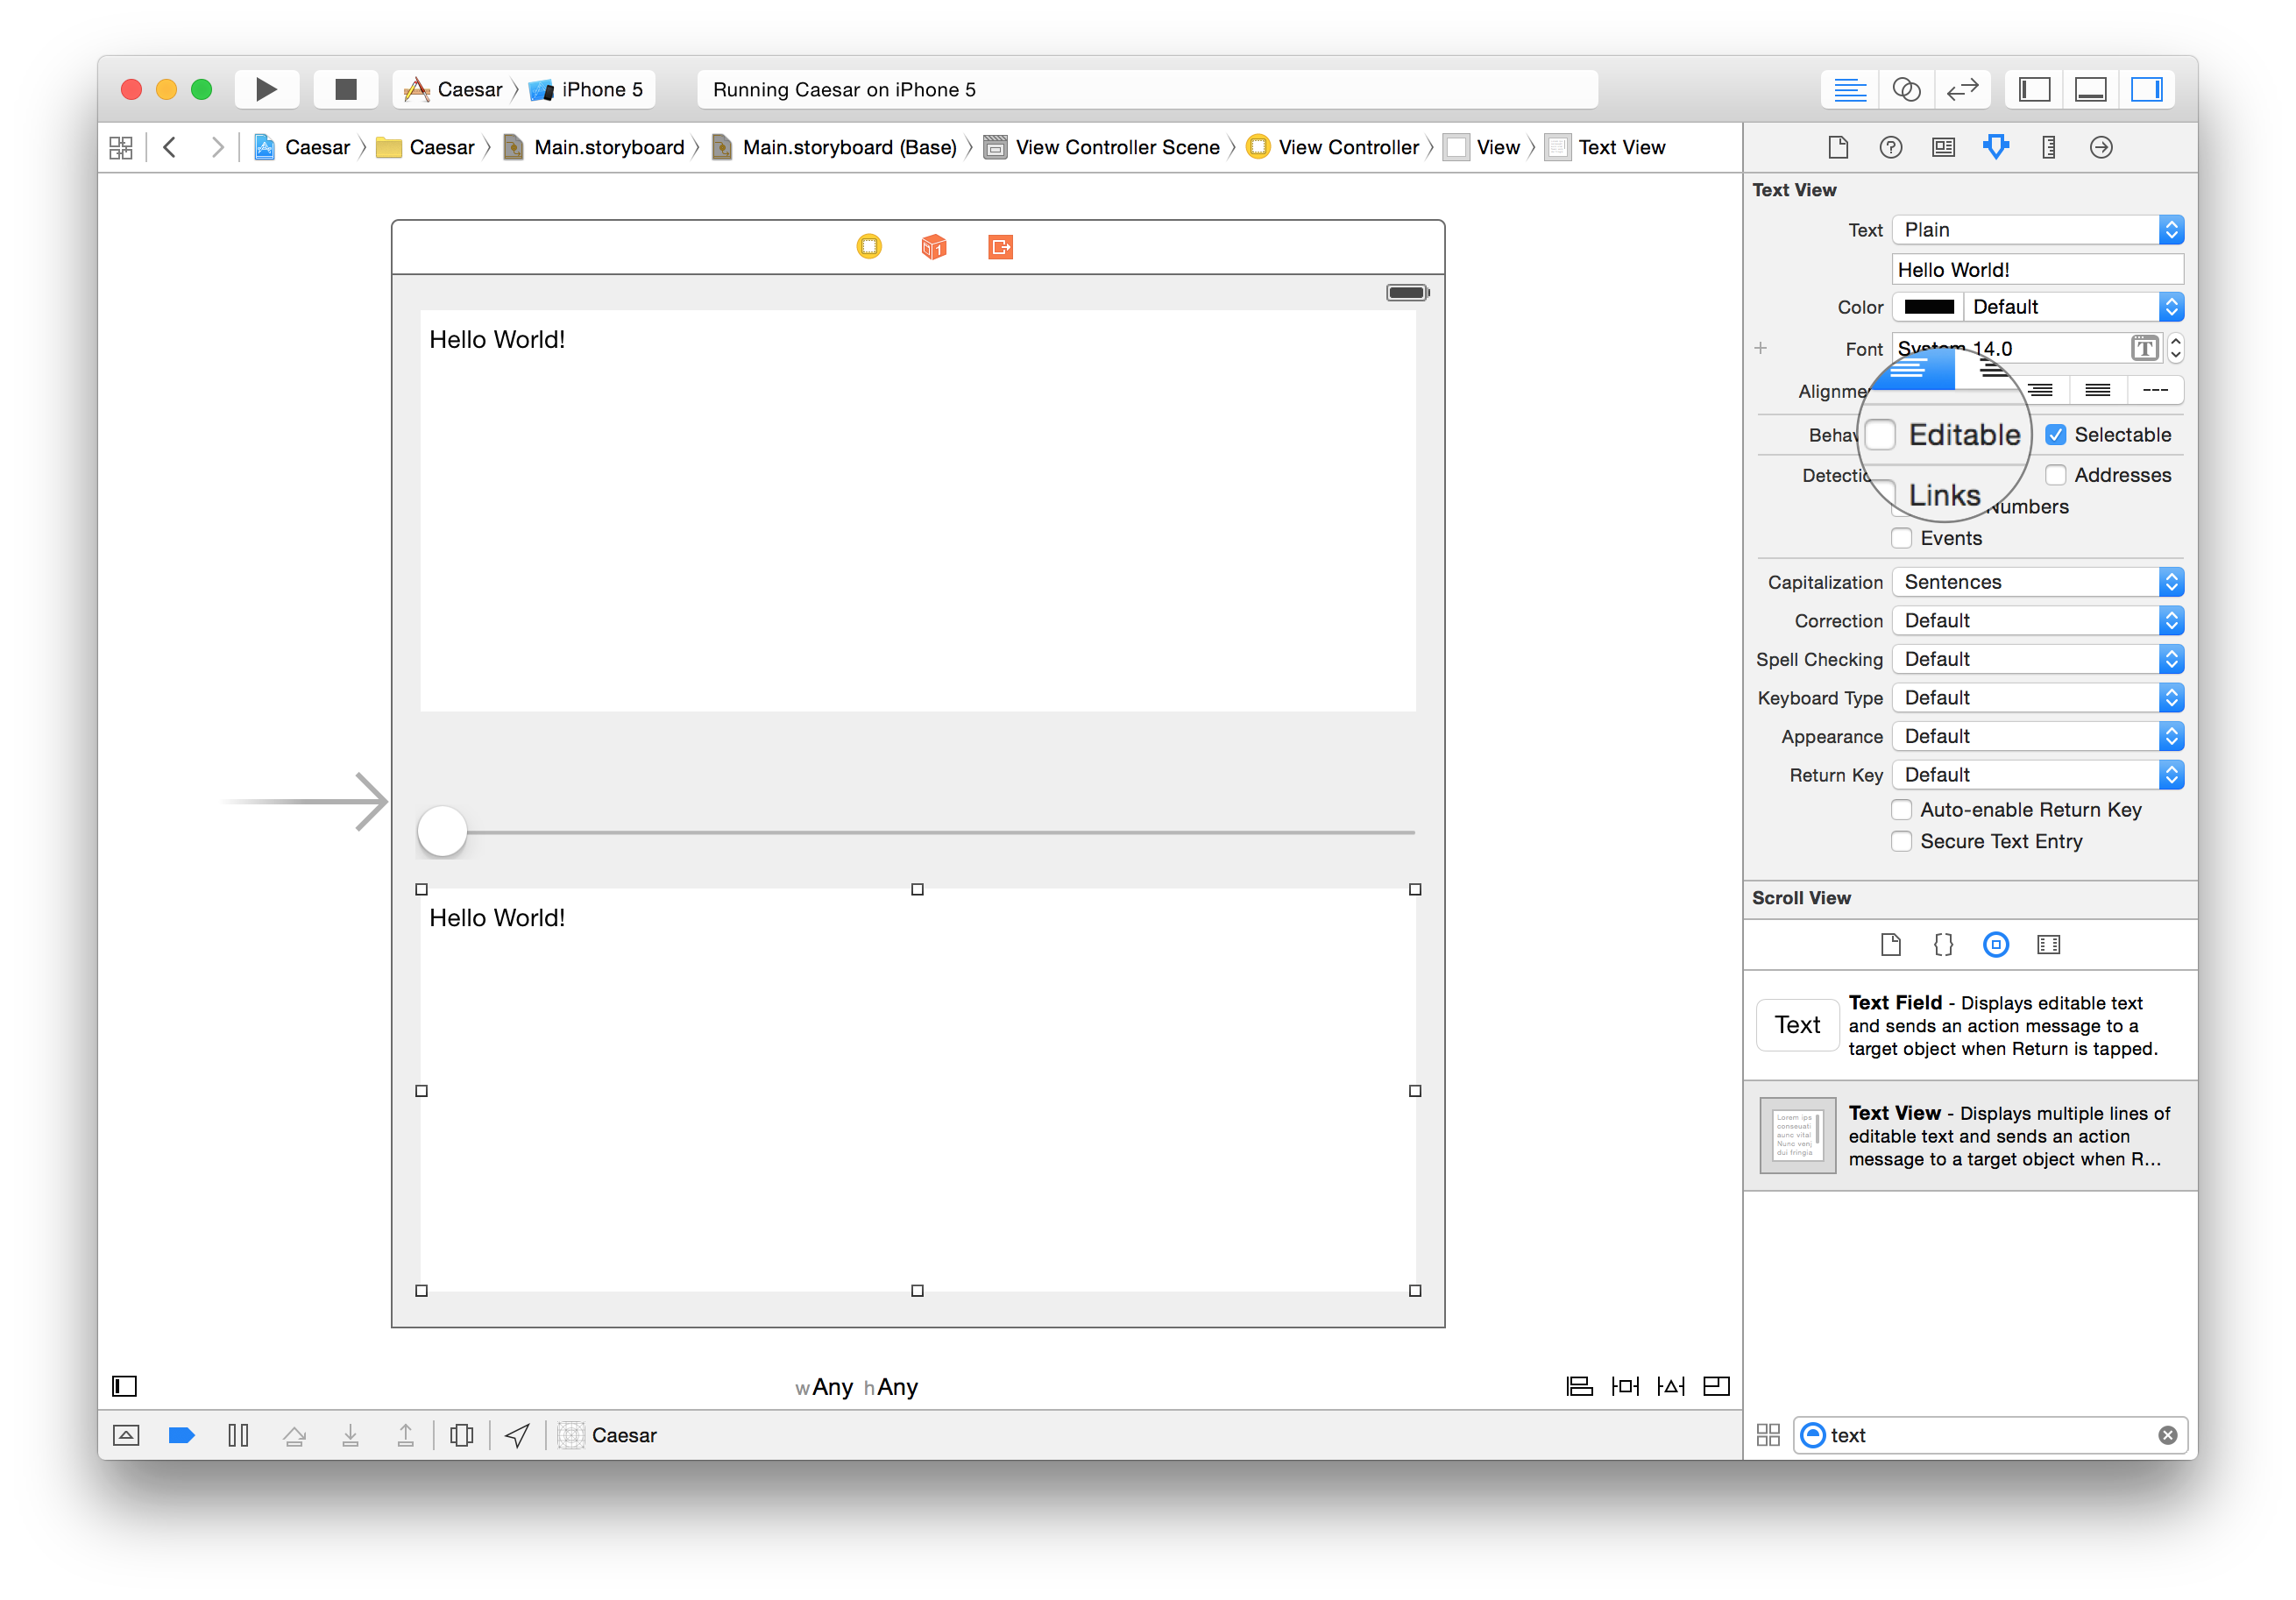
-
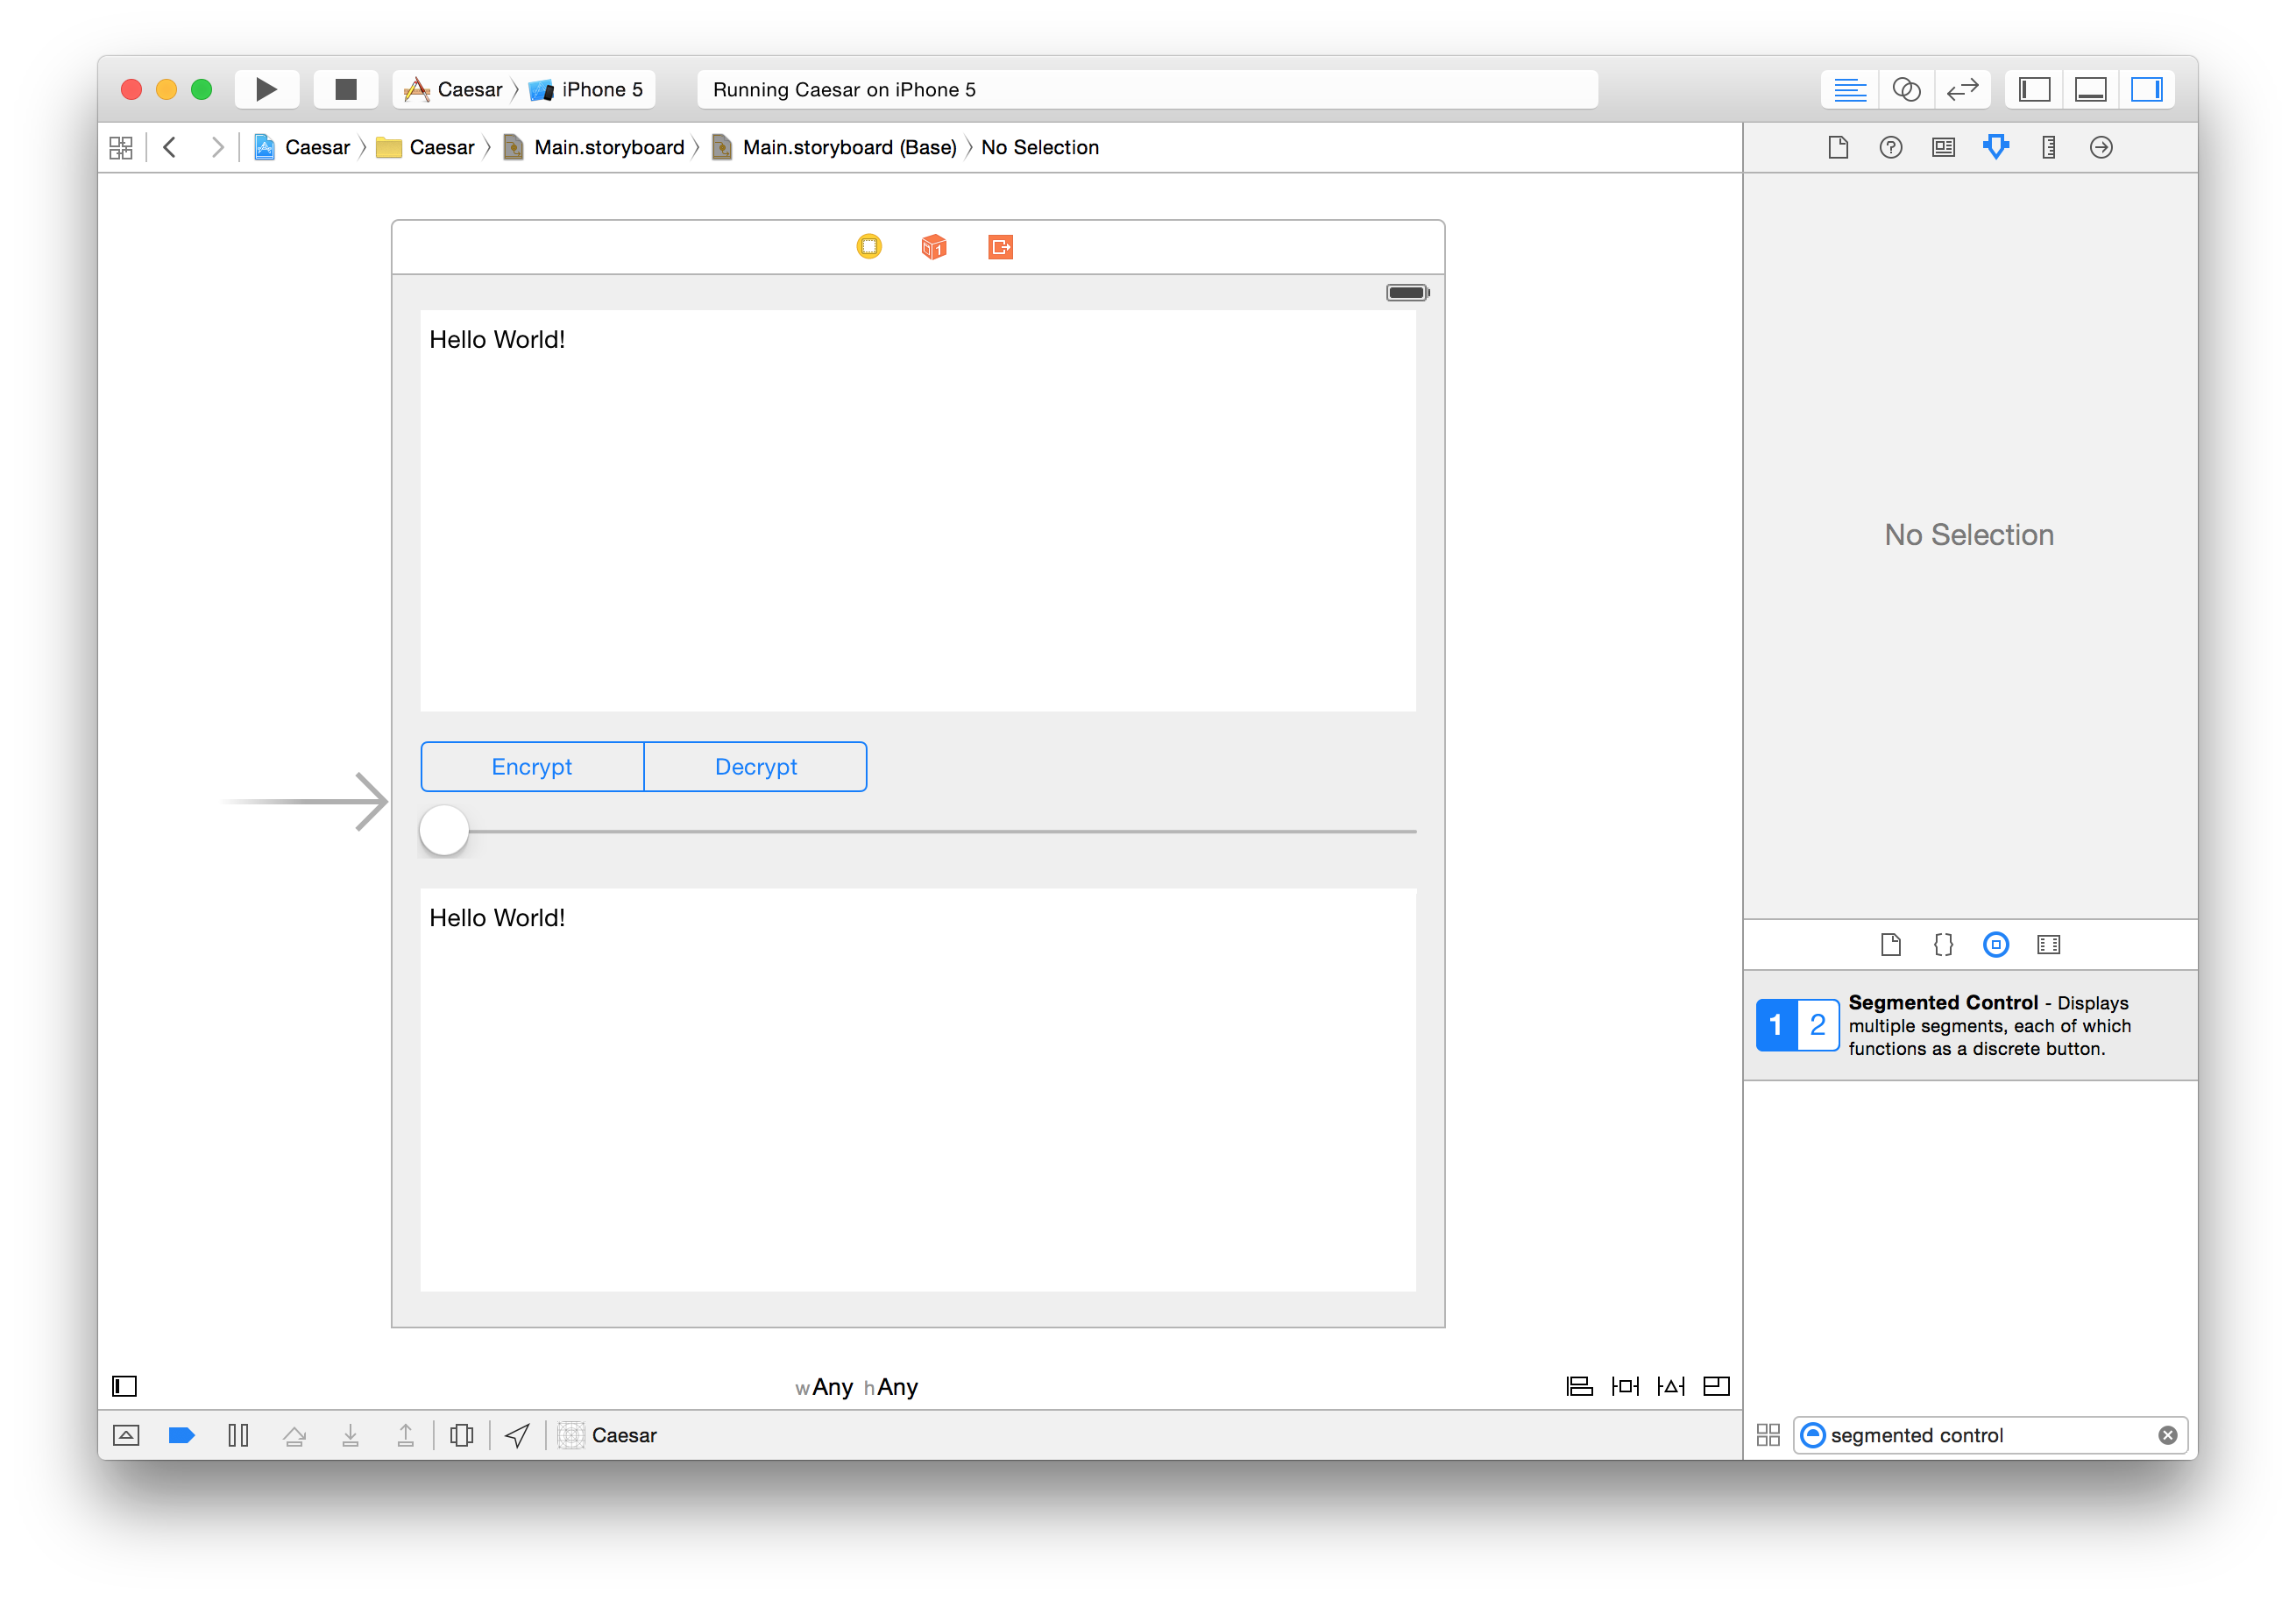
We also need a segmented control that will allow the user to switch between encryption and decryption. Search for the segmeted control in the Object library and place it above the slider toward the left. Stretch it to make it take the left half of the remaining space. Then double-click on First and type Encrypt and double-click on Second and type Decrypt.
-
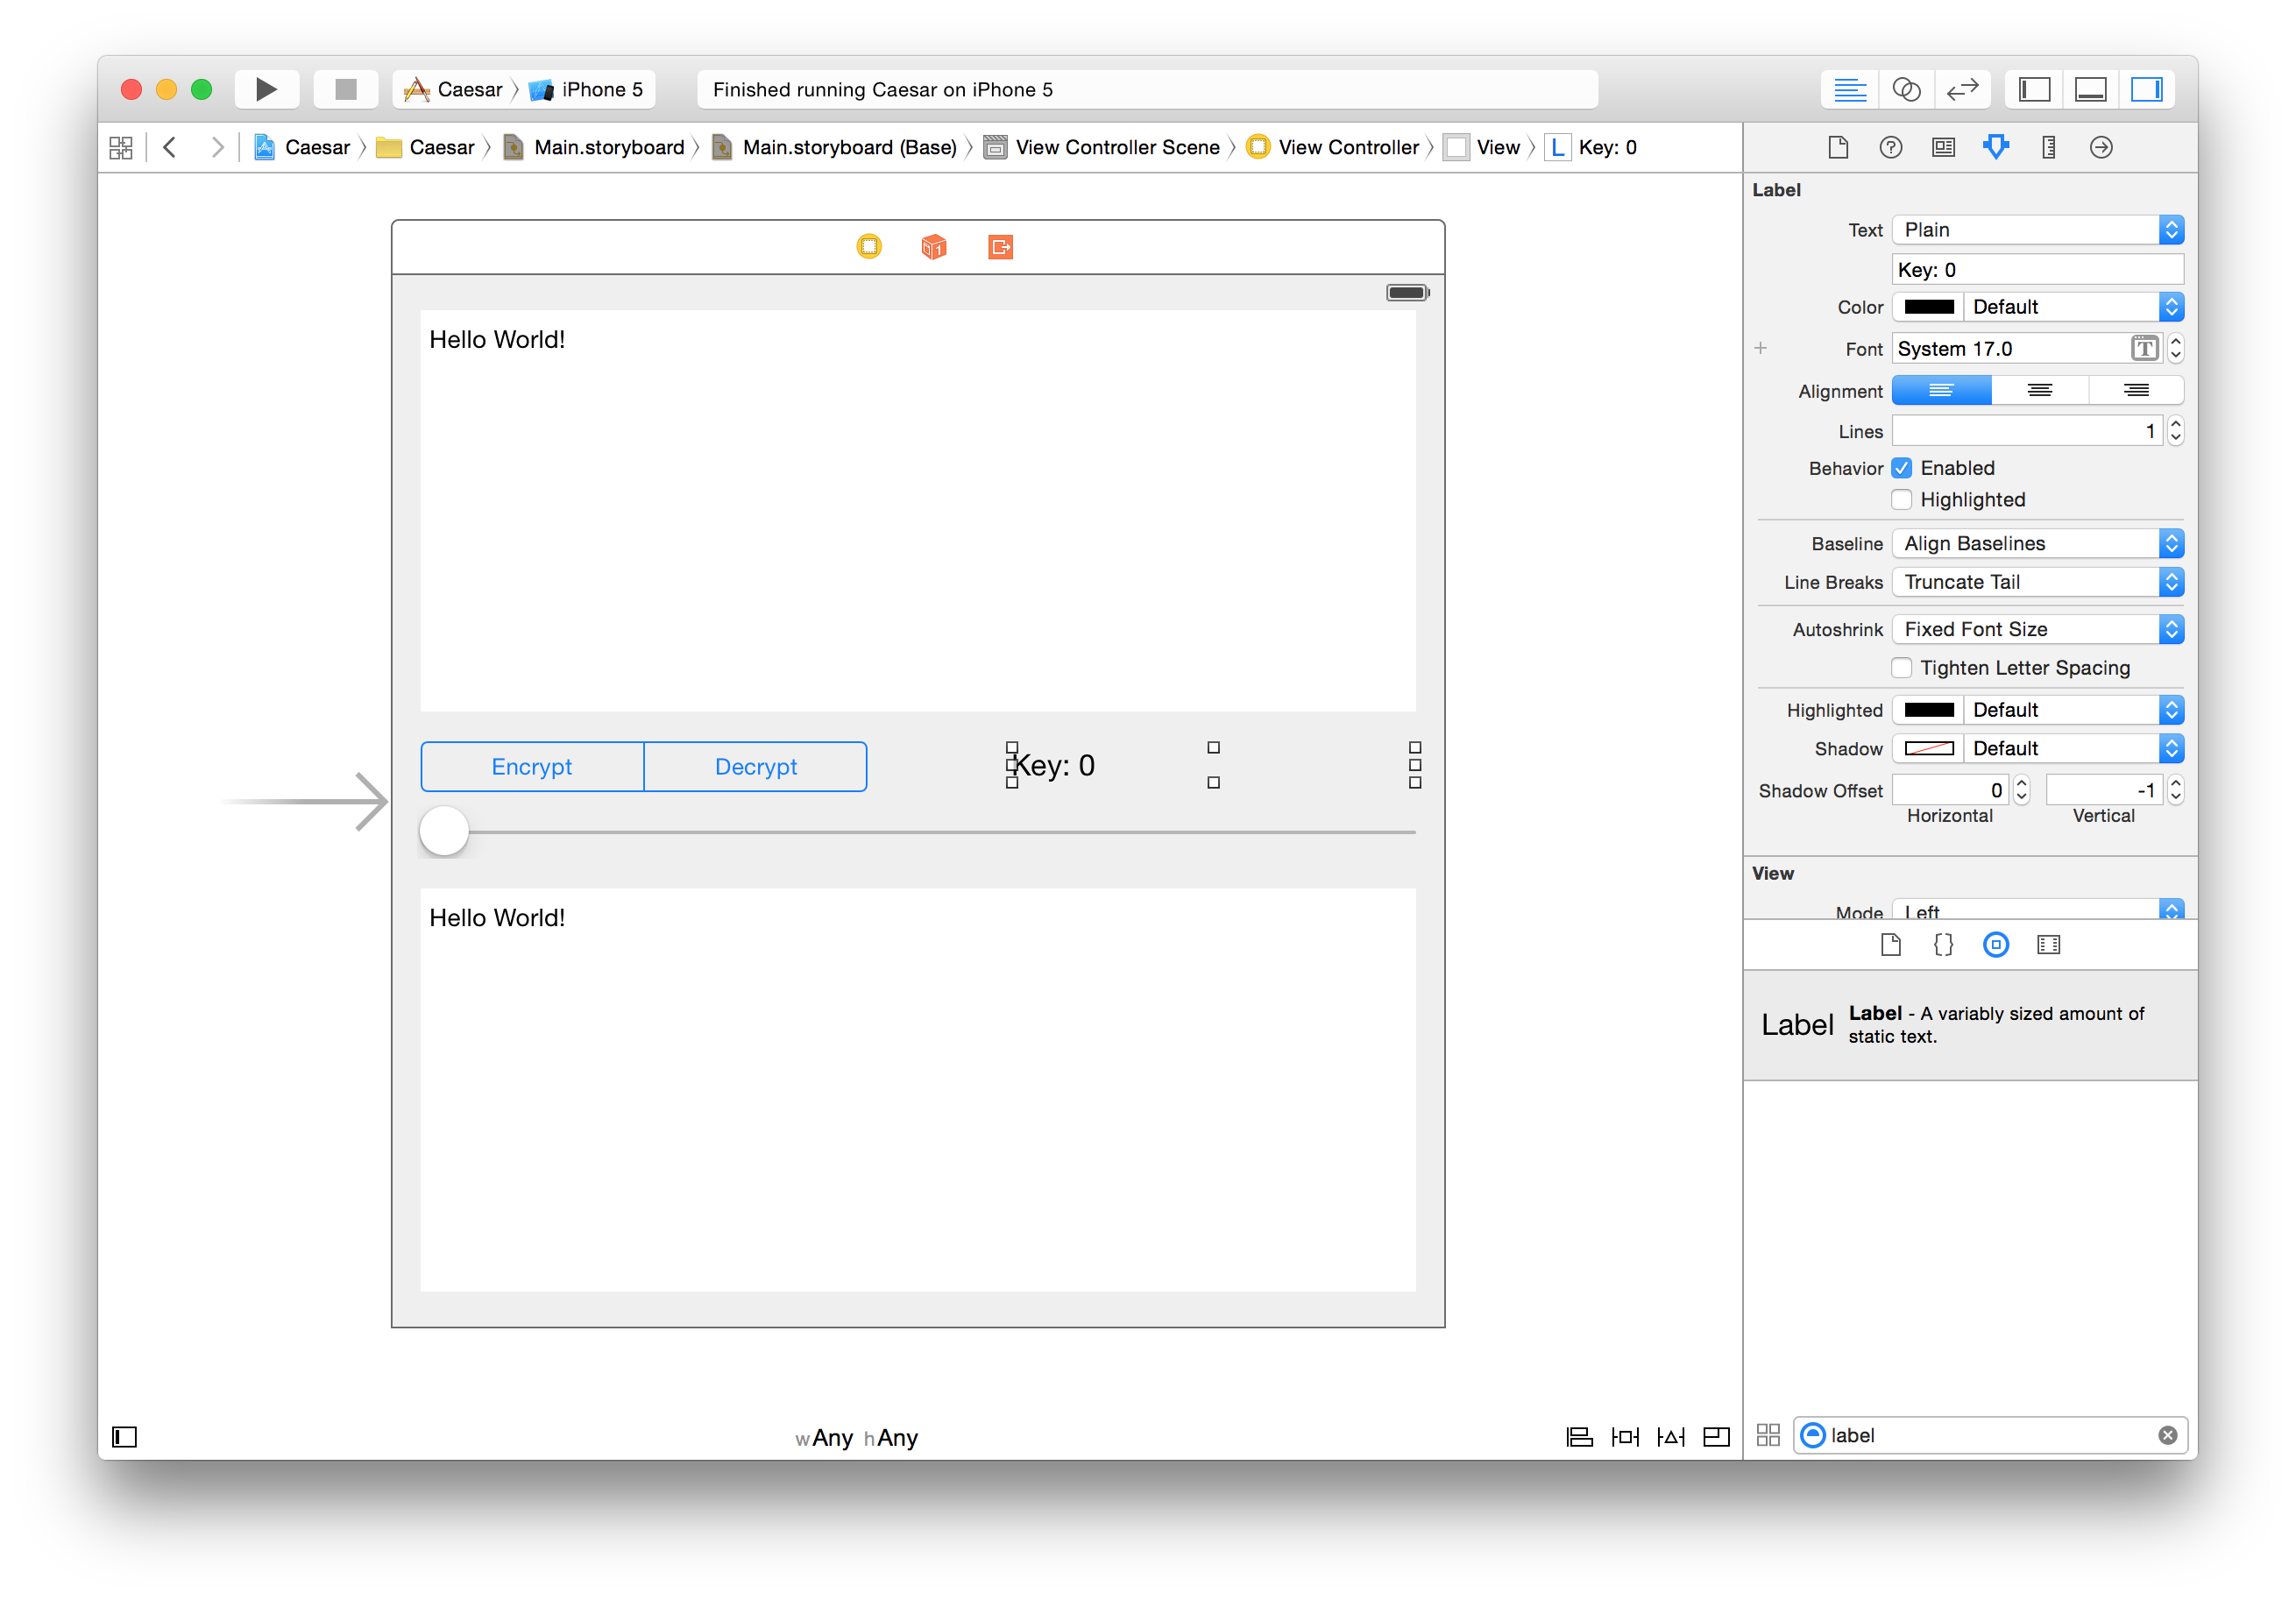
Finally, search for a label in the Object library and place it to the right of the segmented control. Also stretch it to take the remaining space. Double-click on it and type Key: 0 to set its default value.
-
If we now try to run the app in the simulator, we’ll see the UI elements we’ve added, but they will most likely not be properly layed out:
-
So let’s add some constraints:
-
Click on the upper text view. Then click on the Pin icon that looks like
 . In the Add New Constraints dialog, click on the four icons that look like
  to set the constraints around the text view. Then set a fixed values for the leading (left), trailing (right), top and bottom distances (0, 0, 0 and 20 points, respectively). To finish, click Add 4 Constraints.
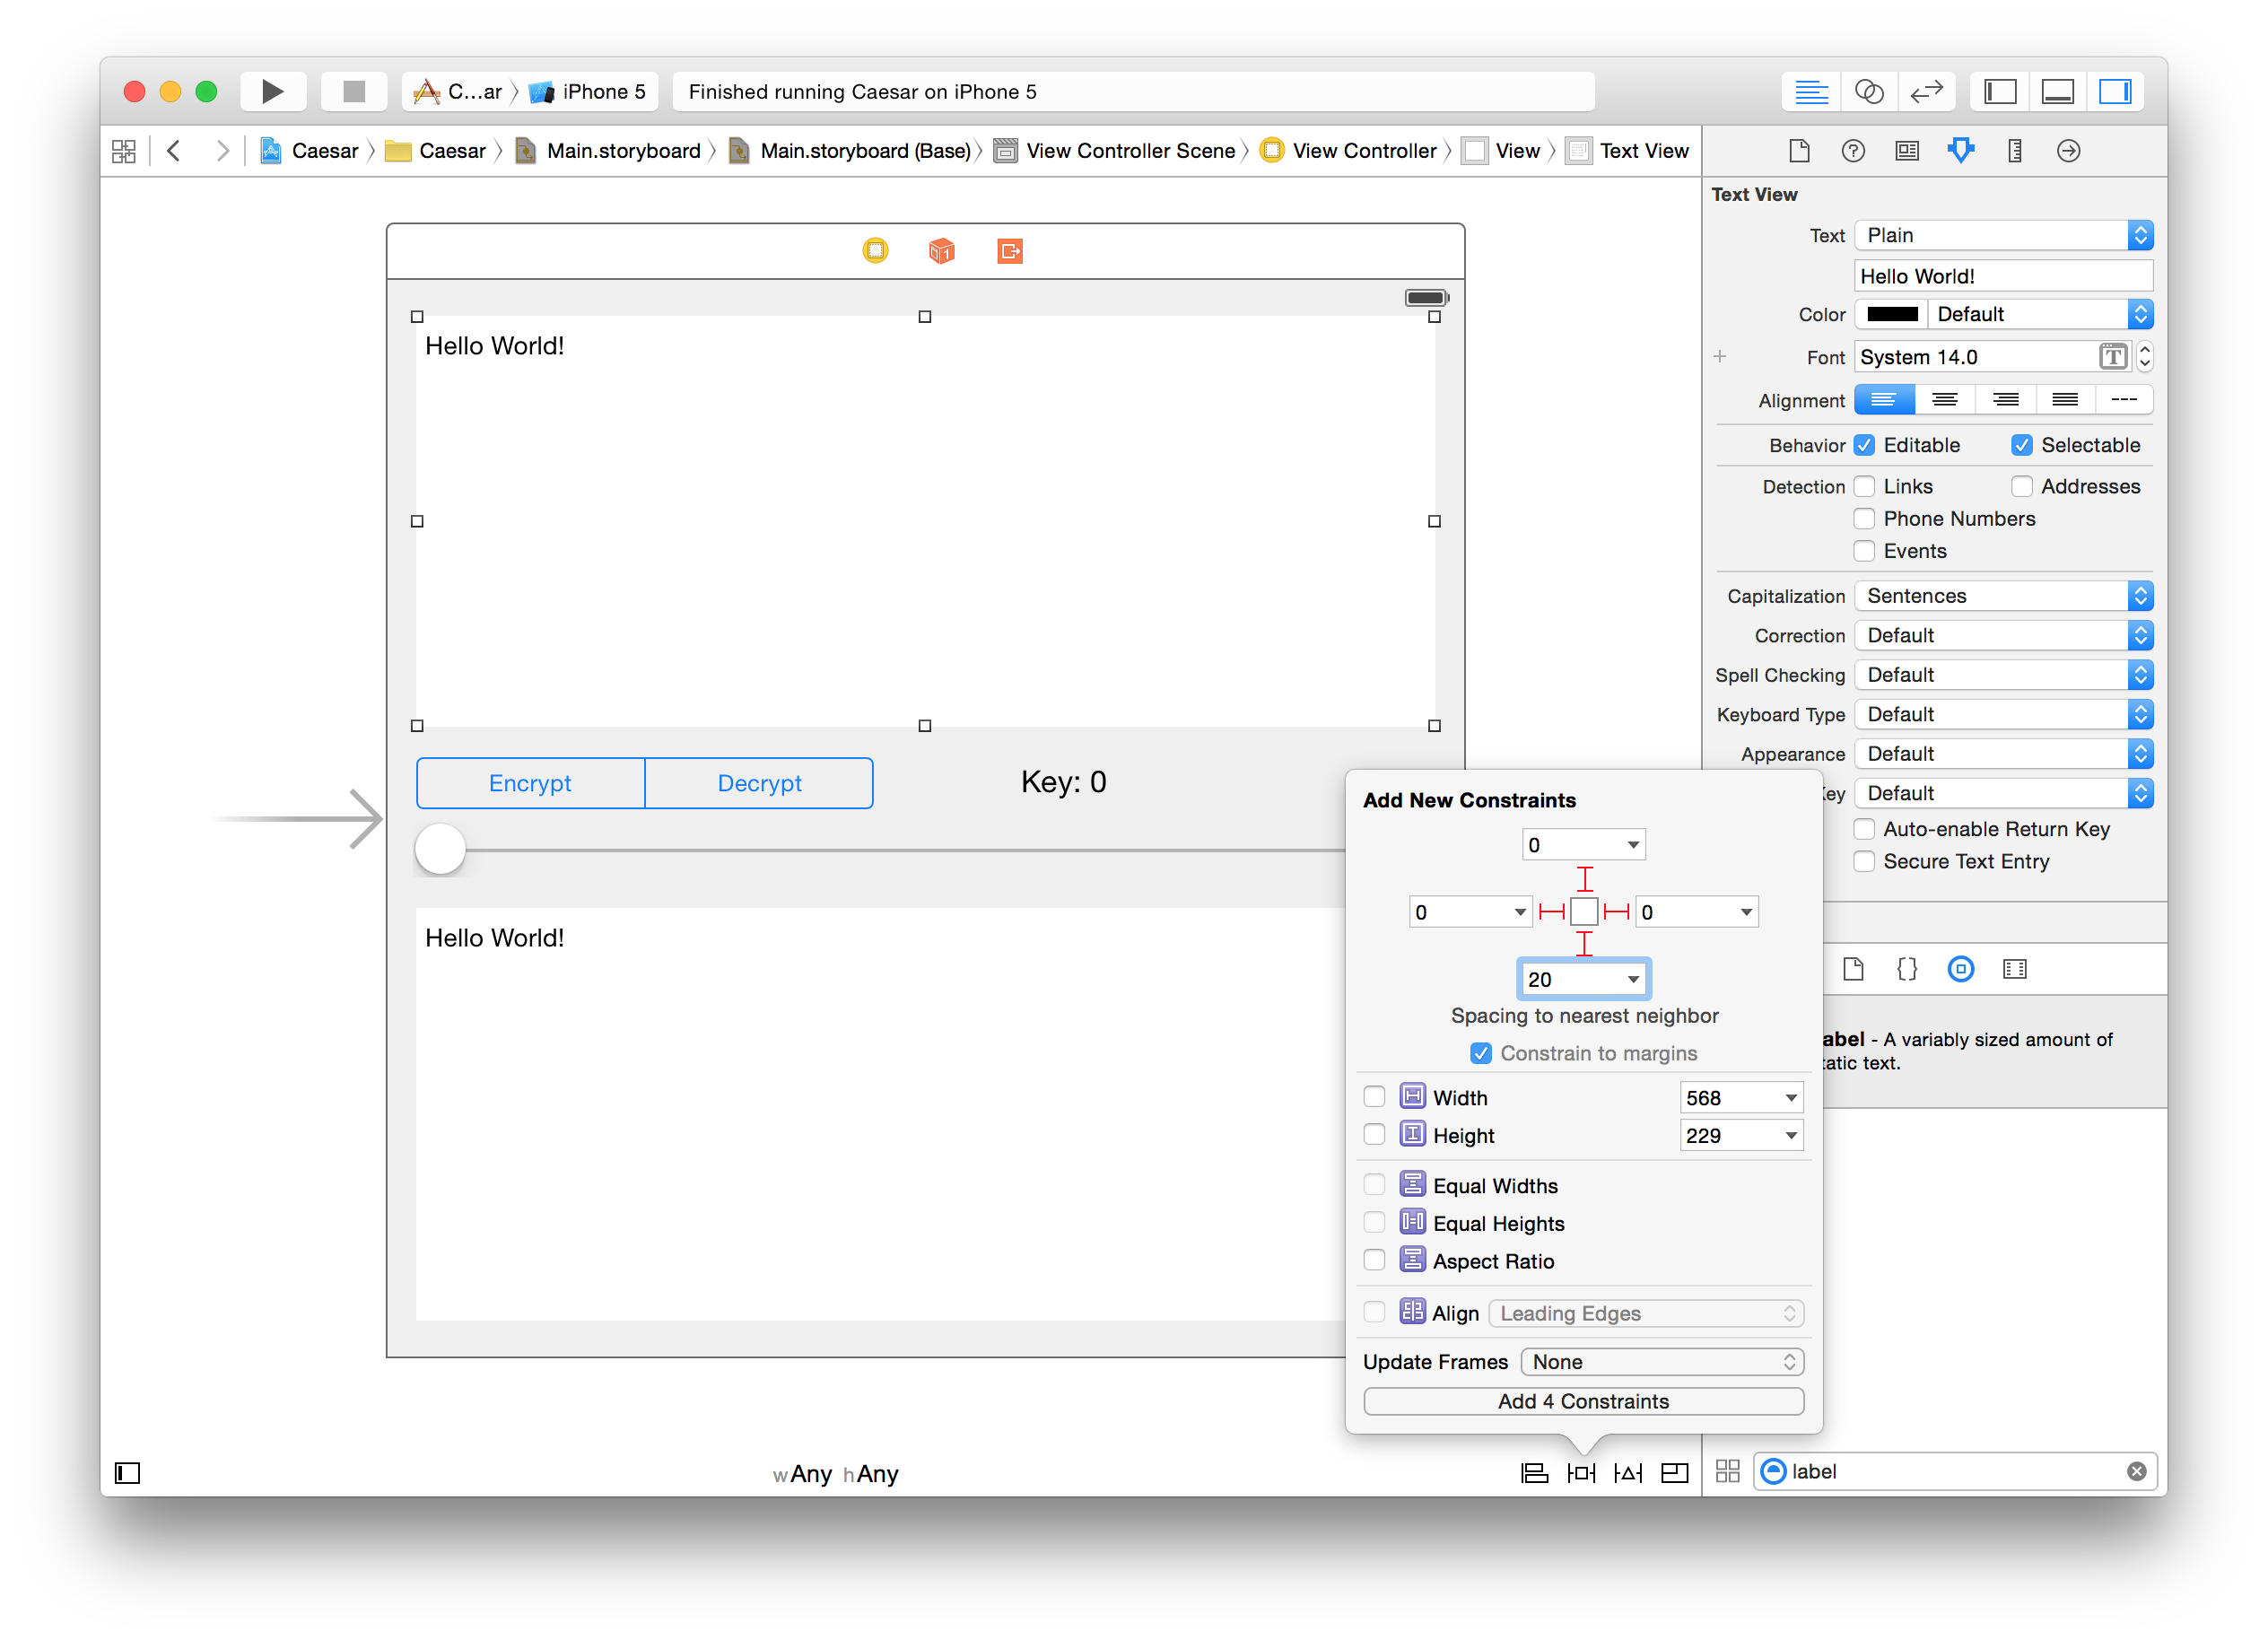
-
Click on the segmented control. Just like you did for the text view, click on the Pin icon that looks like
and click on the four icons that look like to set the constraints around the text view. But this time, set a values of 20 above and below, 0 for the left and 40 for the right, then click Add 4 Constraints.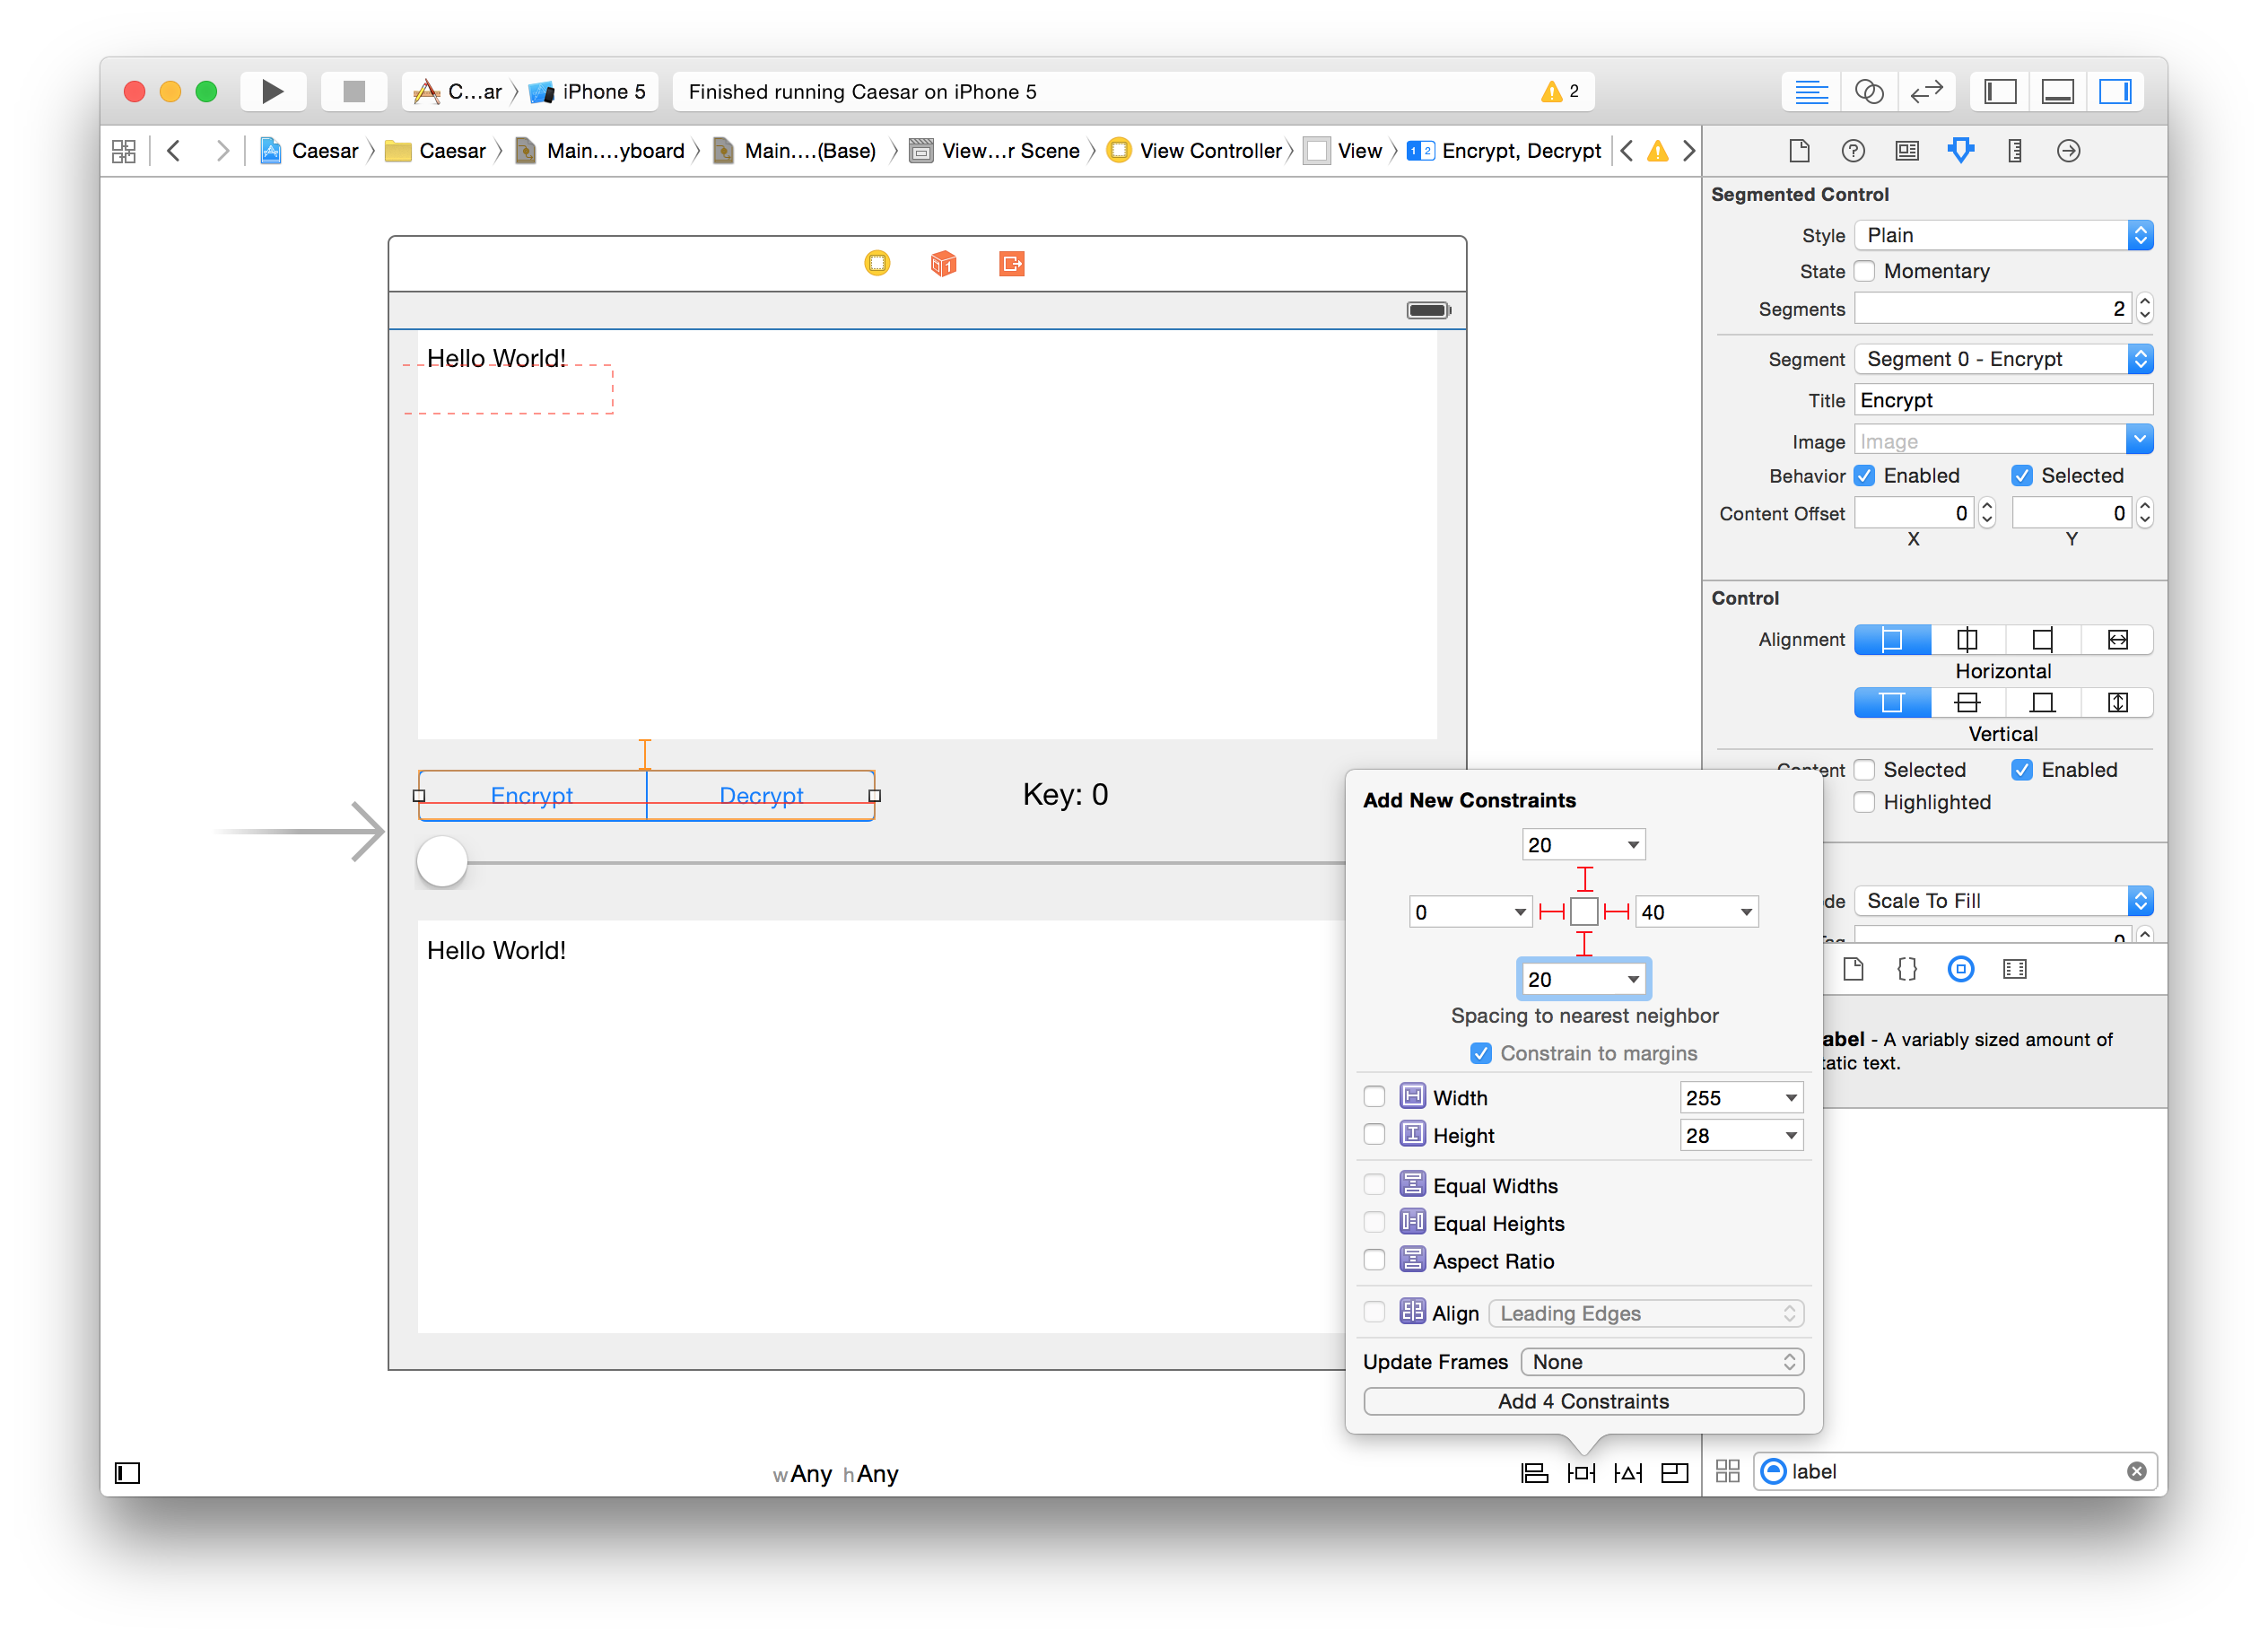
-
Click on the label and click on the Pin icon (
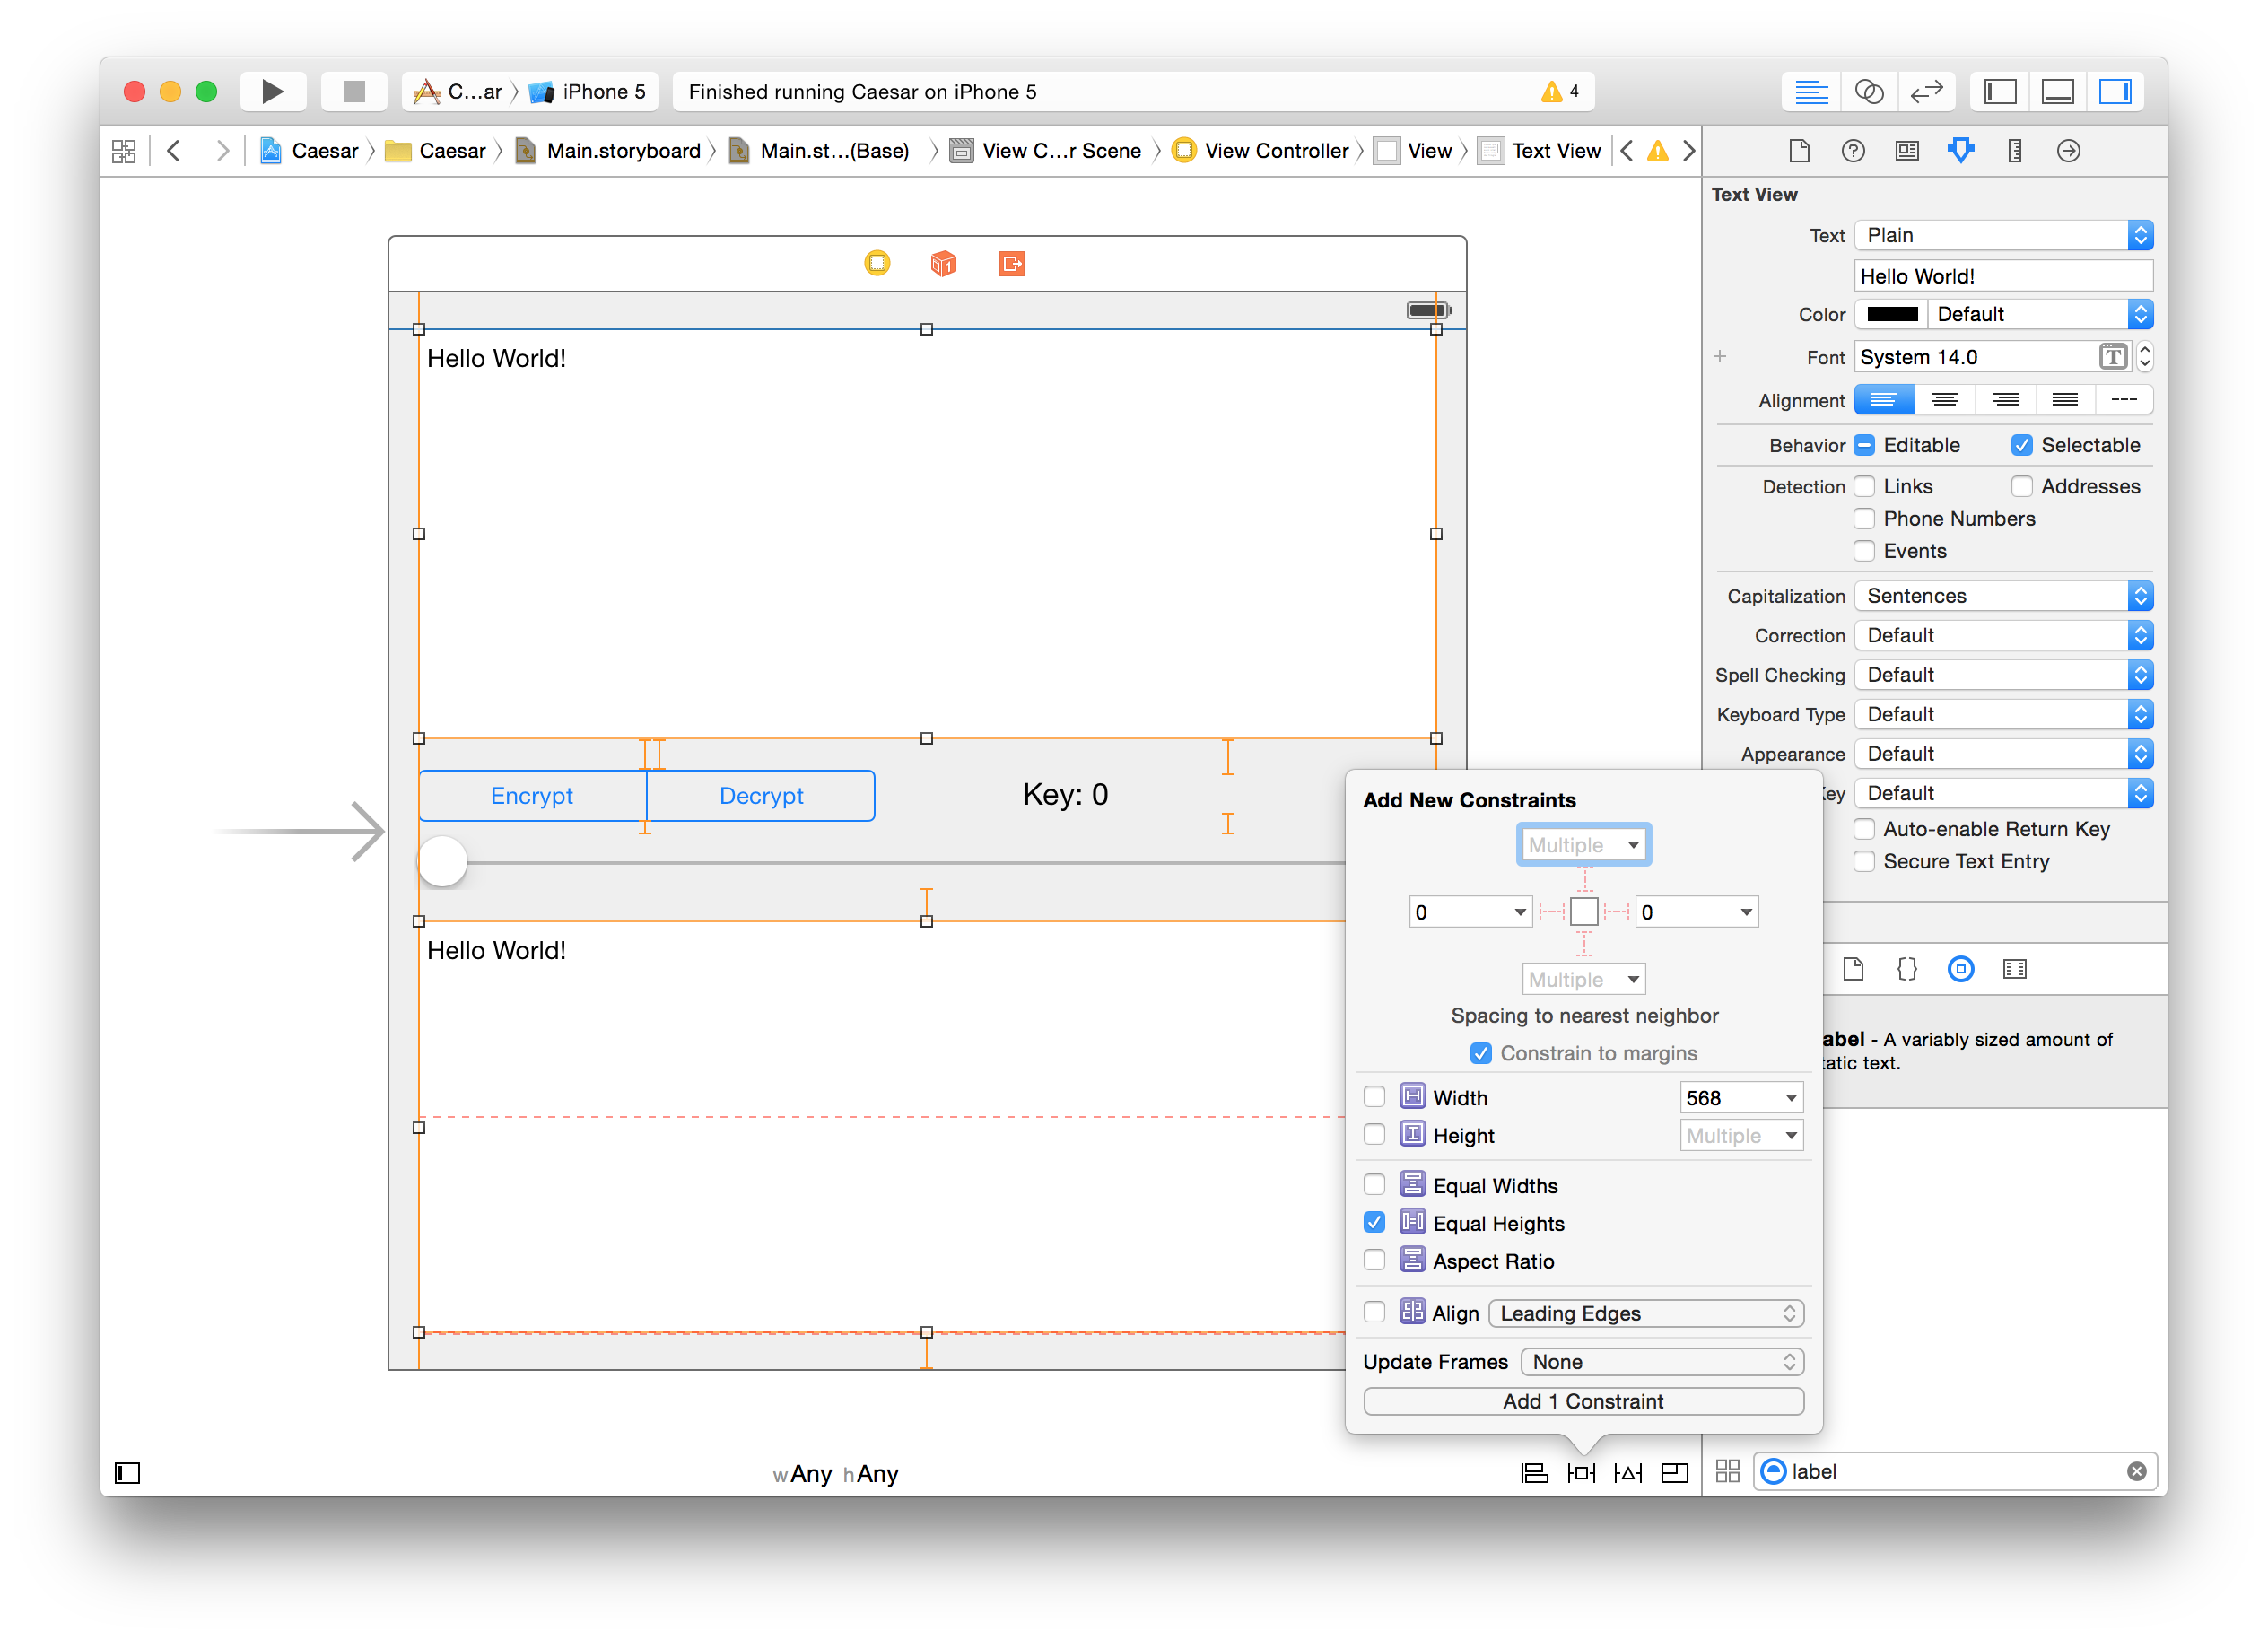
). In the Add New Constraints dialog, again set the four constraints around the text view. They should be 20 for above and below, 40 for the left and 0 for the right. Then check th checkbox next to Height and set it to 30 to match that of the segmented control and click Add 5 Constraints.
-
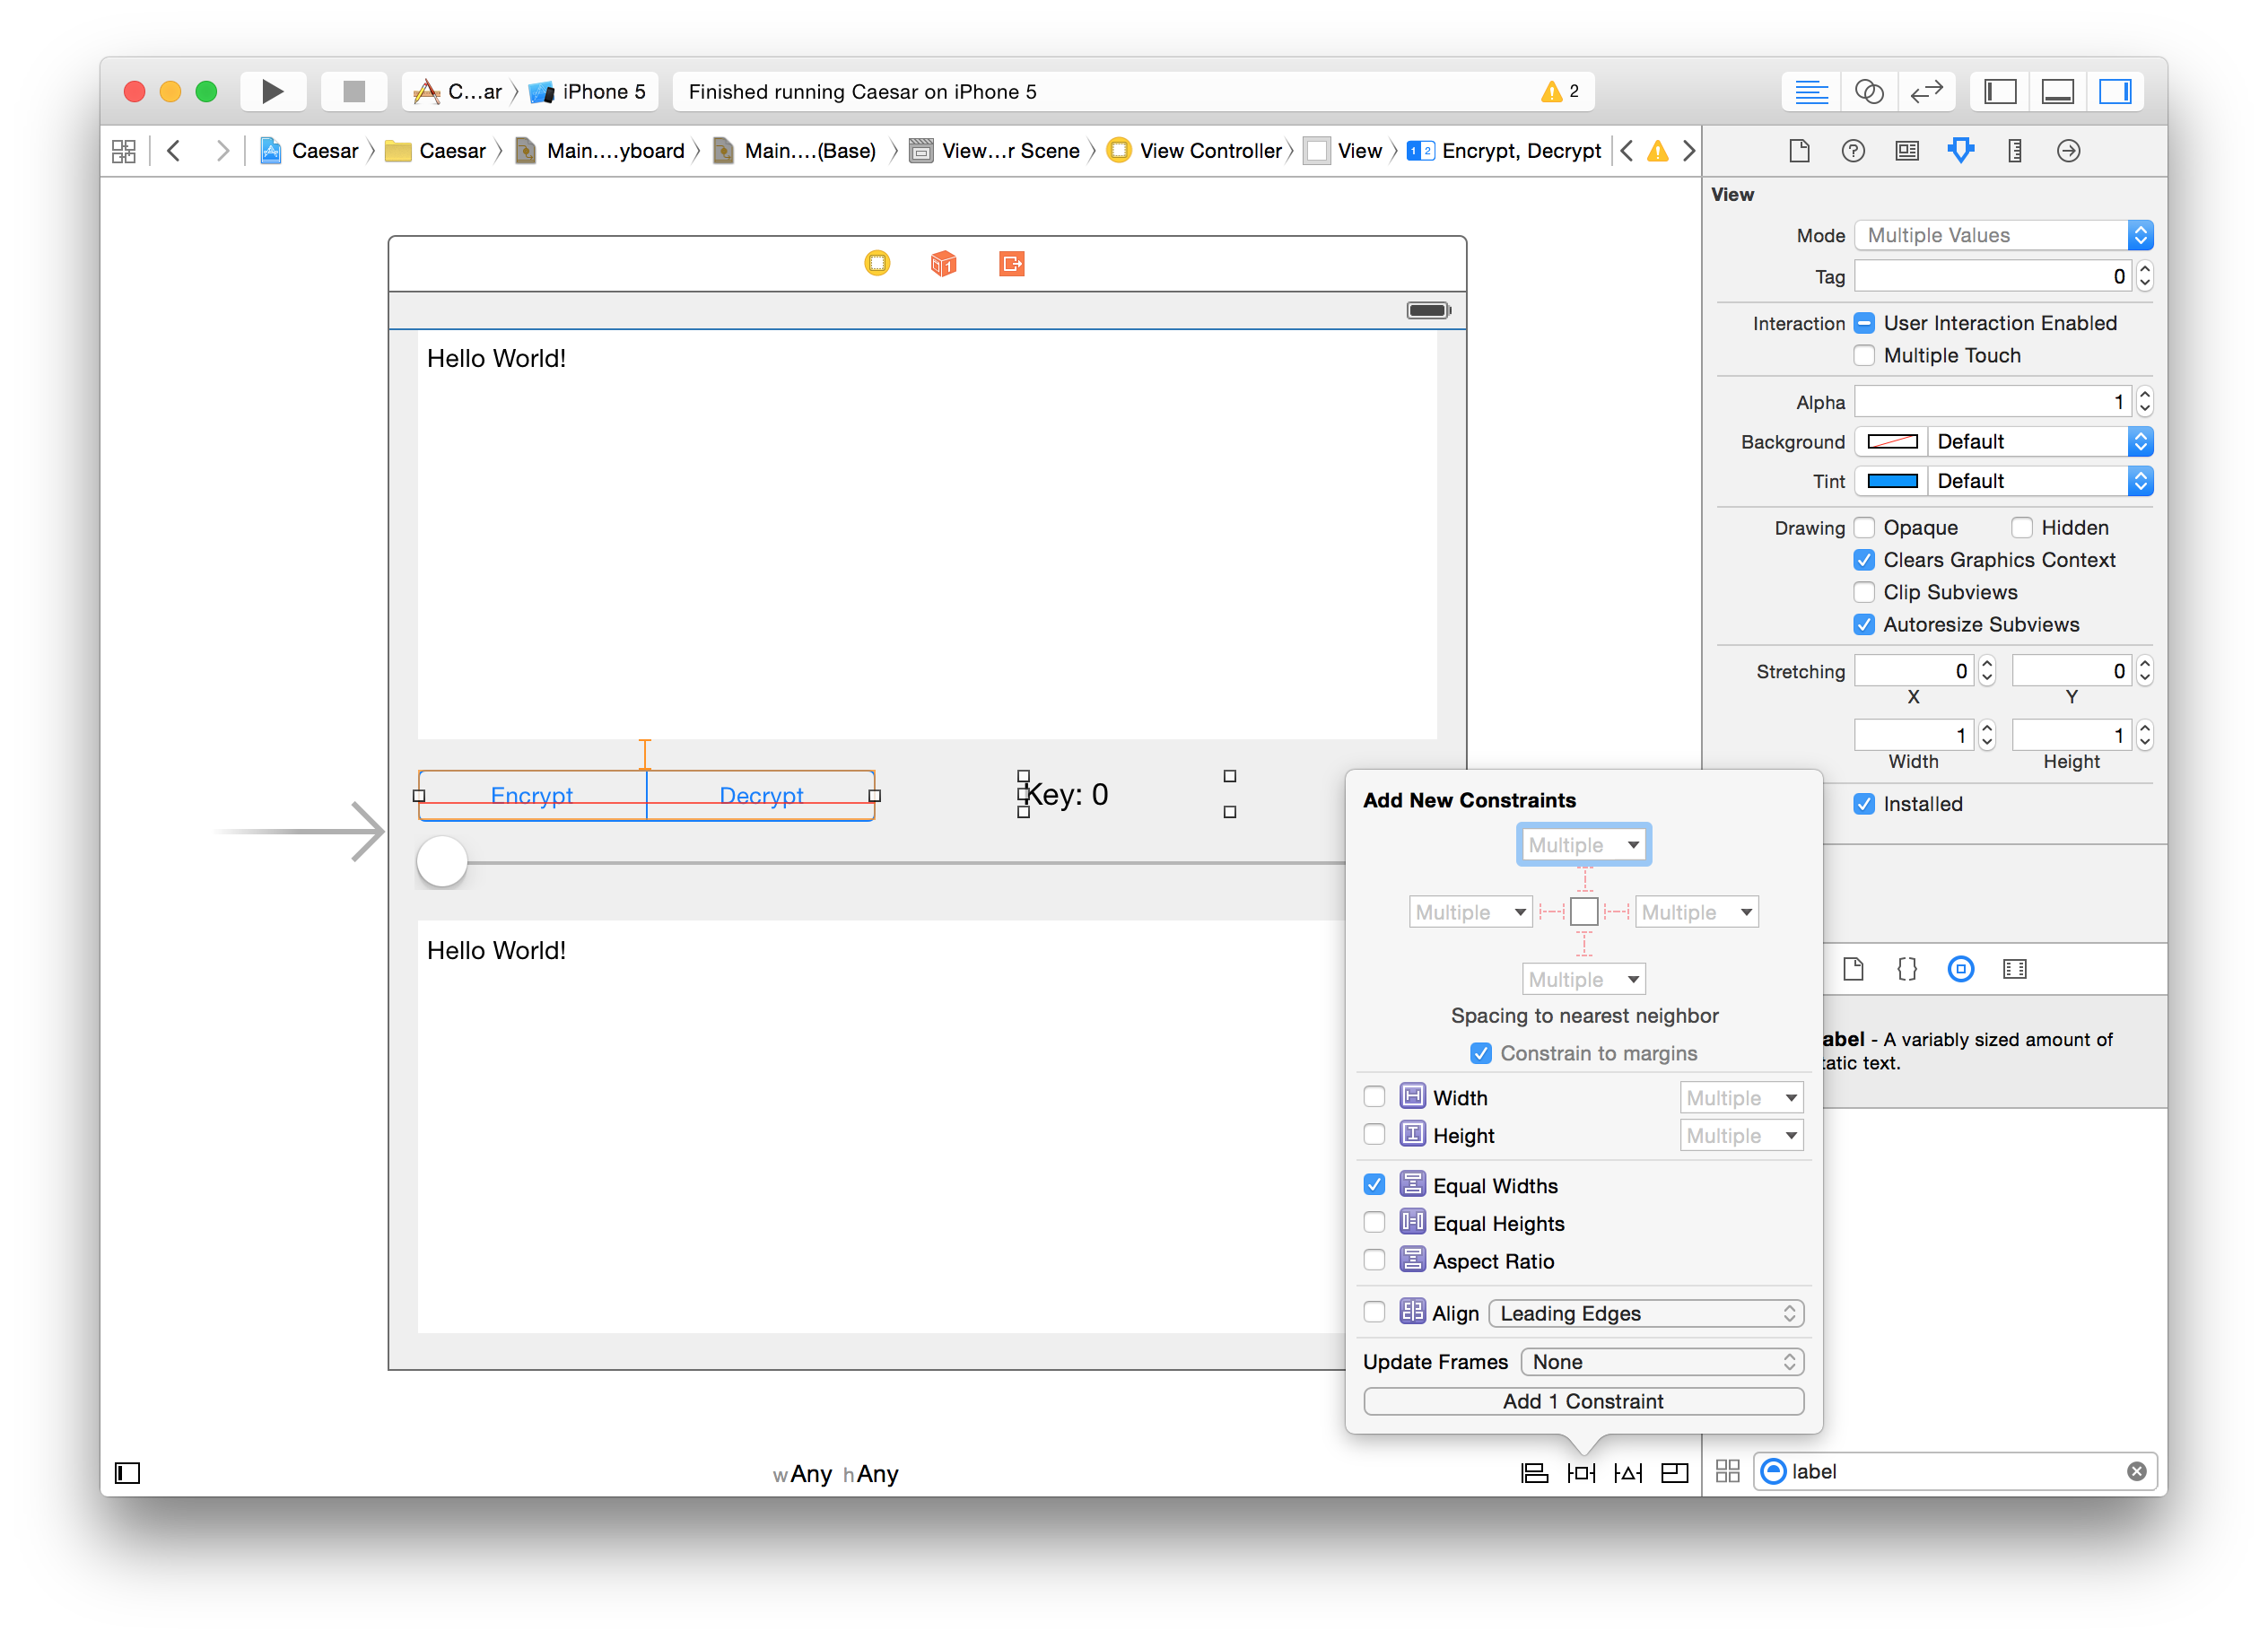
Now the Shift key and click on the segmented control and then on the label to select both of them. Click on the Pin icon and check the checkbox next to Equal Widths, then click Add 1 Constraint.
-
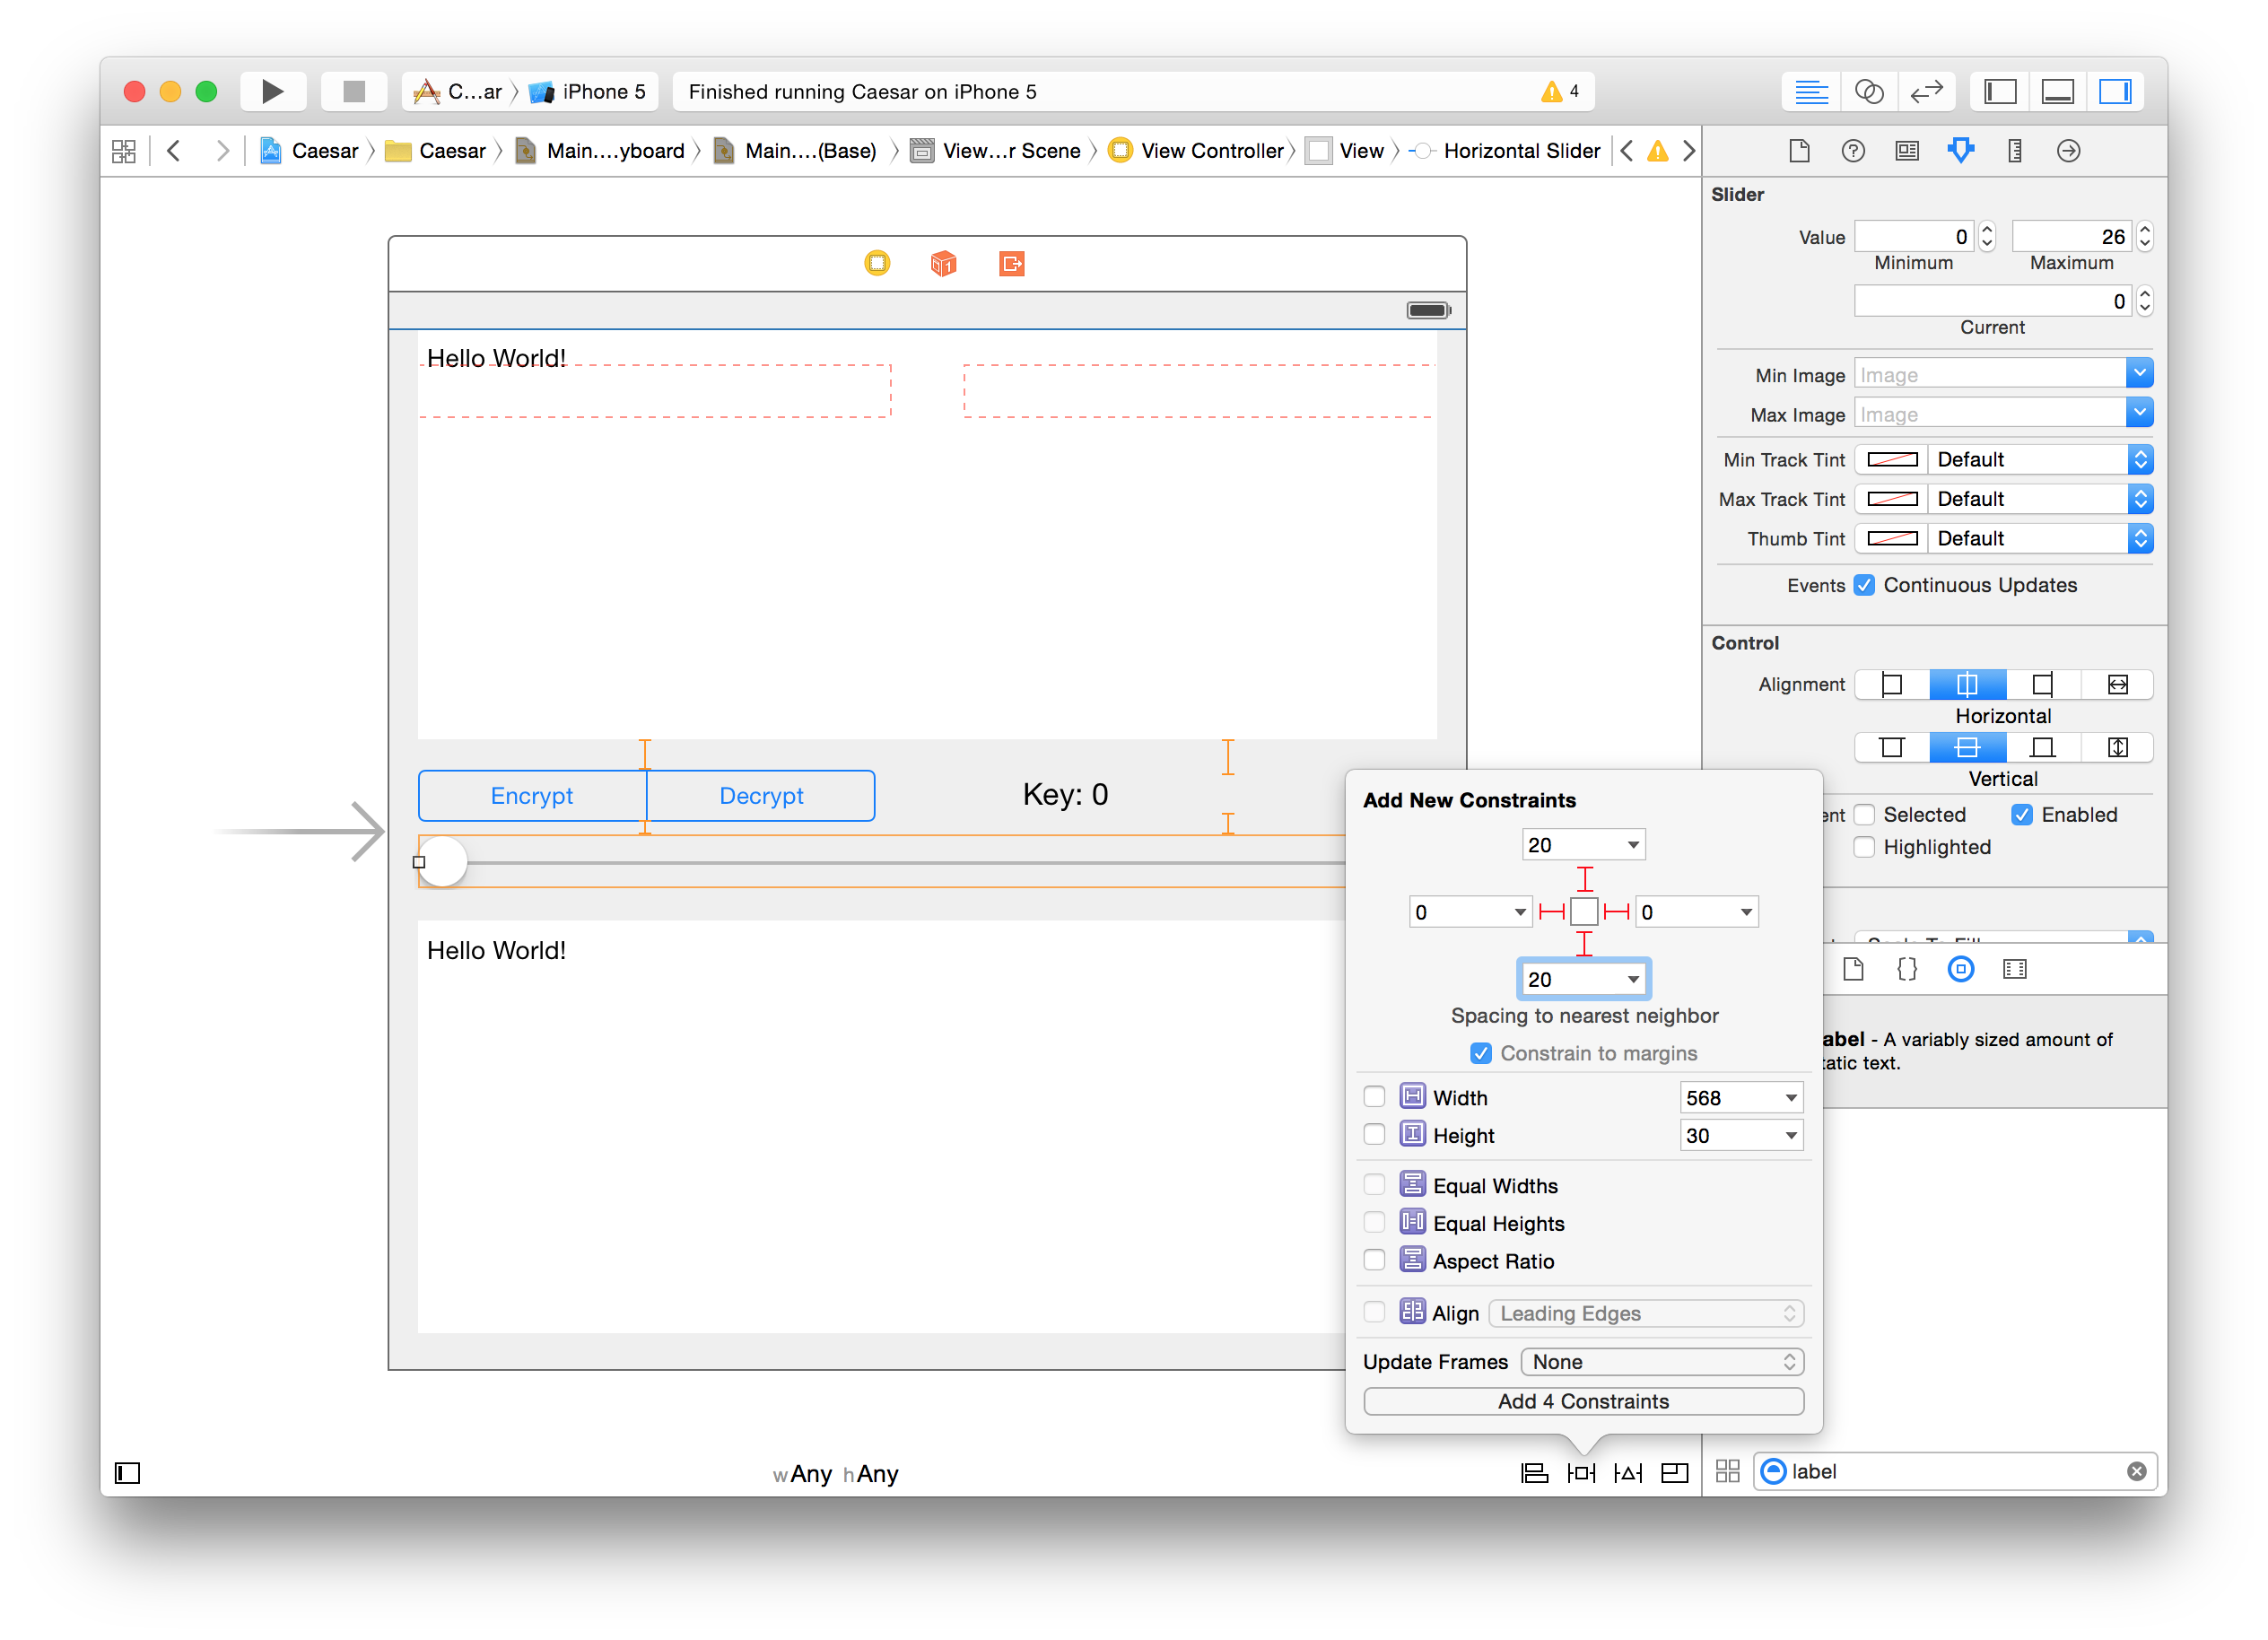
Click on the slider and then click on the Pin icon. Add four constraints, 20 for above and below and 0 for the left and the right. Click Add 4 Constraints.
-
Click on the lower text view. Again add four constraints: 20 above and below, 0 for the left and for the right. Click Add 4 Constraints.

-
Finally, hold shift and click on both text fields to select them. Add the last constraint: Equal Height.
-
-
Notice that the constraints are now highlighted in orange, but the UI elements are still positioned the same way. Generally you want to see user interface elements where they’ll be at runtime, so you should update the canvas to reflect that.
-
Click on the Resolve Autolayout Issues icon on the bottom of the Xcode window that looks like
 and select All Views in View Controller > Update Frames.
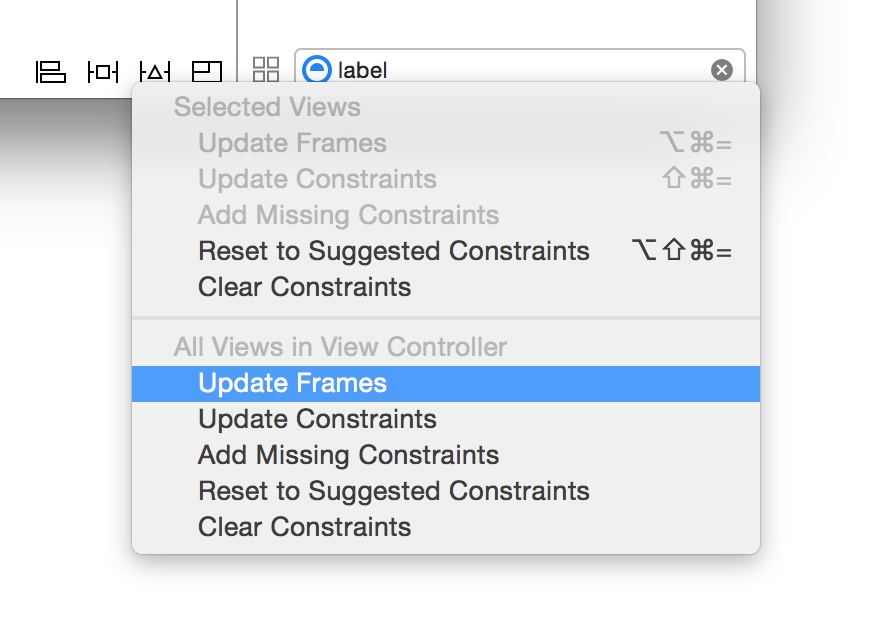
-
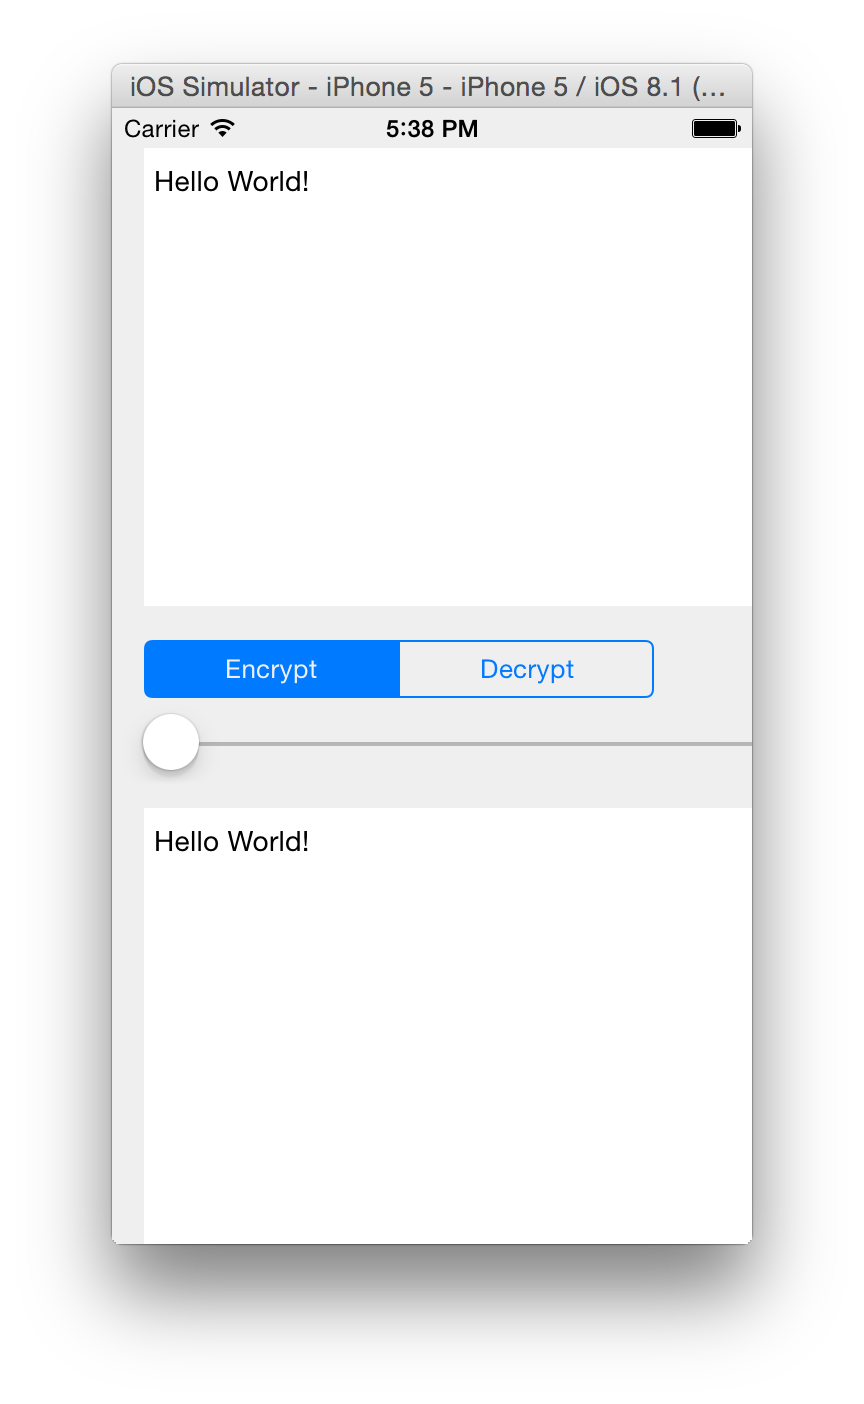
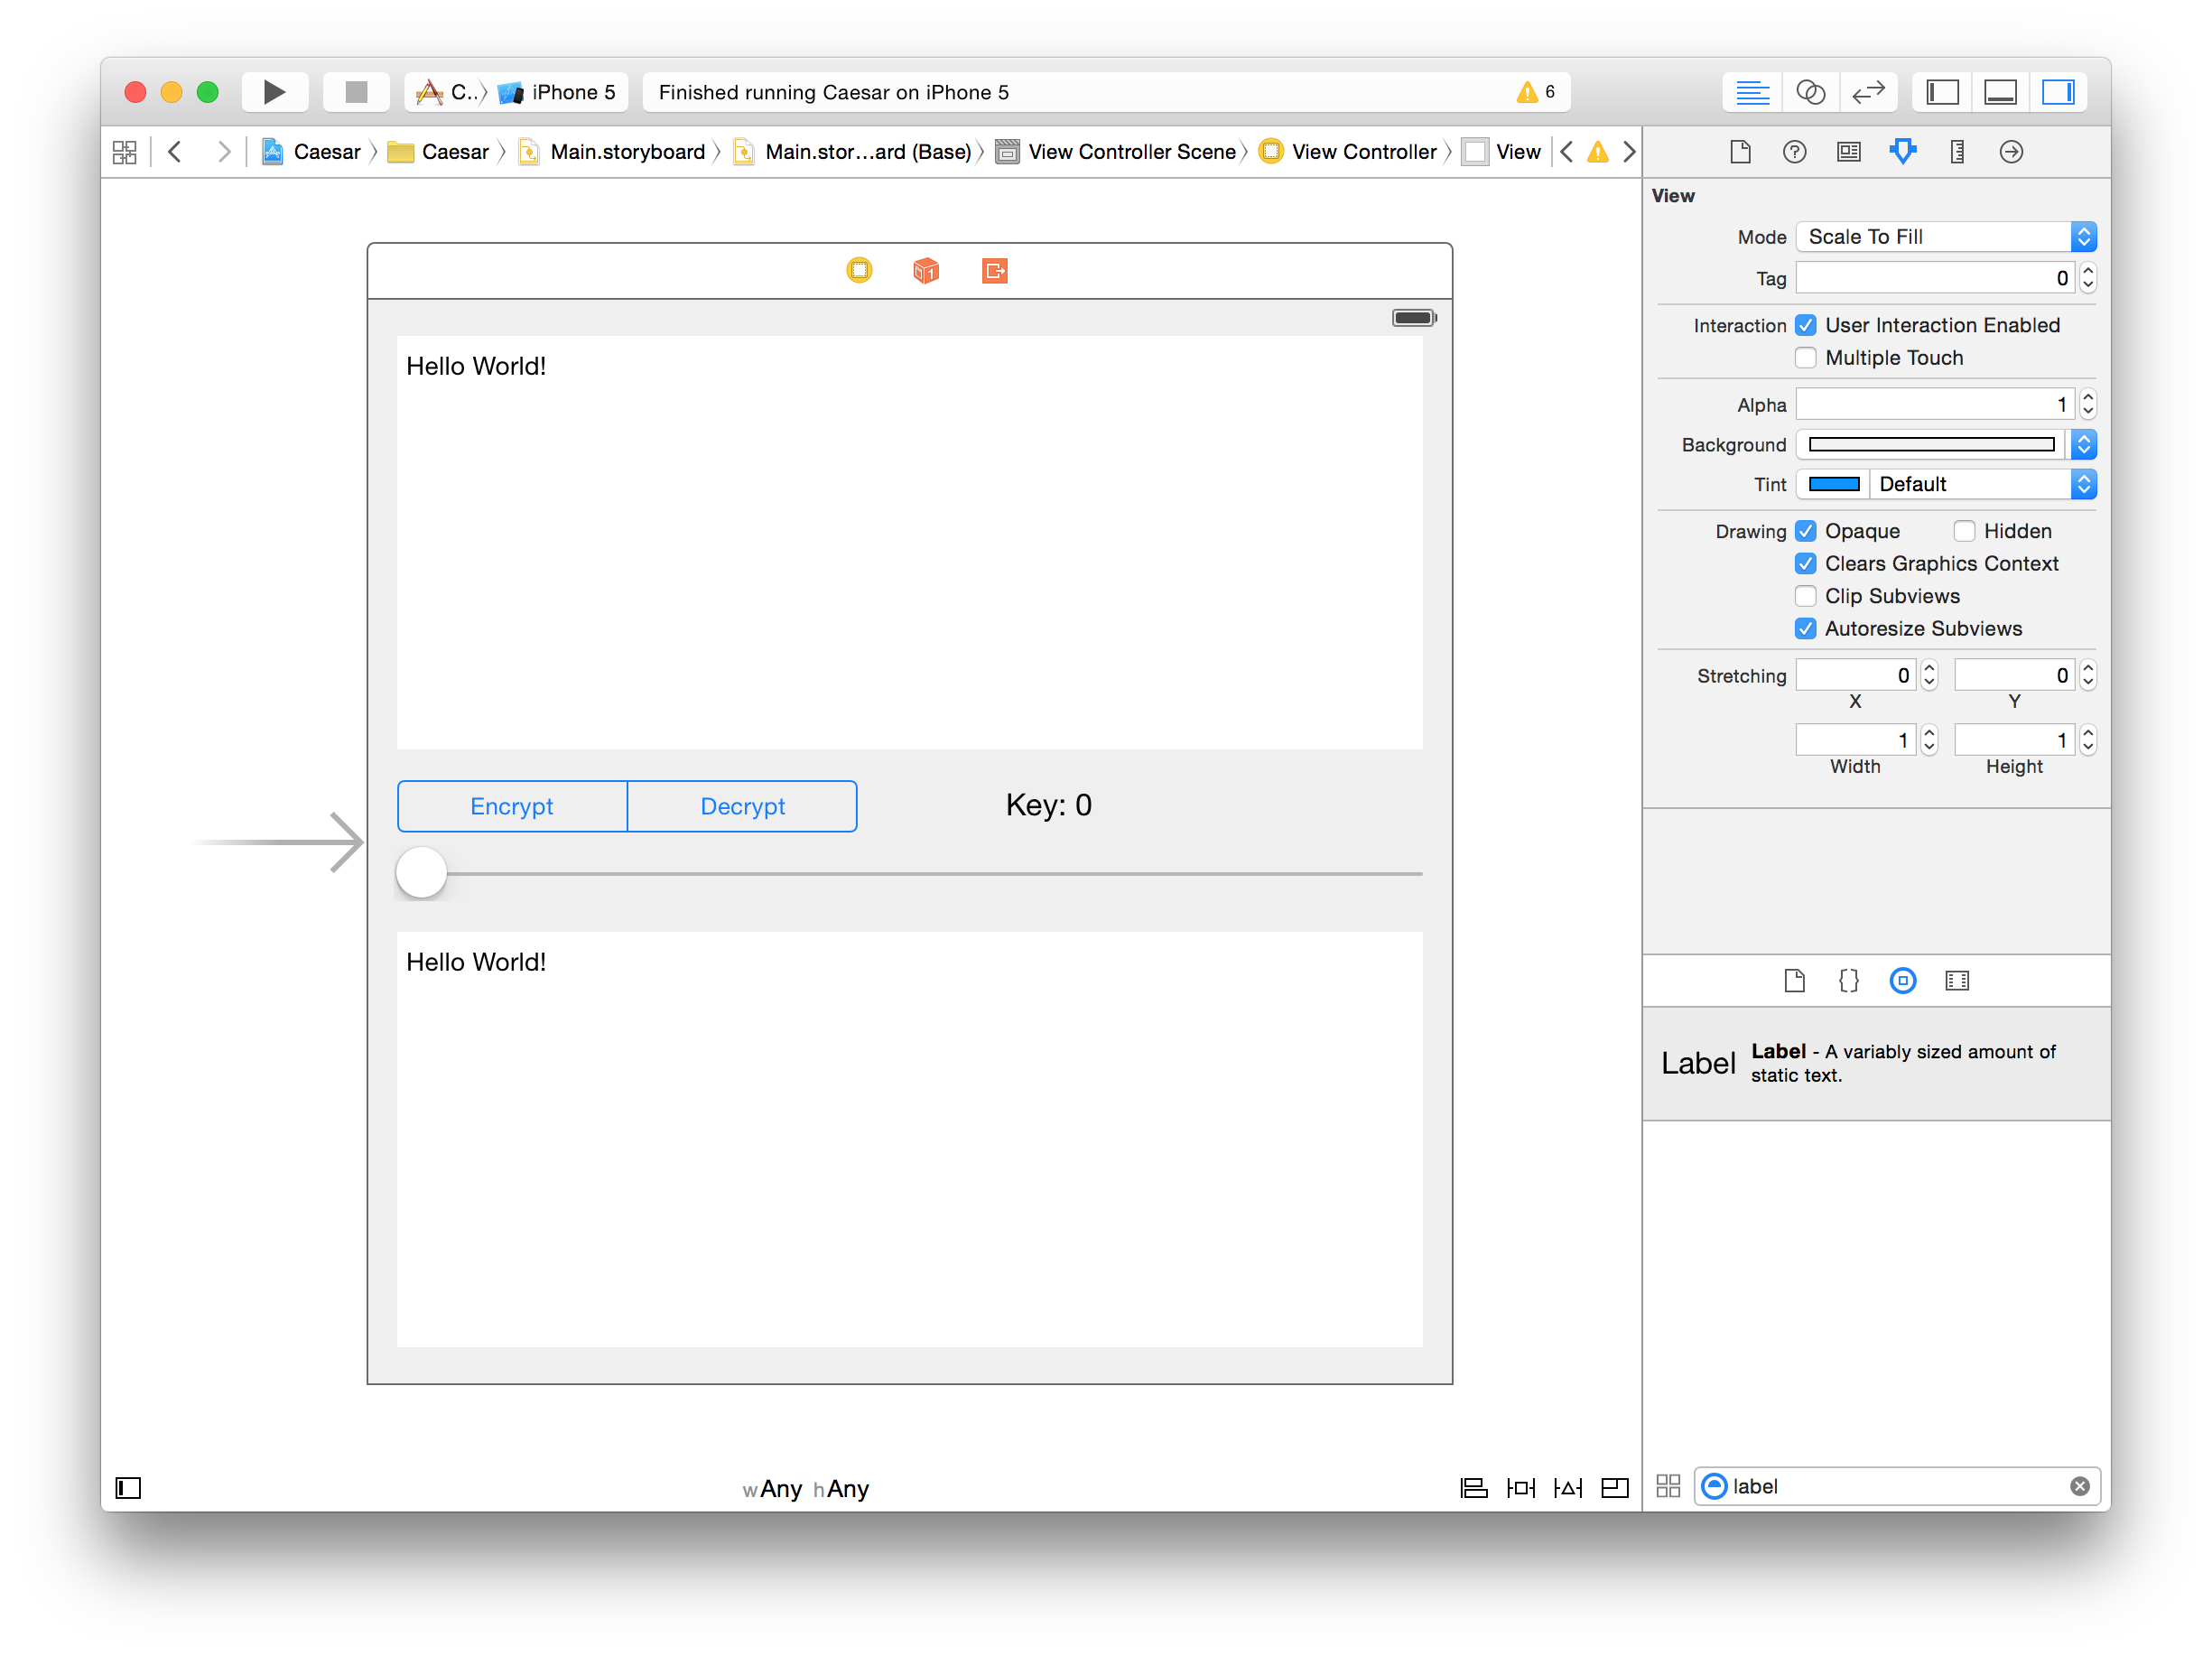
The objects should reposition themselves and the view should look like this:
-
If you run the app now, it should look correct, but nothings will happen if you slide the slider or change the text in the upper text view. This is where the controller comes in.
Controller
-
Our application will have only one controller and it will be represented by the
ViewControllerclass. We won’t have to modify it’s public interface for now and most of the remaining code will go inViewController.m -
Will again be working with Assistant Editor, but this time we’ll have the
Main.storyboardon the left andViewController.mon the right.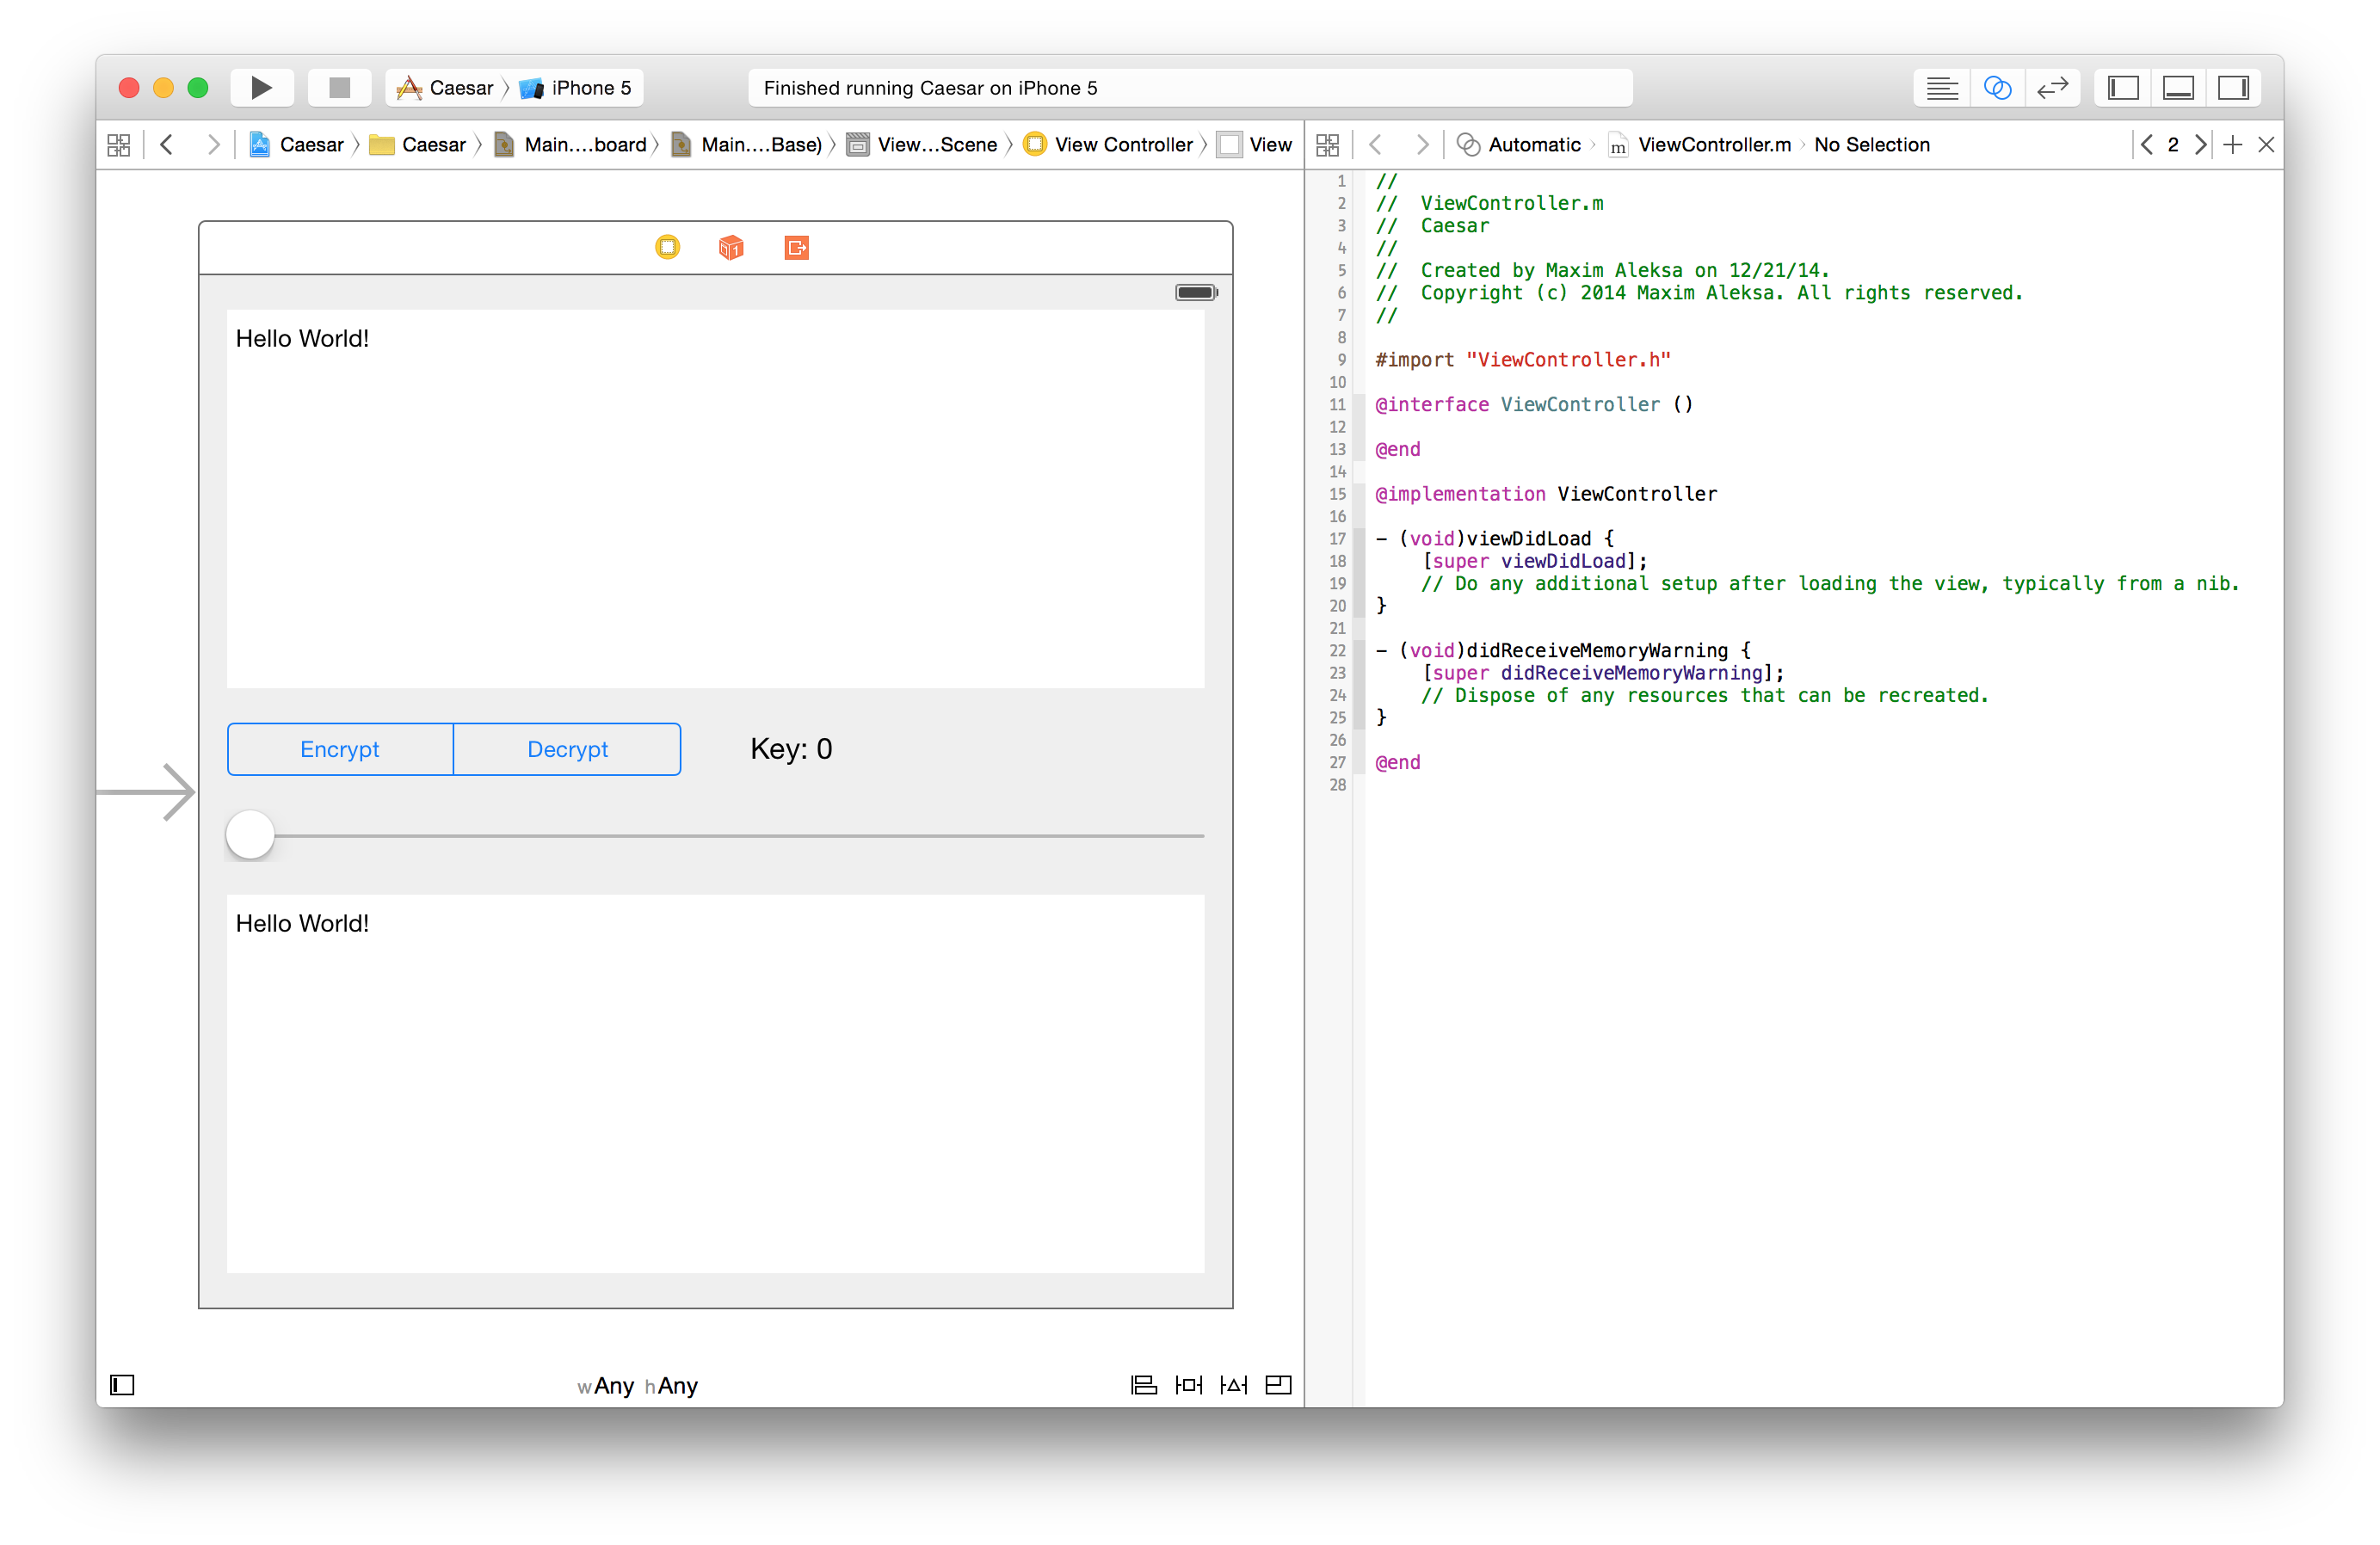
-
Xcode has automatically given us two methods,
viewDidLoadanddidReceiveMemoryWarning. From their name, you can guess when they will be called, but our applications is simple enough, so we don’t need them. You can just delete their implementations fromViewController.m. -
Before connecting the view, let’s connect the model. First we need to
#import "Message.h" -
Then we need to add a property for the message (still remember what a property is?). Add
@property (strong, nonatomic) Message *originalMessage;to the private interface of
ViewControllerbetween@interface ViewController ()and@end. -
Now, remember that
originalMessageis a pointer to aMessageobject (still remember what a pointer is?). This means that it points to some memory address on the heap. In order fororiginalMessageto be valid, we need to allocate memory for aMessageobject, initialize that object and setoriginalMessageto point to that object before we ever useoriginalMessage. But when should this be done? A very good time is when we first try to accessoriginalMessage. Remember that when we acces properties in Objective-C, the getter method is called. Objective-C automatically generates setters and getters for us when we create properties, and the default getter just returns the instance variable. What we want the getter to do instead is allocate and initialize aMessageobject the first time we access it, and then always return the instance variable. By default, all pointers are set tonilin Objective-C, which just means that they do not point to anything. So let’s write our own getter fororiginalMessagewhere we do a simple check to see iforiginalMessagehas been set. Let’s add this to the implementation ofViewController:- (Message *)originalMessage { if (!_originalMessage) { _originalMessage = [[Message alloc] init]; } return _originalMessage; }This is known as lazy instantiation, i.e. we don’t instantiate an object until we need to use it. It’s a very common pattern in Objective-C.
-
So this takes care of connecting the controller to the model. The controller now has
originalMessage, aMessageobject that will store a string and will be able to encrypt and decrypt it with a key. -
Now let’s connect the view to the controller. We need to add a property for each of the UI elements we’ve added (so we’ll need five more properties). These properties are known as outlets. Let’s first add an outlet for the text view that will have the original message. Connecting outlets is extremely easy (and fun!) in Xcode. Just hold the Control key and drag the text view between
@interface ViewController ()and@end.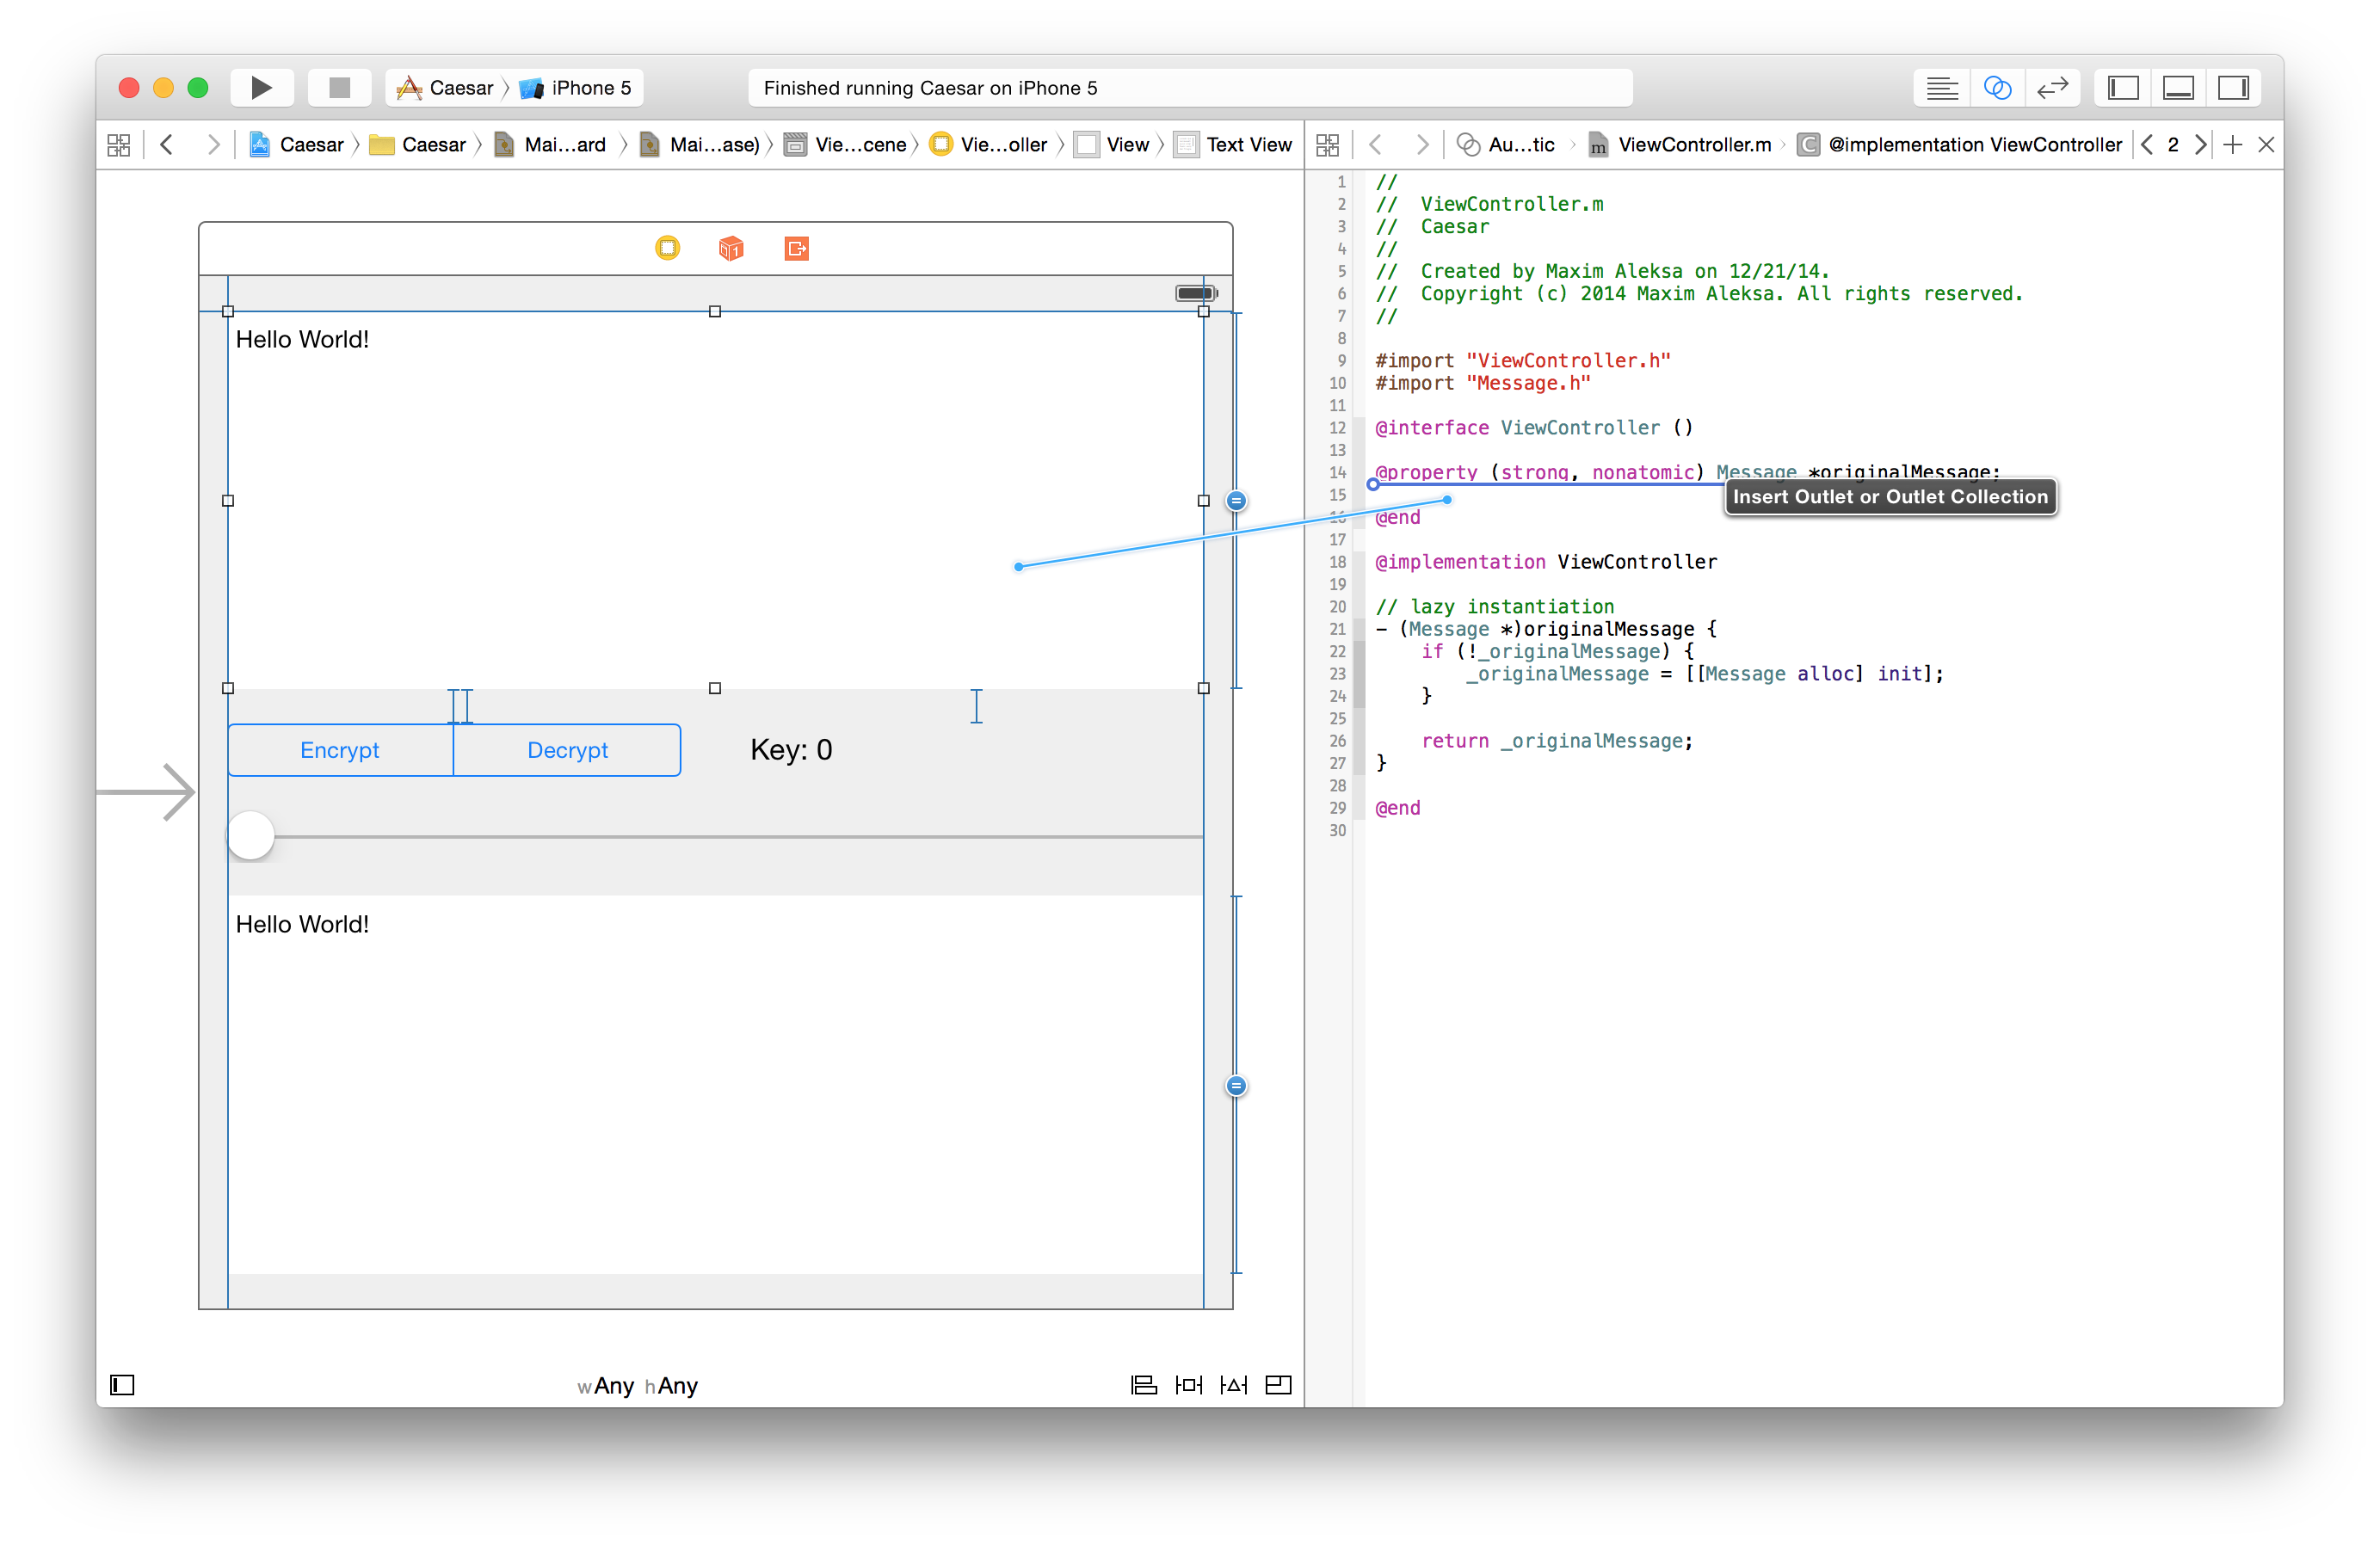
Name the outlet
originalMessageView. Notice that it’s of typeUITextViewand that it’s aweakpointer (as opposed to astrongpointer.). The view will have astrongpointer to it, controller does not need to.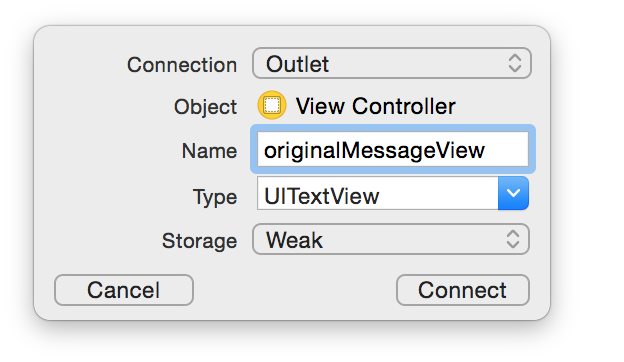
Click Connect and you’ll see this line of code appear in the private interface:
@property (weak, nonatomic) IBOutlet UITextView *originalMessageView;IBOutletjust lets Xcode that this is an outlet. -
We now need to do the same for the rest of the UI elements that we’ve added. Connect the other text view and name the outlet
resultingMessageView. Then connect the segmented control and name its outletencryptionModeControl, then connect the slider, naming itkeySliderand the label, naming itkeyLabel. -
Notice the circles to the right of
@propertyfor the outlets. If you hover over them with your mouse, Xcode will highlight the view to which that outlet is connected.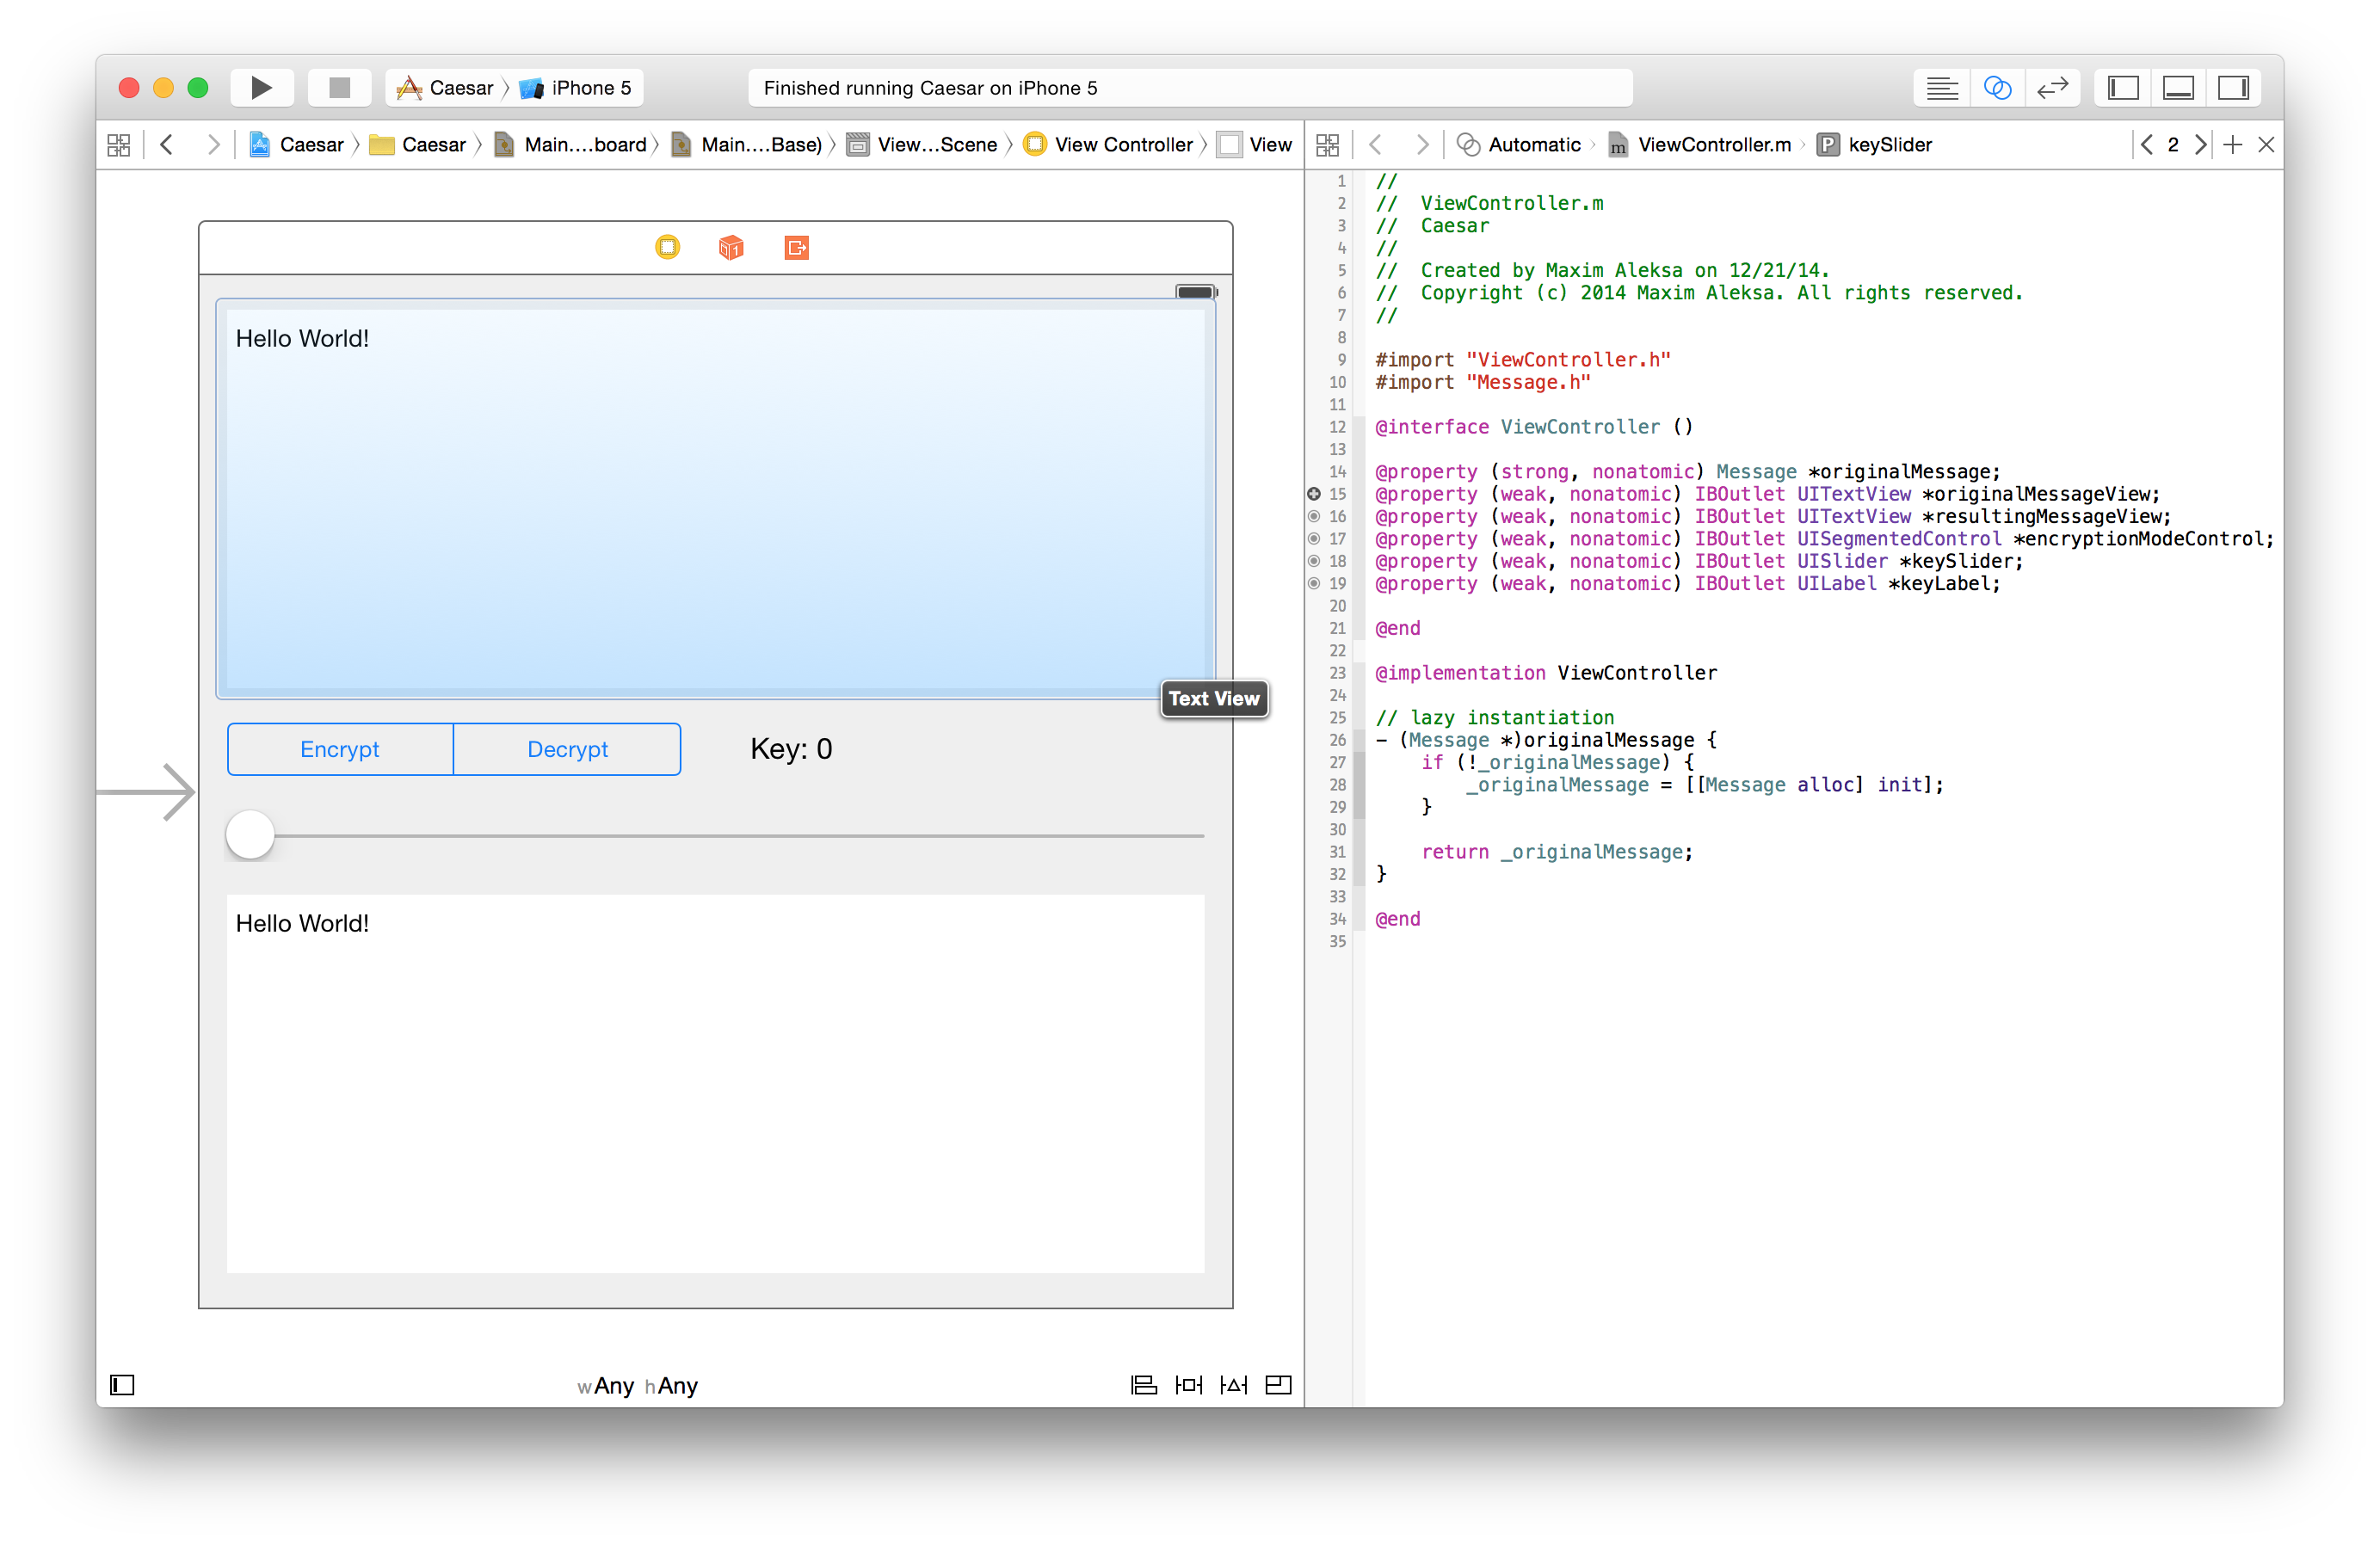
-
As a reminder, we’ve added these outlets so that our controller can talk to our view.
-
Let’s add a method called
updateUIthat we’ll call whenever we need to update the view (this can happen when the user updates the original message, changes encryption mode or slides the slider). We’ll put the implementation between@implementation ViewControllerand@end.- (void)updateUI { }First, we need to update the text value of the label, in case the user has slid the slider. We first need to access the
keySliderproperty ofselfand then we need to access thetextproperty of that slider, so we’ll begin withself.keyLabel.textWe need to assign to it a string that we’ll be of format
Key: X, whereXis the value of the slider. Remember the format strings from earlier? We need to create one usingNSString’sstringWithFormat:class method. The value of the key will come from thekeySliderand we need to cast it to anintto make the compiler happy. So we’ll ultimately need this line of code inupdateUI:self.keyLabel.text = [NSString stringWithFormat:@"Key: %d", (int)self.keySlider.value];Then, we need to update the message in our model to match the one typed by the user in
originalMessageView:self.originalMessage.message = self.originalMessageView.text; -
Finally, we have to update the text in the
resultingMessageView. We first have to check the value of the segmented control (encryptionModeControl). Segmeted control has a property calledselectedSegmentIndex, whose value is the index of the selected segment. So it will be 0 if the user has selected Encrypt and 1 if the user has selected Decrypt. We then set the text of theresultingMessageViewaccording to the sected mode. (Rember that we encypt and decrypt by calling methods on our model and that the key is the value of the slider).if (self.encryptionModeControl.selectedSegmentIndex == 0) { self.resultingMessageView.text = [self.originalMessage encryptWithKey:self.keySlider.value]; } else if (self.encryptionModeControl.selectedSegmentIndex == 1) { self.resultingMessageView.text = [self.originalMessage decryptWithKey:self.keySlider.value]; }So that’s all we had to do to update the UI: update the key label, update the model (which is not part of the UI, but
updateUIis a good place to put this since we might want to update the model when the message changes) and encrypt or decrypt. -
The control will need to call
updateUIwhen something changes with the view (when the user updates the original message, changes encryption mode or slides the slider). But since the view can’t talk directly to the controller, the controller has to “listen” to those changes. This is known as an action. -
You can add an action just like you add an outlet, by dragging and dropping a UI element from the view to the controller, but this time it has to go between
@implementation ViewControllerand@end. -
First, let’s add an action for when the user slides the slider. Hold the Control key and drag the line between
@implementation ViewControllerand@end.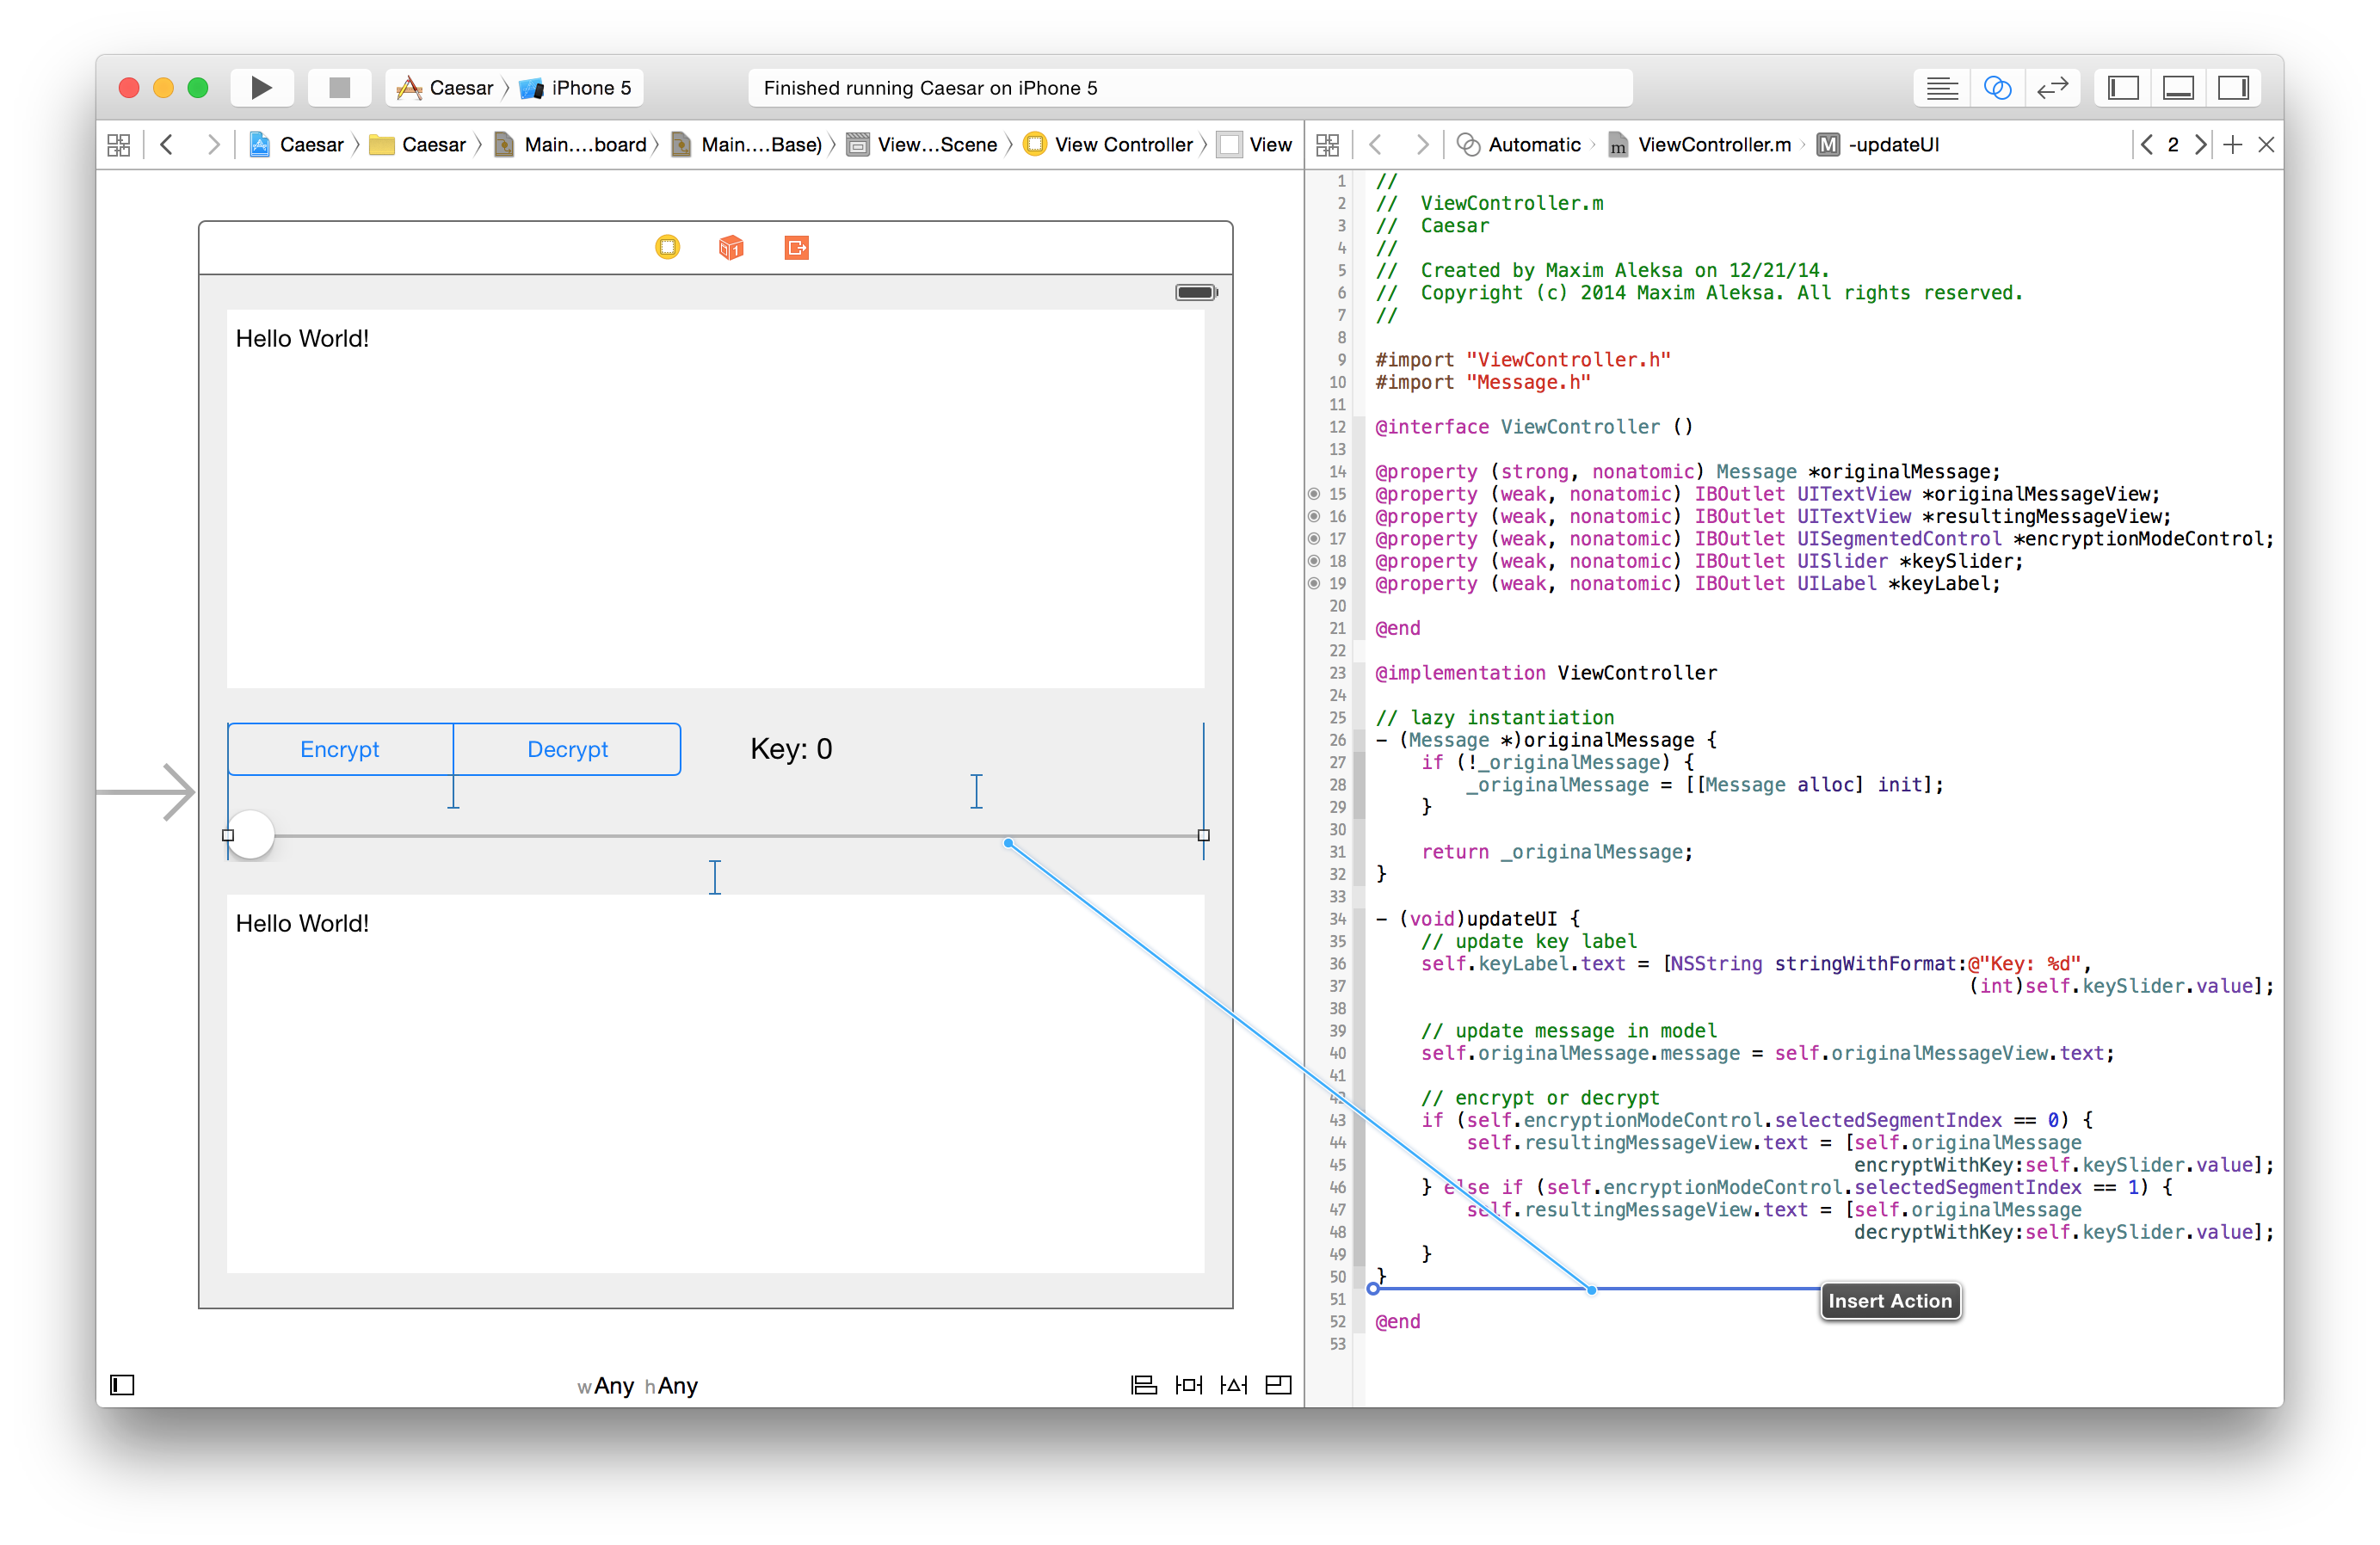
-
Name the method
changeKeyand change type toUISlider. Notice that the event is Value Changed, which means that this method will be called when the value of the slider changes. Also note that the argument is Sender, which means that a pointer toUISliderwill be passed in.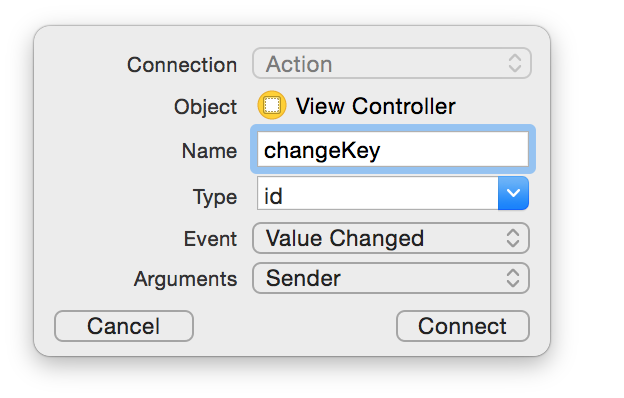
Click Connect and you’ll see this code appear in the implementation section:
- (IBAction)changeKey:(UISlider *)sender { }IBActionreturn type is the same asvoid, but it tell Xcode that this is indeed an action. Again, you can hover the mouse over the circle to the left of- (IBAction)and Xcode will highlight the view with which the action is associated.When the user slides the slider we must do two things: ensure that the value of the slider is an integer (because a slider doesn’t step its values by 1) and update UI. So we fist store the value in an
intand then assign thatinteger back to the value of the slider. And then we call theupdateUImethod.int key = (int)sender.value; sender.value = key; [self updateUI]; -
Now we need to add action for when the user switches between encryption and decryption. Hold the Control key and drag the slider in an empty space betwen
@implementation ViewControllerand@end. Name the methodchangeEncryptionModeand change type toUISegnementedControl. You’ll these lines of code added to the implementation:- (IBAction)changeEncryptionMode:(UISegmentedControl *)sender { }This method is very easy. All we need to do when the user switches the mode is just update the UI:
[self updateUI]; -
Finally, the controller has to know when the user finishes editing text in
originalMessageViewso that it can update the text inresultingMesageViewright away. Unfortunately,UITextViewdoes not support the actions mechanism to communicate with the controller. Another mechanism that allows the view to talk to the controller is delegates. We can makeViewControllerto be the delegate of the text view that contains the original message. This means thatViewControllerwill conform toUITextViewDelegateprotocol, i.e. it will implement all of the required methods declared in that protocol and some of the optional ones. It turns out that theUITextViewDelegateprotocol does not have any required methods, but an optional one includestextViewDidEndEditing:, which is called when the user finishes editing a text view. This sounds like a solution to our problem. First, switch toViewController.hby clicking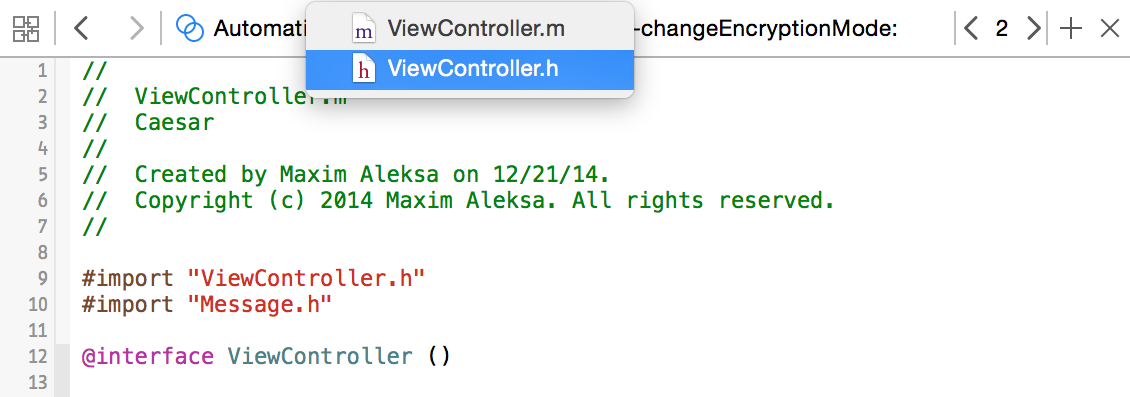
and change
@interface ViewController : UIViewControllerto
@interface ViewController : UIViewController <UITextViewDelegate>This is all we need to do to say that
ViewControllerconforms to theUITextViewDelegateprotocol. Now we need to setViewControllerto be the delegate of text view where the user will be typing messages. Control-drag the text view to the yellow circle above it that represents the View Controller.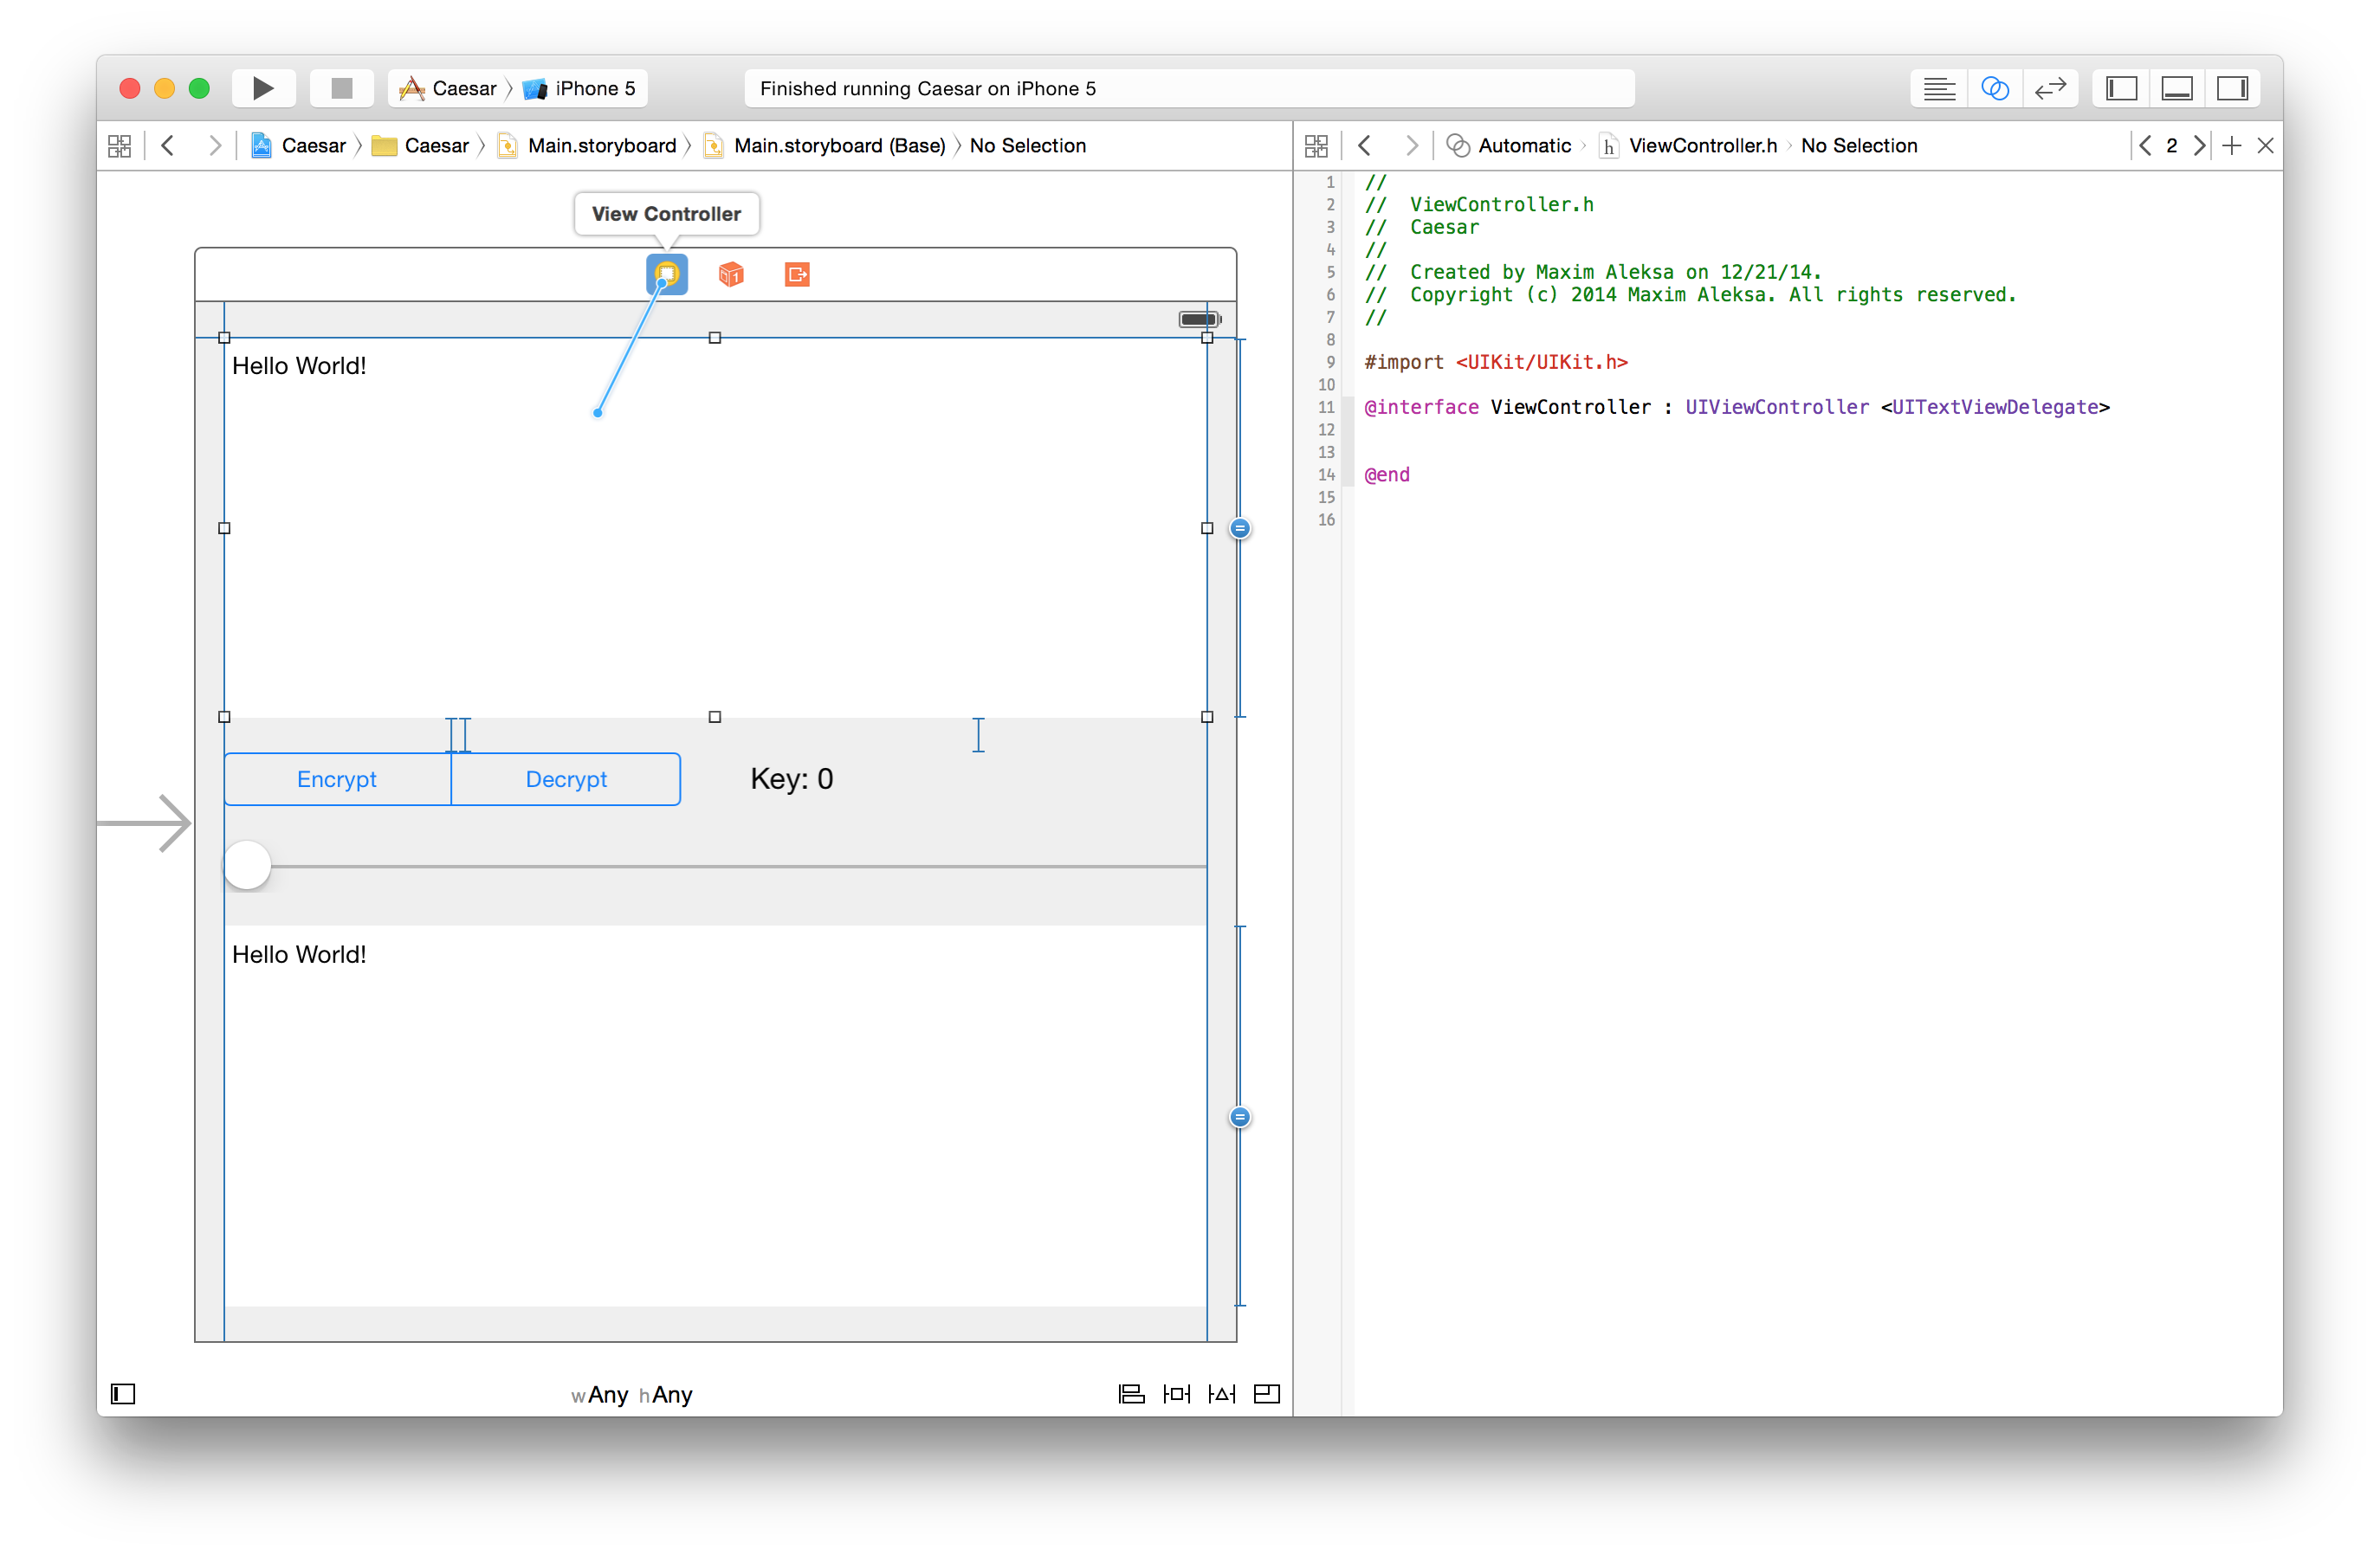
Select
ViewControllerto be the delegate.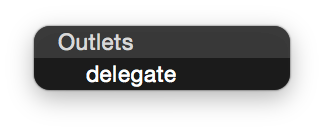
Now switch back to
ViewController.mand implementtextViewDidEndEditing:. What we need to do when the user finishes typing the message is again just update the UI.- (void)textViewDidEndEditing:(UITextView *)textView { [self updateUI]; }Alternatively, you could update the model here instead of in updateUI, but this would require that you also do so inviewDidLoadthat we deleted earlier. -
One last touch. In order for the user to actually end editing a text view, he or she must dismiss the keyboard. Let’s add some code that dismisses it when the user taps on an area outside of the keyboard. We’ll skip the explanation of this code and assume thtat it works.
- (void)touchesBegan:(NSSet *)touches withEvent:(UIEvent *)event { // dismiss keyboard on touch [self.view endEditing:YES]; [super touchesBegan:touches withEvent:event]; } -
As a summary, this is what your
ViewController.hshould look like:ViewController.h1 2 3 4 5 6#import <UIKit/UIKit.h> @interface ViewController : UIViewController <UITextViewDelegate> @end And this should resemble your
ViewController.m:ViewController.m1 2 3 4 5 6 7 8 9 10 11 12 13 14 15 16 17 18 19 20 21 22 23 24 25 26 27 28 29 30 31 32 33 34 35 36 37 38 39 40 41 42 43 44 45 46 47 48 49 50 51 52 53 54 55 56 57 58 59 60 61 62 63 64#import "ViewController.h" #import "Message.h" @interface ViewController () @property (strong, nonatomic) Message *originalMessage; @property (weak, nonatomic) IBOutlet UITextView *originalMessageView; @property (weak, nonatomic) IBOutlet UITextView *resultingMessageView; @property (weak, nonatomic) IBOutlet UISegmentedControl *encryptionModeControl; @property (weak, nonatomic) IBOutlet UISlider *keySlider; @property (weak, nonatomic) IBOutlet UILabel *keyLabel; @end @implementation ViewController // lazy instantiation - (Message *)originalMessage { if (!_originalMessage) { _originalMessage = [[Message alloc] init]; } return _originalMessage; } - (void)updateUI { // update key label self.keyLabel.text = [NSString stringWithFormat:@"Key: %d", (int)self.keySlider.value]; // update model self.originalMessage.message = self.originalMessageView.text; // encrypt or decrypt if (self.encryptionModeControl.selectedSegmentIndex == 0) { self.resultingMessageView.text = [self.originalMessage encryptWithKey:self.keySlider.value]; } else if (self.encryptionModeControl.selectedSegmentIndex == 1) { self.resultingMessageView.text = [self.originalMessage decryptWithKey:self.keySlider.value]; } } - (IBAction)changeKey:(UISlider *)sender { int key = (int)sender.value; sender.value = key; [self updateUI]; } - (IBAction)changeEncryptionMode:(UISegmentedControl *)sender { [self updateUI]; } - (void)textViewDidEndEditing:(UITextView *)textView { [self updateUI]; } - (void)touchesBegan:(NSSet *)touches withEvent:(UIEvent *)event { // dismiss keyboard on touch [self.view endEditing:YES]; [super touchesBegan:touches withEvent:event]; } @end -
Congratulations, you’ve now finised building your first iPhone application! Run it to make sure once more that it doesn’t have any bugs. Feel free to play with your new app and procrastinate.
Further Resources
There are many resources available that will teach you iOS development, ranging from Apple’s own official documentation to video tutorials on YouTube. But allow me to recommend the following:
-
Programming in Objective-C, Sixth Edition
Stephen G. Kochan
Addison-Wesley Professional, 2013
ISBN 0-321-96760-7
(This is the book with which I first taught myself programming.) -
Objective-C Programming: The Big Nerd Ranch Guide, Second Edition
Aaron Hillegass
Big Nerd Ranch Guides, 2013
ISBN 0-321-94206-X -
iOS Programming: The Big Nerd Ranch Guide, Fourth Edition
Joe Conway, Aaron Hillegass, Christian Keur
Big Nerd Ranch Guides, 2014
ISBN 0-321-94205-1 -
CS193p: Developing iOS 7 Apps for iPhone and iPad
Paul Hegarty
Stanford, 2013
https://itunes.apple.com/us/course/developing-ios-7-apps-for/id733644550 -
iOS Developer Library Documentation
https://developer.apple.com/library/ios/navigation/
And here are some resources for starting with Swift:
-
Beginning iPhone Development with Swift: Exploring the iOS SDK
David Mark, Jack Nutting, Kim Topley, Fredrik Olsson, Jeff LaMarche
Apress, 2014
ISBN 1-484-20410-7 -
The Swift Programming Language
Apple Inc., 2014
https://itunes.apple.com/us/book/swift-programming-language/id881256329 -
This website contains many more resouces found on the Internet: http://www.learnswift.tips.